
Kerika is rated by Top Business Software
Sebagai sebahagian daripada usaha berterusan kami untuk memastikan Kerika mudah digunakan dan dibeli dari mana-mana sahaja di dunia, sistem harga baru kami membolehkan pelanggan untuk membayar dalam mana-mana mata wang berikut:
USD – Dolar Amerika Syarikat
AED – Dirham Emiriah Arab Bersatu
AFN – Afghani Afghanistan
ALL – Lek Albania
AMD – Dram Armenia
ANG – Gulden Antillen Belanda
AOA – Kwanza Angola
ARS – Peso Argentina
AUD – Dolar Australia
AWG – Florin Aruba
AZN – Manat Azerbaijan
BAM – Mark Konvertibel Bosnia dan Herzegovina
BBD – Dolar Barbados
BDT – Taka Bangladesh
BGN – Lev Bulgaria
BIF – Franc Burundi
BMD – Dolar Bermuda
BND – Dolar Brunei
BOB – Boliviano Bolivia
BRL – Real Brazil
BSD – Dolar Bahamas
BWP – Pula Botswana
BYN – Rubel Belarus
BZD – Dolar Belize
CAD – Dolar Kanada
CDF – Franc Congo
CHF – Franc Switzerland
CLP – Peso Chile
CNY – Yuan China
COP – Peso Colombia
CRC – Colón Costa Rica
CVE – Escudo Cape Verde
CZK – Koruna Czech
DJF – Franc Djibouti
DKK – Krone Denmark
DOP – Peso Dominican
DZD – Dinar Algeria
EGP – Pound Mesir
ETB – Birr Ethiopia
EUR – Euro
FJD – Dolar Fiji
FKP – Pound Kepulauan Falkland
GBP – Pound Sterling British
GEL – Lari Georgia
GIP – Pound Gibraltar
GMD – Dalasi Gambia
GNF – Franc Guinea
GTQ – Quetzal Guatemala
GYD – Dolar Guyana
HKD – Dolar Hong Kong
HNL – Lempira Honduras
HTG – Gourde Haiti
HUF – Forint Hungary
IDR – Rupiah Indonesia
ILS – Shekel Baru Israel
INR – Rupee India
ISK – Króna Iceland
JMD – Dolar Jamaica
JPY – Yen Jepun
KES – Shilling Kenya
KGS – Som Kyrgyzstan
KHR – Riel Kemboja
KMF – Franc Komoro
KRW – Won Korea Selatan
KYD – Dolar Kepulauan Cayman
KZT – Tenge Kazakhstan
LAK – Kip Laos
LBP – Pound Lubnan
LKR – Rupee Sri Lanka
LRD – Dolar Liberia
LSL – Loti Lesotho
MAD – Dirham Maghribi
MDL – Leu Moldova
MGA – Ariary Madagascar
MKD – Denar Macedonia
MMK – Kyat Myanmar
MNT – Tögrög Mongolia
MOP – Pataca Macau
MUR – Rupee Mauritius
MVR – Rufiyaa Maldives
MWK – Kwacha Malawi
MXN – Peso Mexico
MYR – Ringgit Malaysia
MZN – Metical Mozambique
NAD – Dolar Namibia
NGN – Naira Nigeria
NIO – Córdoba Nicaragua
NOK – Krone Norway
NPR – Rupee Nepal
NZD – Dolar New Zealand
PAB – Balboa Panama
PEN – Sol Peru
PGK – Kina Papua New Guinea
PHP – Peso Filipina
PKR – Rupee Pakistan
PLN – Złoty Poland
PYG – Guaraní Paraguay
QAR – Riyal Qatar
RON – Leu Romania
RSD – Dinar Serbia
RUB – Rubel Rusia
RWF – Franc Rwanda
SAR – Riyal Arab Saudi
SBD – Dolar Kepulauan Solomon
SCR – Rupee Seychelles
SEK – Krona Sweden
SGD – Dolar Singapura
SHP – Pound Saint Helena
SLE – Leone Sierra Leone
SOS – Shilling Somalia
SRD – Dolar Surinam
STD – Dobra São Tomé dan Príncipe (sebelum 2018, digantikan dengan STN)
SZL – Lilangeni Eswatini
THB – Baht Thailand
TJS – Somoni Tajikistan
TOP – Paʻanga Tonga
TRY – Lira Turki
TTD – Dolar Trinidad dan Tobago
TWD – Dolar Taiwan Baru
TZS – Shilling Tanzania
UAH – Hryvnia Ukraine
UGX – Shilling Uganda
UYU – Peso Uruguay
UZS – Soʻm Uzbekistan
VND – Đồng Vietnam
VUV – Vatu Vanuatu
WST – Tala Samoa
XAF – Franc CFA Afrika Tengah
XCD – Dolar Caribbean Timur
XOF – Franc CFA Afrika Barat
XPF – Franc CFP (digunakan di wilayah Pasifik Perancis)
YER – Rial Yemen
ZAR – Rand Afrika Selatan
ZMW – Kwacha Zambia
Jika negara anda tidak disenaraikan di atas, kaedah pembayaran lalai adalah dalam USD – Dolar Amerika Syarikat.
We have noticed attempts by Chinese spammers to exploit Kerika, and we are taking some measures to reduce this hassle. We used to block these spammers one-by-one, but that is obviously time-consuming, especially when a bunch of them try the same trick, which is sending out dozens or hundreds of invitations to people to join them in their Kerika boards.
These spammers are using VPNs to appear as if they are from other countries, but there was a pattern to their use of Kerika: all the team invitations they sent out involve the same destination: qq.com, which is a major Chinese web portal operated by Tencent, primarily known for its instant messaging service, QQ.
While we support Chinese as a language, we don’t have any legitimate users in China since China blocks Google and so many other services. Which means that there will never be a legitimate use to add people from the qq.com domain to a Kerika board.
There’s a simple block we are introducing: we will keep a blacklist of domains, including qq.com, where the system will stop you from adding team members. This will help cut off Chinese spammers who are targeting other people from China.
We have had a 30-day free trial period for new users for a very long time, but we have long seen that people don’t really need the full 4 weeks to make up their mind about whether Kerika is what they are looking for, or not.
In fact, a trial period has a disadvantage in that people tend to forget they are in a free trial until they start getting reminders that the trial is about to end!
A more practical — and industry-standard — approach is to offer 14-day free trial from now on. This should provide ample time to make up your mind about whether Kerika is the best way for your remote team to get more done!
At Kerika we have been experimenting with using AI for software development for some time now: Microsoft’s Copilot has been used by our developers to help with their coding, and it has definitely proven helpful. We are now adding AI to some of parts of our user interface.
When you want to start a new Kerika Task Board, you will see that there’s a new option for GET HELP FROM AI:
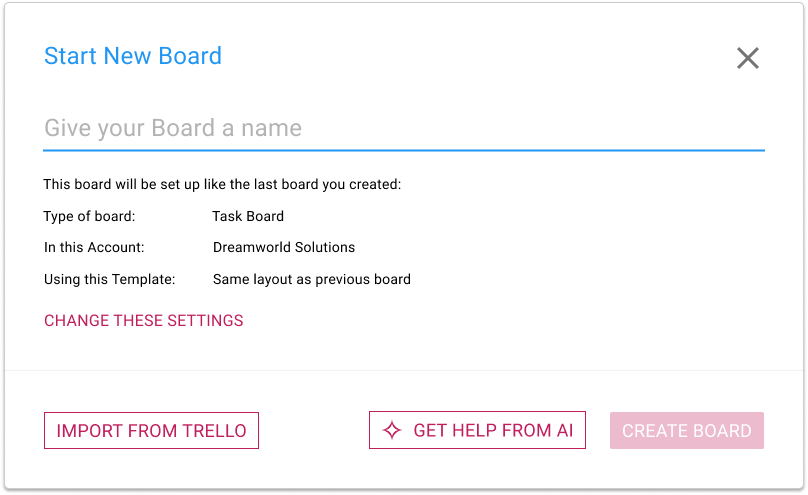
Clicking on this button brings up a dialog where you can tell our AI what you want your new board to do:
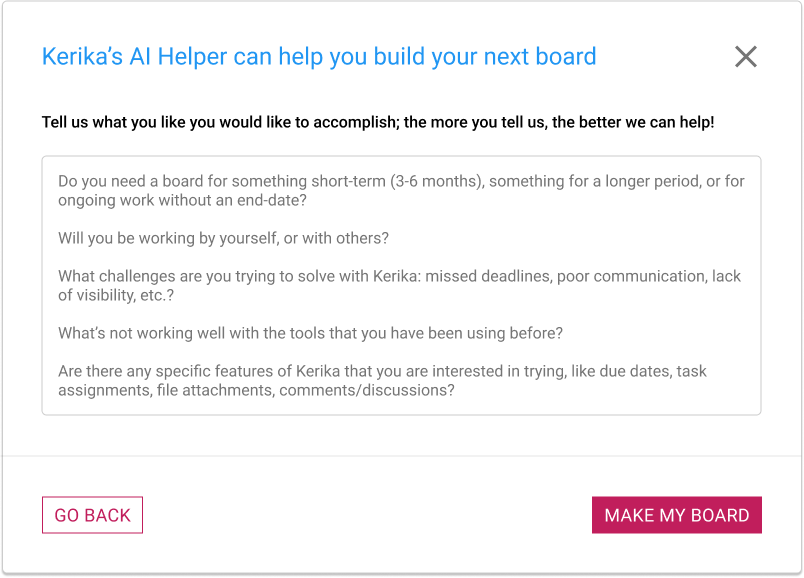
It’s very important to provide as much detail as possible! The more you tell about Kerika’s AI about what you want your board to do, the better it can help. Some suggestions for what you should tell the AI:
Do you need a board for something short-term (3-6 months), something for a longer period, or for ongoing work without an end-date?
Will you be working by yourself, or with others?
What challenges are you trying to solve with Kerika: missed deadlines, poor communication, lack of visibility, etc.?
What’s not working well with the tools that you have been using before?
Are there any specific features of Kerika that you are interested in trying, like due dates, task assignments, file attachments, comments/discussions?
Using AI takes some time, typically 1-2 minutes to build your board. You can do other things with Kerika in the meantime; you will be notified when your board is ready. You can also cancel your request if you change your mind.
Similarly, you now have the option of getting help from Kerika’s AI in making new templates:
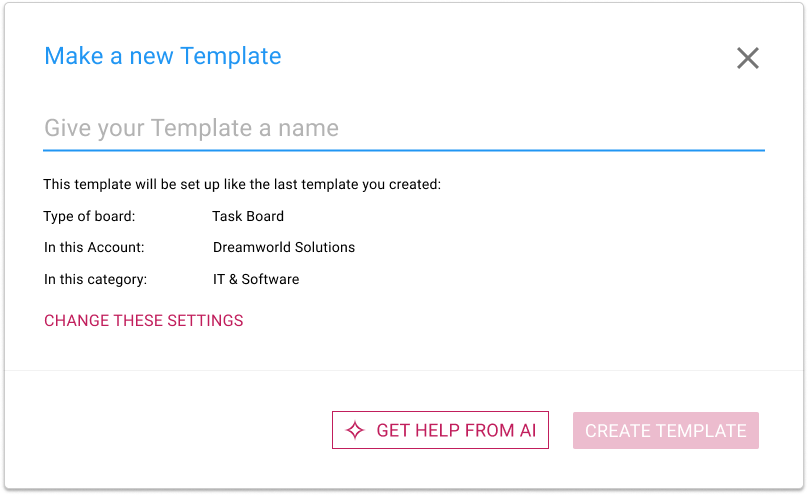
If you choose to get help from AI, you are asked to provide details about what your new template should do, and how it will be used:
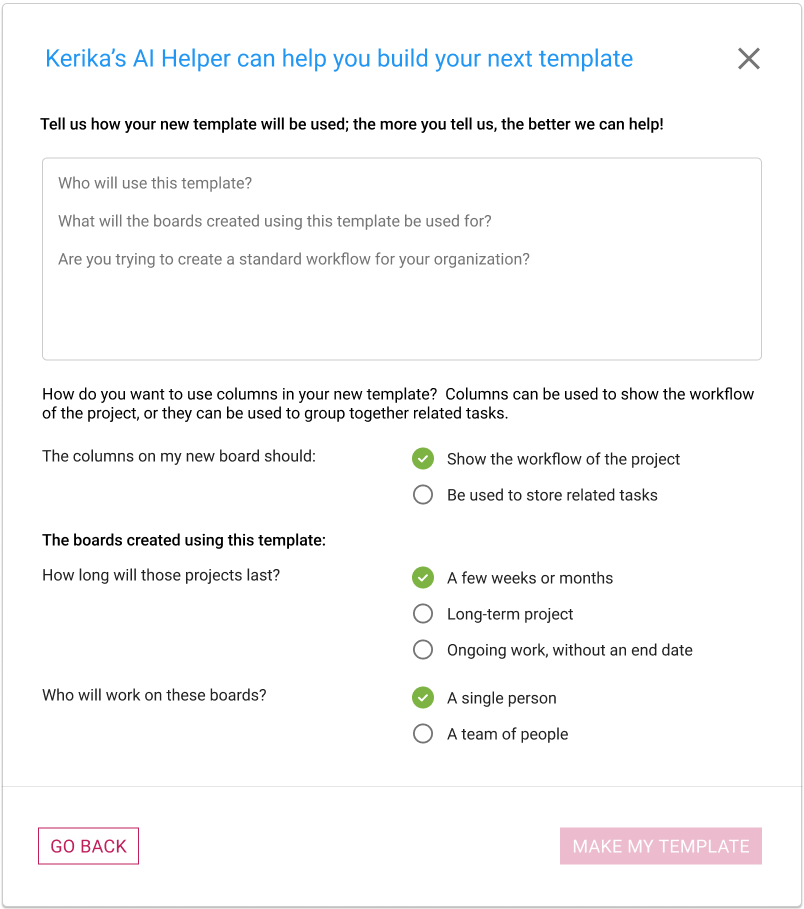
With templates there’s a little more detail that we ask for, and as with using AI to create new boards, the amount and quality of the instructions you provide to Kerika’s AI will make a big difference to how well the AI can help you make a new template.
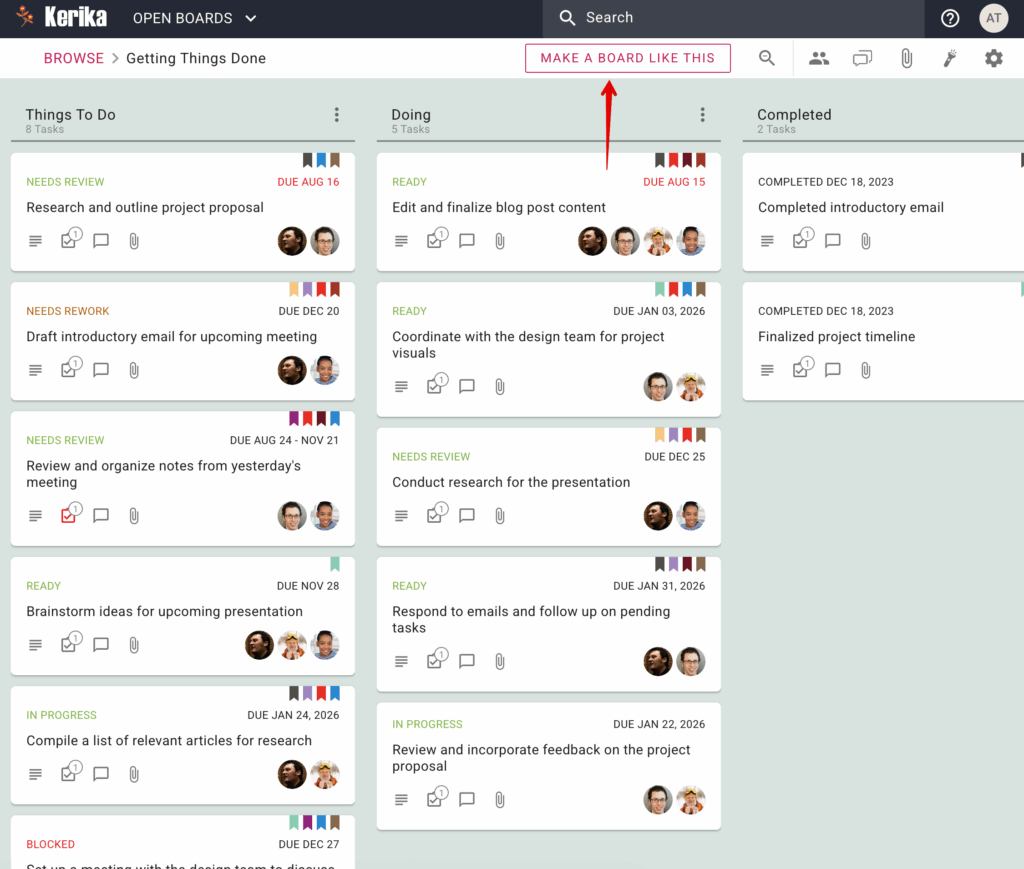
This last one is for new users only: when people sign up as Kerika, they are given the option of browsing our many sample boards (which are organized by job function) so they can get an idea of what Kerika can do before they start their first board.
Ever since we build our sample boards we have observed that they are very popular, and that people would make copies of them to either play with, or use as a basis for building their own boards.
Making a copy to play with is fine, but making a copy to create a starting point for your new board is not very effective.
To make it easy for people to handle both needs, we now include a MAKE A BOARD LIKE THIS button that’s shown whenever a new user is viewing a sample board.
Clicking on this button brings up a dialog where the new user is asked what they would like to do with their version of this sample board:
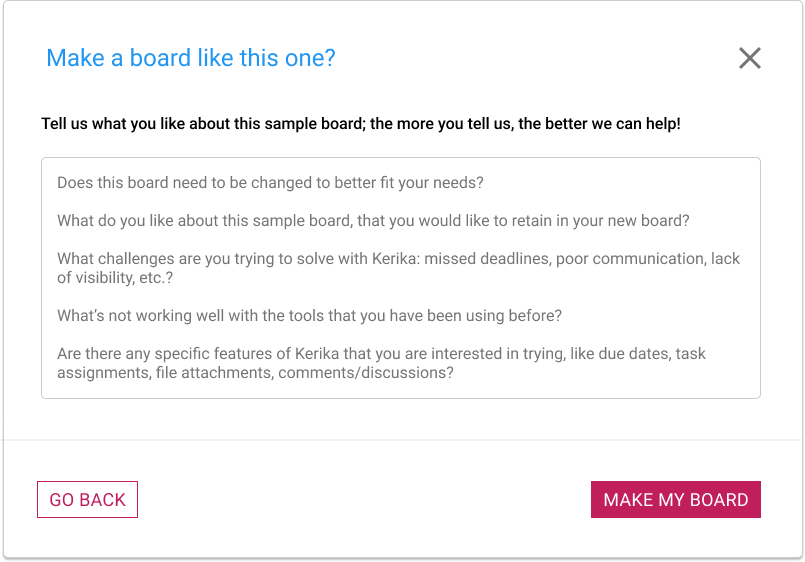
If all you need is a copy, just tell that to the AI: “Make a copy of this board”. But if you want a version of the board that’s personalized to your needs, make sure you give plenty of input to the AI!
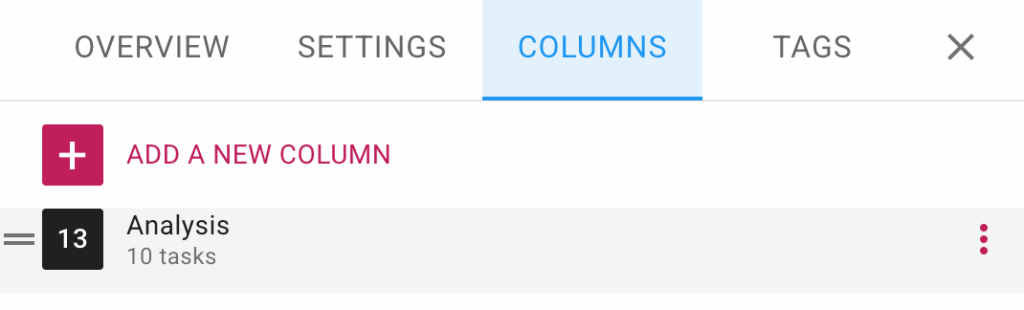
If you are working on a Task Board, the Board Settings dialog’s Column tab can now let you hide or show columns.
To use this feature, open the Board Settings dialog by clicking on the gear button that appears on the top-right corner when you are viewing a Task Board, and then switching to the COLUMNS tab.
When you hover over any column in the list an options button (three dots) will appear:
Click on that and you will see the Actions menu.:
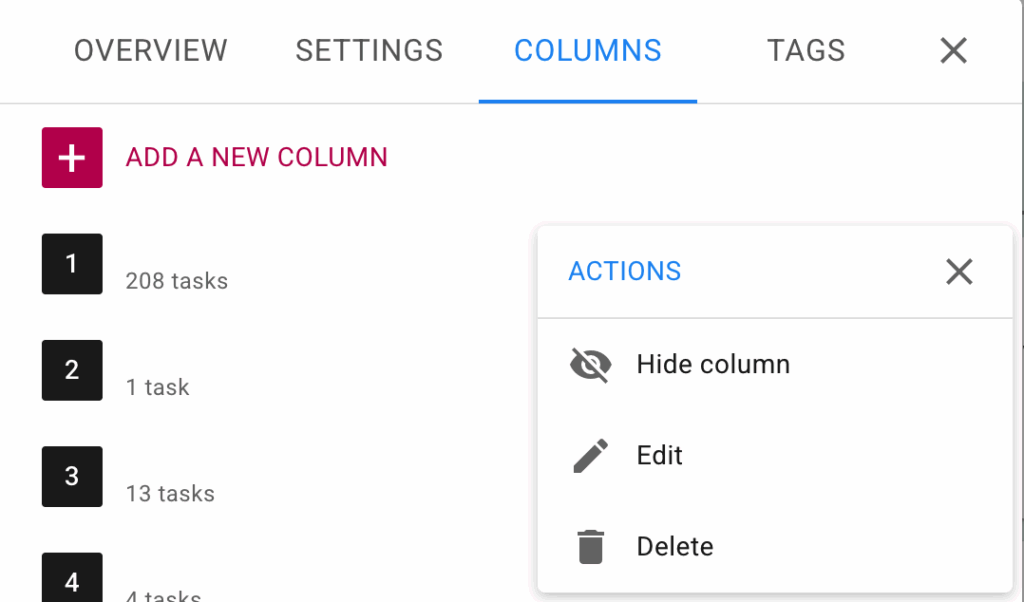
This makes it easier to manage boards with large numbers of columns.
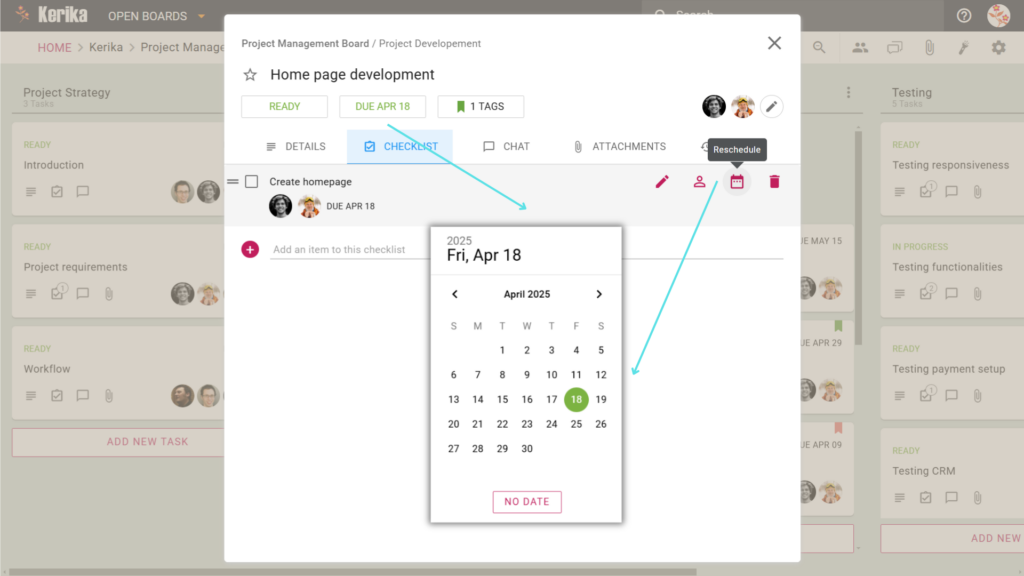
Deadlines are the invisible threads that tie projects together, ensuring that tasks are completed on time and teams stay aligned. Whether you’re working on a single task or breaking down a project into smaller, actionable steps, clear due dates make all the difference.
Click here to check out the board
Efficient deadline management starts with the ability to set due dates on tasks and their components. Here’s how it works:
This ensures the task is anchored within the project timeline and keeps everyone updated.
Integrating due dates into task management, whether for full tasks or individual checklist items, helps teams maintain clarity, focus, and productivity. By thoughtfully setting and managing deadlines, you create a workflow that adapts to your team’s needs while ensuring that nothing falls through the cracks.
When juggling multiple tasks across different stages of a project, staying organized is essential. Tags are a powerful tool that can bring structure to your workflow, helping you quickly identify, categorize, and prioritize tasks.
Whether you’re managing design mockups, backend development, or testing stages, tags make it easier to focus on what matters most.
Here’s how you can use tags to streamline your project management:

Click Here To Preview These Tags
Tags act like visual markers, giving you instant insights into a task’s category or status. Here’s how you can apply them to individual task cards:
Pro Tip: Use consistent color coding for tags to make it easy to distinguish between categories, like green for “backend” tasks or blue for “design.”

Custom tags allow you to tailor categorization to your team’s needs. Here’s how you can create tags:
Pro Tip: Keep tag names short and intuitive. This ensures everyone on your team can easily understand and use them effectively.
Tags are more than just labels, they’re a way to simplify and enhance your task management. By using tags effectively, you can categorize, prioritize, and focus on tasks with ease, keeping your team aligned and productive.
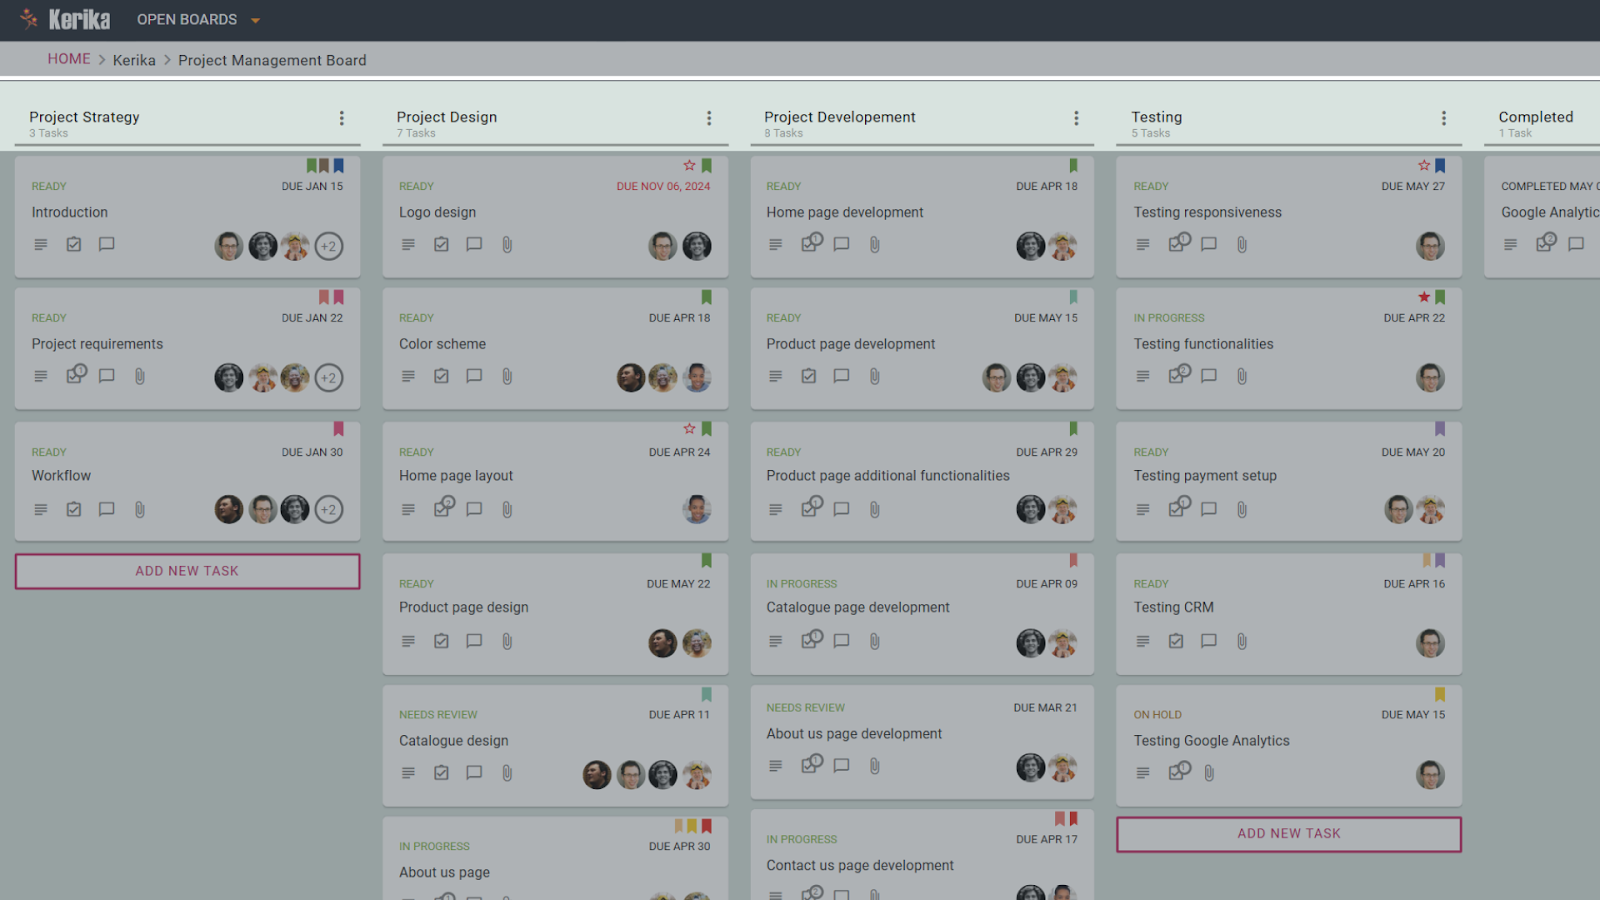
Managing projects efficiently starts with a well-organized workflow. Breaking down your tasks into clearly defined stages can help you and your team stay aligned and productive. A structured workflow makes it easier to track progress, identify bottlenecks, and prioritize tasks effectively.
Let’s dive into how you can set up columns in your task board to maximize efficiency using the example board provided.
Click here to check out this board
Columns are the backbone of your workflow. Each column represents a stage in your project, helping you visualize the flow of tasks from start to finish. The key is to ensure that your columns align with the nature of your project and the way your team works.
While defining Workflow Stages. think about the natural progression of your tasks.
For example:
Once your workflow stages are defined, turn them into columns on your task board. Start with broad categories and refine them as you better understand your team’s needs.
For example:
This approach ensures your columns are intuitive, adaptable, and tailored to the natural progression of your tasks
Consider creating columns that add value to your workflow:
A well-organized workflow begins with thoughtful column setup. By tailoring your columns to reflect your project’s natural stages and including supportive columns you can improve team efficiency and maintain clarity in your process. Start organizing your workflow today and experience the benefits!
Keeping tasks organized is essential for smooth workflows, especially when managing a high volume of items. Task numbering can add clarity and make referencing specific tasks more efficient. But manually numbering tasks? That’s time-consuming and prone to errors.
This is where Auto-Numbering comes in. With this feature, each task card is automatically assigned a unique number as soon as it’s created, ensuring every task is identifiable at a glance.
Let’s dive into how auto-numbering works and how you can enable it to streamline your projects.

Click here to check out this board
Auto-numbering assigns a sequential number to each new task card on a board. This numbering is unique to the board and helps teams quickly refer to tasks in discussions, reports, or updates without confusion.
Auto-numbering brings simplicity and order to task management, eliminating the hassle of manually keeping track of task identifiers. Whether you’re managing a complex project or a small workflow, this feature ensures every task is easily recognizable and trackable.