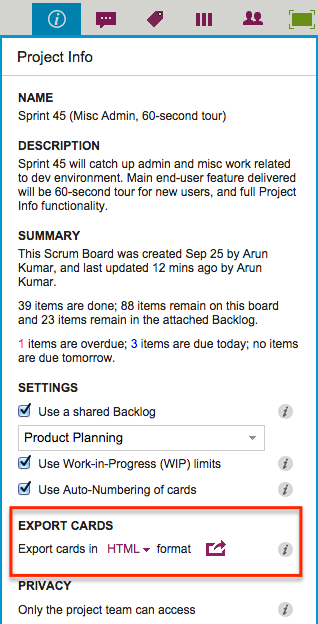
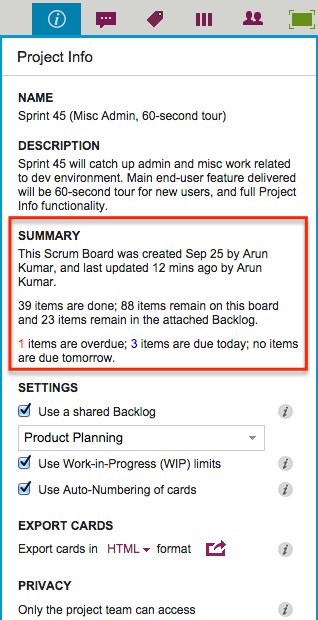
To access this feature, simply click on the Project Info button that’s shown at the top-right of each Kerika Board, and you will see the Project Info display (that we have talked about in an earlier blog post):
Export
CSV format is useful if you want to want to take data from Kerika and put it into Excel or some other analysis tool;
HTML format is useful if you want to print material from Kerika, or insert it into Word, PowerPoint or similar tools.
With both CSV and HTML exports, hidden cards are not exported: this means that if you are currently choosing to hide some columns (by using the Workflow button), or hide some cards (by using the Tags filters), then the cards that you are not viewing right now will not be part of the export.
When you export a board in CSV format, you get the following data, for each visible card:
Example of CSV export
Column Name: e.g. Backlog, In Progress, Done, etc.
Card Name: e.g. “Create PR news release”.
Card Description: e.g. “We need to create a PR news release once our latest version is ready…” (Rich text will be converted to plain text, since CSV files can only deal with plain text.)
Status: e.g. Needs Review, Needs Rework, etc. (If the card doesn’t have a special status, “Normal” will be shown.)
Due Date: the date the card is due, if a date has been set. (If the card doesn’t have a Due Date, “Not Scheduled” will appear.)
Assigned To: a list of names of the people the card is currently assigned to. (If the card isn’t assigned to anyone, “Not Assigned” will appear.)
Exporting could take a while: the exported data are put into a file in your Google Drive or Box account — depending upon whether you are using Kerika+Google or Kerika+Box — and when the process completes, you get an email with a link to the file containing your data.
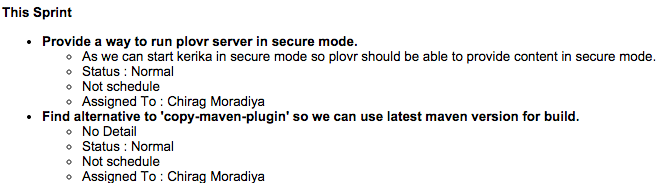
It’s a similar experience if you do a HTML export; however the format of the data is different, giving you an indented set of attributes for each card, like this example from a Kerika+Box project:
Example of HTML export from Kerika+Box
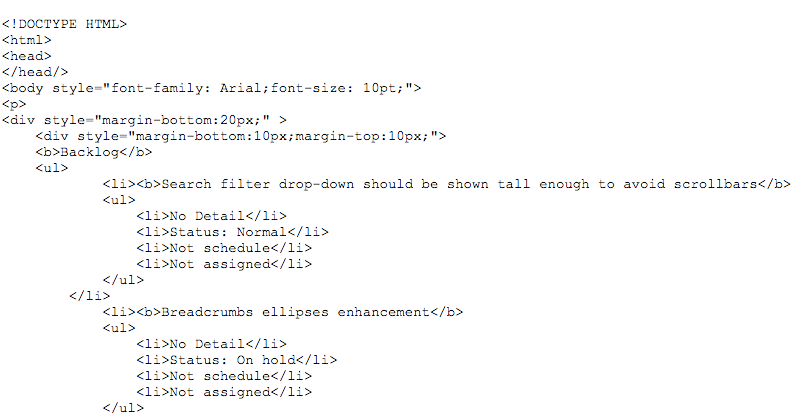
One caveat about exporting HTML: if you open the results in Google Docs, Google shows a preview of the output, and that doesn’t look good: instead of rendering the HTML, Google actually exposes it.
Here’s an example from a Kerika+Google project:
Example of HTML export from Kerika+Google
The export feature can be used for many different purposes, of course: the most common scenario we envision is people wanting to include material from Kerika in their analysis and presentations.
And, of course, one use would be for government agencies that have to respond to Freedom of Information Act (FOIA) requests, or other Sunshine laws.
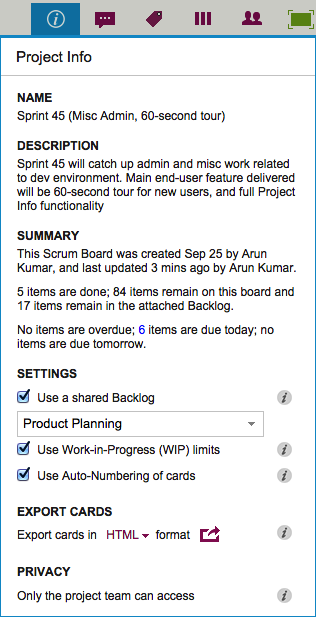
There are several sections in here: at the top is the Name and Description of the project:
Name and Description
The Description is a new attribute of Kerika’s boards: it lets you provide context about the project that can help orient new team members, and it can also help with your Searches in the future.
It tells you when the board was first created, and by whom.
It tells you when the board was last updated, and by whom.
And for Task Boards and Scrum Boards it tells you how many cards are done, and how many remain.
Since each card typically represents a work item, this is a quick way to find out how much work remains on a board, without having to count up all the cards in each column.
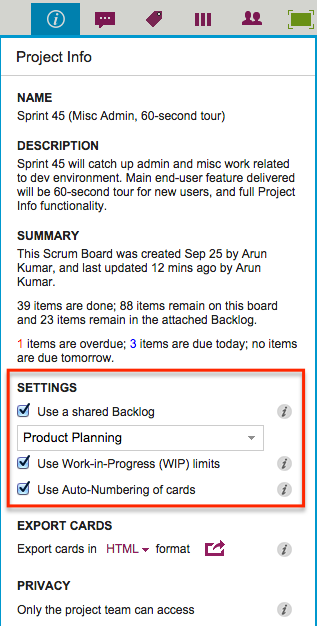
For Task Boards and Scrum Boards, this view also shows you how many cards are due today, due tomorrow, and overdue.
And for Scrum Boards, it shows you how many cards are in the Backlog that you are using, so you get a sense for how far along you are with the overall project, not just the current Sprint.
All Kerika Task Boards and Scrum Boards now have support for Work-In-Progress Limits: these can be turned on or off by the Project Leader or Account Owner:
Task Boards and Scrum Boards also have a new auto-numbering feature that can help you manage very large boards, e.g. if you are using Kerika for an internal Help Desk.
Kerika’s Task Boards are so easy to set up and use that teams sometimes make the mistake of sticking everything on the same board, week after week and month after month, until the board becomes really too big to be useful.
The Kerika software itself doesn’t buckle under the weight of hundreds of cards on a single board (and, to be honest, we are also guilty of sometimes doing very large Scrum iterations that turned over a few hundred cards -.-), but just because the software works fine doesn’t mean the practice makes sense.
The most common way for a Kanban board to get overcrowded is for it to be used for too long: the Done column gets bigger and bigger, as more work gets completed each week, until you end up with a very lop-sided looking board with perhaps 20-50 items in “To Do”, and maybe 1,000 items in “Done”.
When presented with a board that contains hundreds or even thousands of items in Done, it’s hard for individual team members to get visual satisfaction from seeing cards move over to the Done column on a regular basis: as work gets done, it seems to vanish into this endless pile of other work that’s already been done.
Teams and, especially, Project Leaders should not underestimate the value of this visual satisfaction of seeing a well-balanced board, with about the same number of items in “To Do” (or Backlog, or Pending, or whatever you choose to call your parking lot) and in the “Done” column, with an even-looking distribution of items in the columns in the middle.
(The simplest Kanban board may just have three columns: To Do, Doing, and Done, but Kerika makes it easy to have far more complex workflows, and to capture your organizations’ best practices as a collection of process templates.)
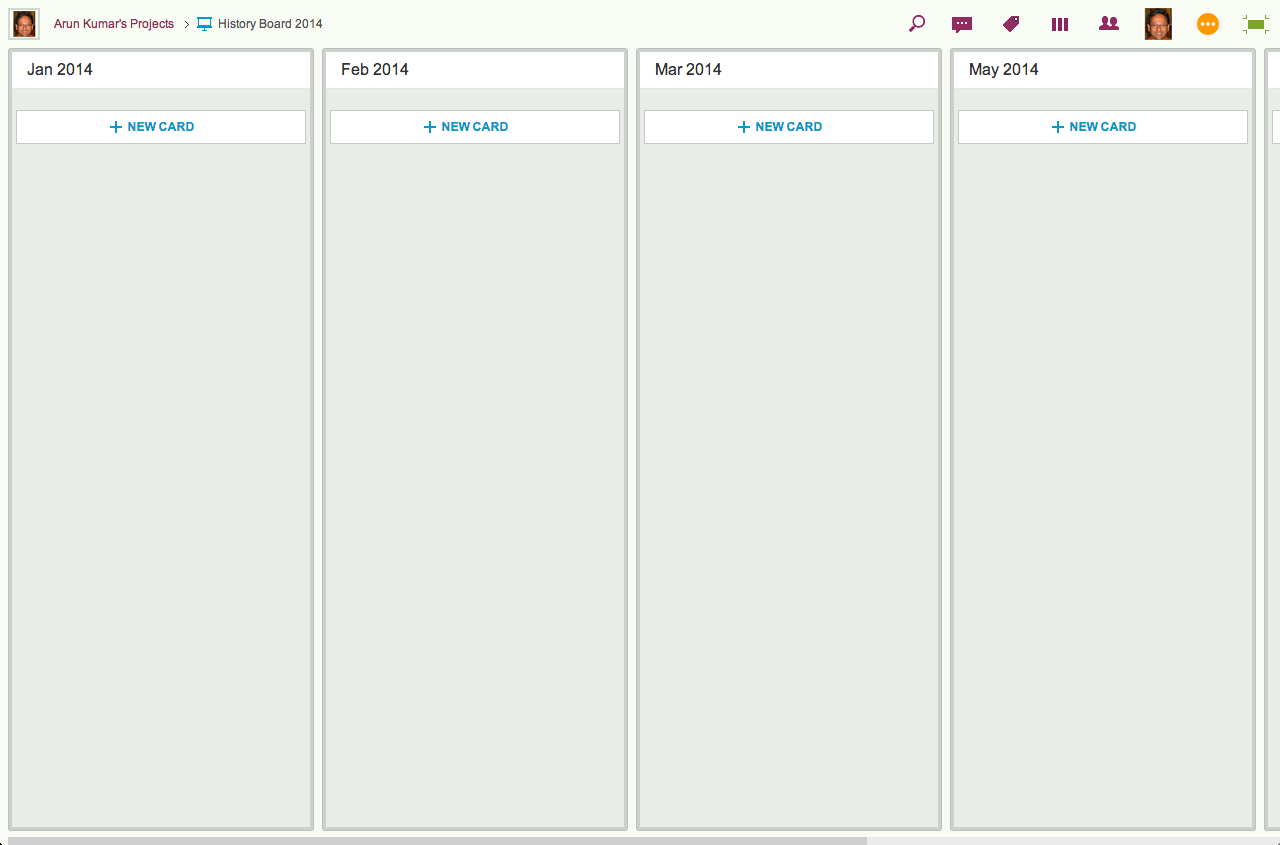
If a Kanban board is going to be used for an extended period, say several months or more, then we recommend create a parallel History Board that can be used to track the historical achievements and progress of the team. Here’s how this scheme works:
Create a board called “History Board 2014”. (The name isn’t particularly important.)
Organize this boards with columns that look like this: Jan 2014, Feb 2014, Mar 2014…
An example of a History Board
We will use these columns to hold all the cards that were completed in that particular month. So, for example, the Jan 2014 column would contain everything that was completed in January 2014.
At the end of every month, pause for a moment to celebrate your team’s accomplishments for that month. (Order in some beer and pizza and maybe pause for longer than a moment…)
Move all the items that in Done onto the History Board: use Kerika’s cut-and-paste feature, which will let you move a bunch of cards intact, along with their history, chat, attachments, etc., from the Done column of your main Kanban board to the appropriate column in your History Board.
Laptop users will find their right-mouse click menu handy for this: click on a card in the Done column, do “Select All” from the right-mouse menu, and then do a “Cut”. Once you have cut (or copied) anything into your Kerika Clipboard, a Paste button will automatically appear at the top of each column, on each board where you can make changes.
So, Cut from Done on your active board, go over to your History Board, and then do click on the Paste button at the top of the appropriate column, e.g. the August 2014 column.
This simple method lets you achieve two objectives at the same time:
It’s an easy way to trim the size of your active Kanban board: by taking out the “Done” stuff each month you can stop it from ballooning in size over time.
It’s an easy way to create a comprehensive historical view of everything your team has achieved over time: go over to the History Board and you can see how work got done over an entire year. (Might be useful at performance review time ;-)
A side-benefit: your active Kanban board will load a lot faster if it doesn’t get overloaded.
We often get asked if Kerika has an integration with Git. The short answer is “No”, but the longer answer is more nuanced…
We use Git ourselves for managing our own source code and other software assets.
Git was designed from the git go (ha!) to be used by distributed teams, having originated with the Linux kernel team, perhaps the most important distributed team in the whole world, so it made perfect sense for us to use it: it works across operating systems, and a number of simple GUIs are now available for managing your various source-code branches.
We simply embed the git references within cards on our project boards: sometimes in the chat conversation attached to a card, but more often within the card’s details.
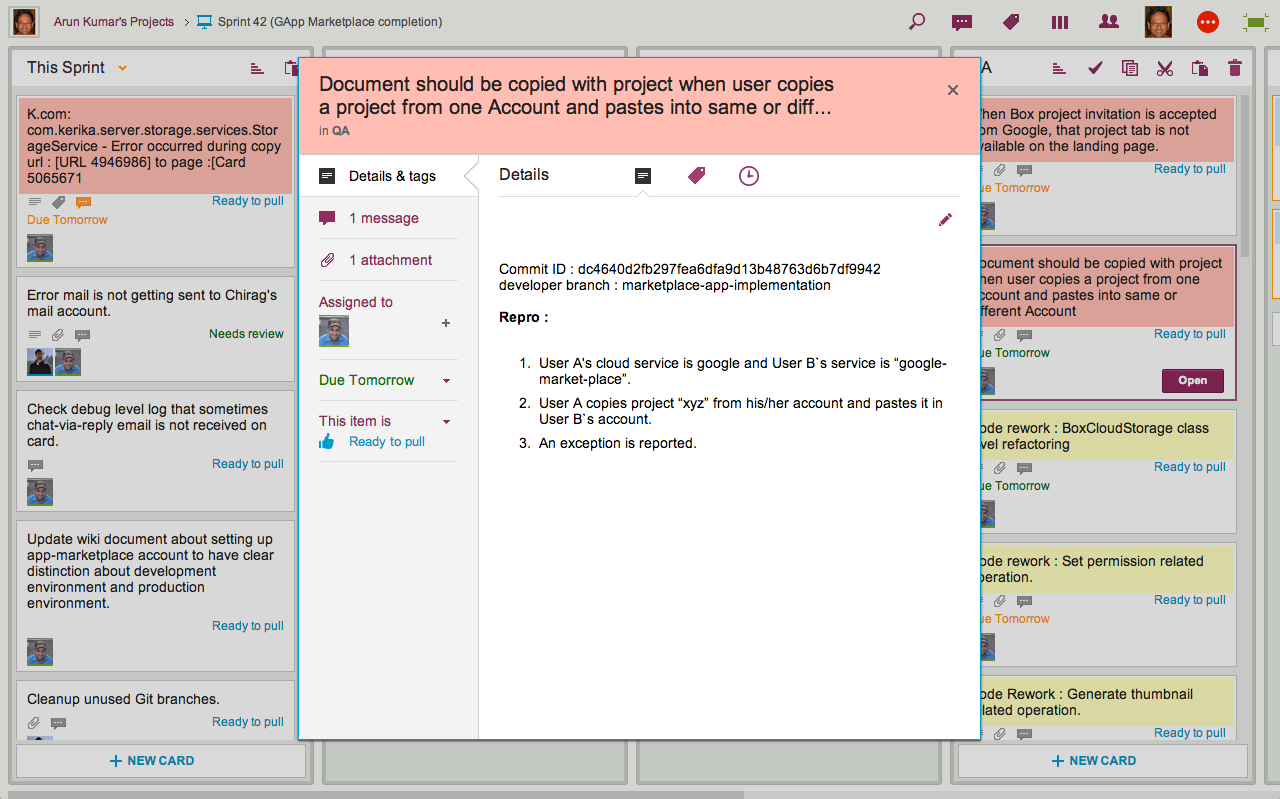
Here’s an actual example of a bug that we fixed recently:
Example of Git integration
We use multiple Git branches at the same time, because we put every individual feature into a separate branch.
That’s not a fixed rule within Git itself; it’s just our own team’s practice, since it makes it easier for us to stick with a 2-week Sprint cycle: at the end of every 2 weeks we can see which features are complete, and pull these git branches together to build a new release.
So while Kerika doesn’t have a direct integration with Git, it’s pretty easy to use Kerika alongside Git, or other source management systems.
Here at Kerika, we often get asked how we do Scrum as a distributed team.
Here’s the model we have evolved, which works for us mainly because we are the very essence of a distributed Agile team: we have people working together on the same product from locations that are 10,000 miles apart!
And this means that we are the most enthusiastic consumers of our products: we use Kerika to manage every part of our business and we only build what we would ourselves love to use.
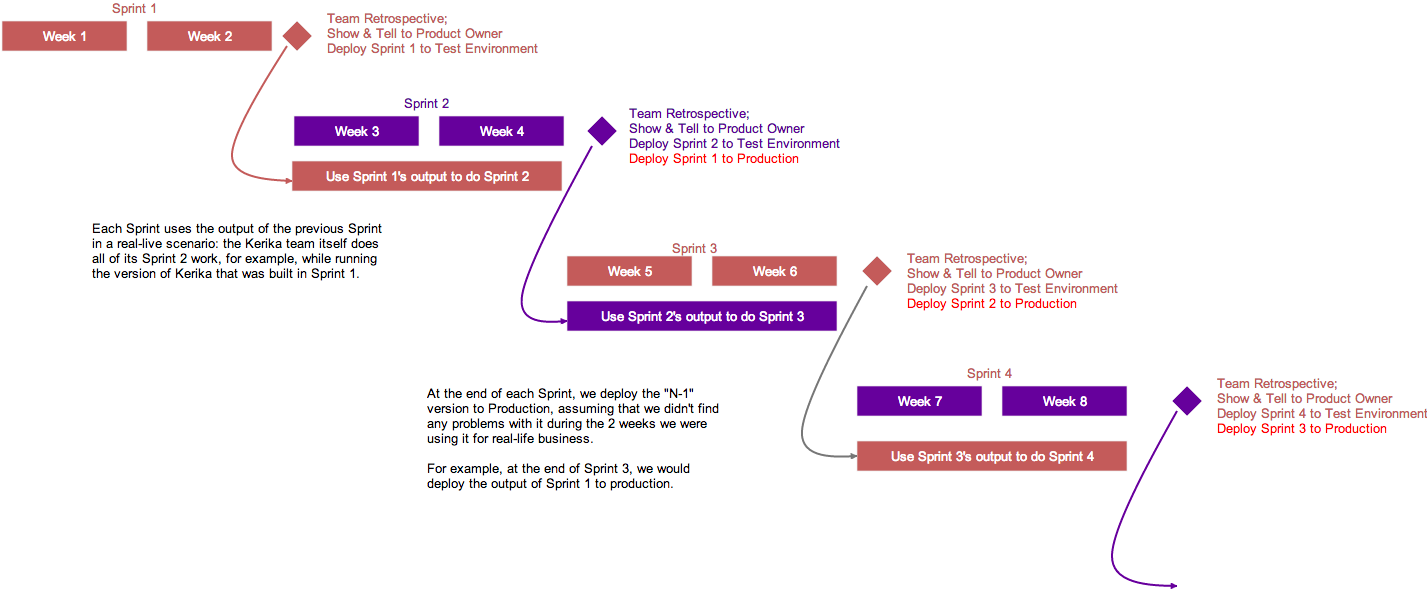
Here’s the basic outline of our Scrum model:
Kerika’s model for 2-week Sprints
Each Sprint is 2 weeks long: that that works well for us; other folks might find that 3 weeks or 4 weeks i better. Pick what works for you.
Each Sprint begins with Sprint Planning, where the Scrum Team gets together with the Product Owner to decide which cards will be pull from our main Product Backlog into the Sprint Backlog.
Each Sprint is organized as a separate Scrum Board: this makes it really easy for us to concentrate upon needs to get delivered in that particular Sprint, without getting distracted by what was done in the past or what remains to be done.
And Kerika makes it really easy to pull cards (literally!) from the Backlog onto a Scrum Board, and then hide the Backlog from view so it doesn’t distract the Team while the Sprint is underway.
Half-way the Sprint, at the end of the first week, we do a gut-check: does the Sprint look like it is going reasonably well? We don’t ask if it is going perfectly: almost no Sprint does; what we are looking for is any indication that the Sprint is going to severely under-deliver in terms of the Team’s commitments to the Product Owner.
We could do these gut-checks every day during our Daily Standups, but in the first part of a Sprint cycle these can often give us false positives: it’s easy to tell early on if a Sprint is going to be disastrous, but it’s hard to tell for sure that it is actually going to end well. But about midway through the Sprint we start to have a more reliable sense for how things may turn out.
In keeping with the Scrum model, our goal is to complete a potentially shippable set of features and bug fixes with each Sprint, although this doesn’t necessarily mean that we will always ship what gets built after each Sprint. (More on that later.)
For each feature or bug, however large or small, we make sure that we have design and testing baked into the process:
An analysis document is prepared and attached to the card, either as a Google Doc or as Box document. (We had been using Kerika+Google exclusively for years, but have recently switched to Kerika+Box since we completed our Box integration.)
The document is often just a few paragraphs long, because we always take cards representing large features (or other big work items) and break them up into smaller cards, so that no card is likely to take more than a day’s work. Kerika makes it really easy to link cards together, so it’s easy to trace work across multiple cards.
For bugs, the attached document describes the expected behavior, the actual behavior, and the root cause analysis. Very frequently, screenshots showing the bugs are attached to the cards.
For new features, several documents may be attached, all quite small: there may be a high-level analysis document and a separate low-level design document.
For all features and bugs, we do test planning at the time we take on the work: for back-end (server) work we rely primarily on JUnit for writing automated tests; for front-end (UI) work we have found that automated testing is not very cost-effective, and instead rely more on manual testing. The key is to be as “test-driven” in our development as possible.
There are several benefits from doing formal planning, which some folks seem to view as being antithetical to an Agile model:
It helps find holes in the original requirements or UI design: good technical analysis finds all the edge cases that are overlooked when a new feature is being conceptualized.
It helps ensure that requirements are properly interpreted by the Team: the back-and-forth of analysis and reviewing the requirement helps ensure that the Product Owner and the Team are in synch on what needs to get done, which is especially important for new features, of course, but can also be important to understand the severity and priority of bugs.
It deliberately slows down the development pace to the “true” pace, by ensuring that time and effort for testing, especially the development of automated tests, is properly accounted for. Without this, it’s easy for a team to quickly hack new features, which is great at first but leads to unmaintainable and unstable code very soon.
At the end of the 2-week cycle, the Team prepares to end the Sprint…
We like to talk about Sprints as “buses”: a bus comes by on a regular schedule, and if you are ready and waiting at the bus stop, you can get on the bus.
But if you are not ready when the bus comes along, you are going to have to wait for the next bus, which thankfully does come by on a regular 2-week schedule.
This metaphor helps the Team understand that Sprints are time-boxed, not feature-boxed: in other words, at the end of every 2 weeks a Sprint will end, regardless of whether a feature is complete or not. If the feature is complete, it catches the bus; otherwise it will have to wait for the next bus.
And here’s where the Kerika team differs from many other Scrum teams, particularly those that don’t consume their own products:
At the end of each Sprint, we do the normal Sprint Retrospective and Show & Tell for the Product Owner.
But, we also then take the output of the Sprint and deploy it to our test environment.
Our test environment is the one we actually use on a daily basis: we don’t use the production environment as often, preferring to risk all of our work by taking the latest/greatest version of the software on the test environment.
This forces us to use our newest software for real: for actual business use, which is a much higher bar to pass than any ordinary testing or QA, because actual business use places a higher premium on usability than regular QA can achieve.
(And, in fact, there have been instances where we have built features that passed testing, but were rejected by the team as unusable and never released.)
This is illustrated above: the version of Kerika that’s built in Sprint 1 is used by the team to work on Sprint 2.
This is where the rubber meets the road: the Kerika Team has to build Sprint 2, while using what was built in the previous Sprint. If it isn’t good enough, it gets rejected.
At the end of Sprint 2, we will release the output of Sprint 1 to production. By this time it will have been used in a real sense by the Kerika Team for at least 2 weeks, post regular QA, and we will have a high confidence that the new features and bug fixes are solid and truly usable.
We could summarize our model by saying that our production releases effectively lag our Sprint output by one Sprint, which gives us the change to “eat our own dogfood” before we offer it to anyone else.
“Done” is where you want to get to: it’s a special column that’s always to the right edge of every Task Board and Scrum Board.
(You can always chose to hide the Done column, of course, just like you can hide every other column on the board.)
Marking a card as “Done” is simply a quick way of moving it to the Done column, which can be handy when you have a very elaborate workflow — and we have seen folks whose boards have up to 20 columns!
In the near future when we add Work-In-Progress (WIP) Limits for Task Boards and Scrum Boards, the Done column, of course, will not be subject to WIP.
We are also planning on adding more metrics to help Project Leaders and Account Owners understand how well their projects are going, and these will naturally make use of the Done count.
(The fifth in a series of blog posts on how you can make use of the status indicators on cards, in Task Boards and Scrum Boards.)
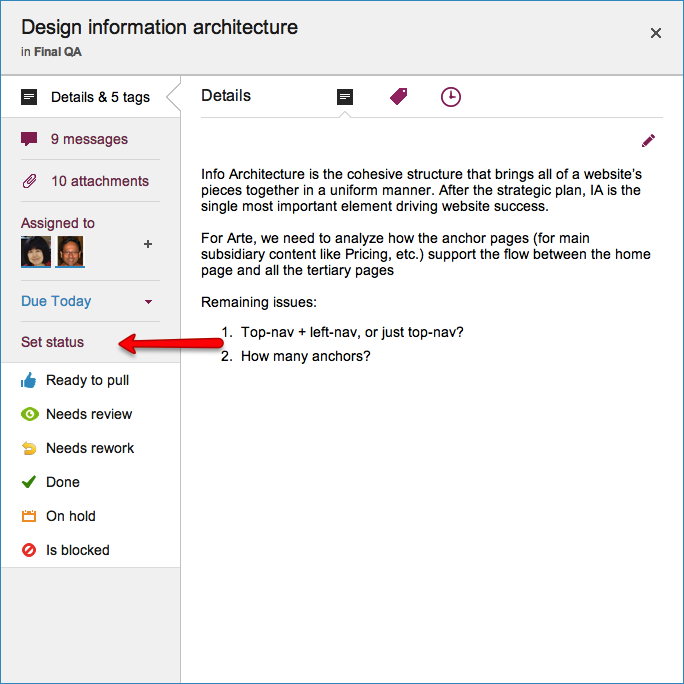
In our last post we talked about how to use the “On Hold” flag; today, let’s take a look at “Is Blocked”
Setting status
“Is blocked” sounds similar to “On hold”, but it should be used in a different context: Blocked is a red flag to the team — it indicates that you are unable to proceed with a task, and you need help.
The essential difference between Blocked and On Hold is that:
You, or perhaps your boss, chose to put something On Hold.
You were forced to mark something as Blocked.
For teams working in a Kanban or Scrum model, the highest priority for a Project Leader should be to unblock cards.
Unblocking cards (and hence, people) is the most useful thing that a Project Leader can do to help move work smoothly.
This is why “Is blocked” is shown in red on a card, so that you can literally raise a red flag!
In an ideal world, cards would only move from left to right: starting off on the left-most column, e.g. the Backlog in a Scrum Board, and moving in stages to the Done column.
In the real world, however, work can sometimes need rework, and that’s what the “Needs rework” status indicator can be used for.
The amount of rework that’s needed will vary widely, depending upon the project and the team:
If someone new has just joined a well-established team, that person may need some time to understand exactly what’s expected of them at each stage of the project’s workflow: they may, for example, be too quick to move a card from “Planning” to “In Development”, without realizing what’s expected of a card that’s fit to exit the Planning stage.
This new person may find that her work gets pushed back to the left, marked as “Needs rework”.
It’s imperative that whoever pushes back work as “Needs rework” also provides some precise description of what rework is needed.
This is most often done using chat, but sometimes a marked up document, screenshot or other materials may be more useful, particularly if the task is complex.
But, simply marking a card as “Needs rework”, without providing a good explanation, is never a good idea: it will generate ill-will within the team, discourage the new person, and simply result in more work for everyone.
Some times of work will always require a lot of rework: e.g. design.
Mockups of new products or features, or copy for new advertising, will go through a lot of rework before it is considered ready to move along a workflow.
This is quite normal, which brings up another critical point: good Project Leaders will ensure that there is no stigma attached to cards being marked as “Needs rework”.
If people are made to feel, however subtly, that their work is of poor quality because many of their cards are frequently marked as “Needs rework”, this will have a very bad effect on individual and team morale.
It’s really incumbent on the Project Leaders to ensure that people understand that “Needs rework” is simply a status indicator, not a judgment of someone’s abilities!
(The first in a series of blog posts on how you can make use of the status indicators on cards, in Task Boards and Scrum Boards.)
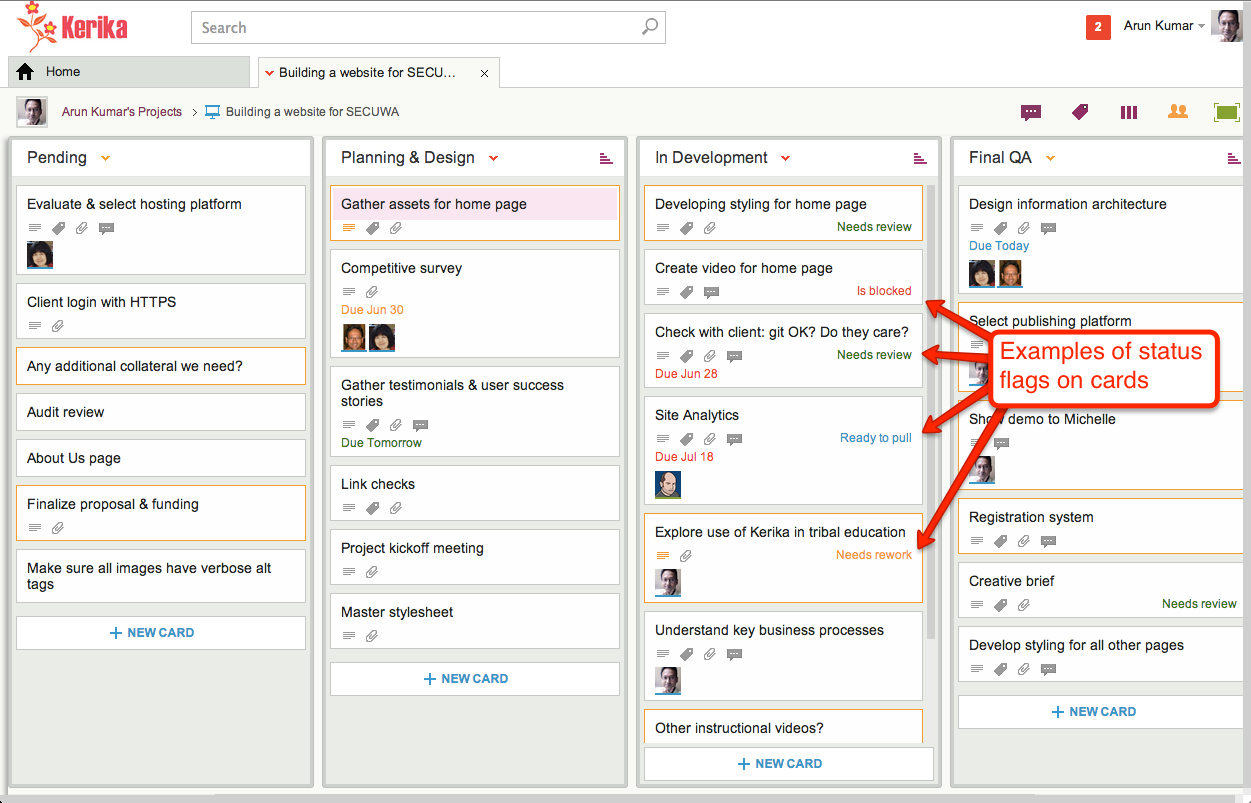
Kerika makes it really easy to flag cards on a board, if you need to alert your team members; here’s an example:
Examples of status flags on cards
There are several statuses that you can report on cards (in addition to “Normal”, the default setting), and we will try to provide some advice in these blog posts on how best to use them.
First up: “Ready to Pull”
Setting status
Ready to Pull is great if your team works in a “pull” environment, rather than a “push” environment. Here’s the easiest way to differentiate between the two:
In a “push” environment, work gets pushed onto people — quite literally. For example, Project Leaders (or even Team Members) decide that a particular card should be handled by a particular person, and they assign that card to that person: in other words, they push that work onto people.
In a “pull” environment, people only assign work to themselves: as they get freed up from whatever they are working on, they look at the board and pick up whatever task is waiting to be pulled (i.e. done) — in other words, they pick up a card that is marked as “Ready to Pull”.
There are advantages and disadvantages to both models, and it’s really a question of how your team prefers to work.
Particularly in organizations that are still transitioning from traditional (Waterfall-style) project management, the push model can be the easiest way to adopt a tool like Kerika: it helps retain the traditional role of a Project Leader as someone who is responsible for the assignment of work among the team.
This is definitely the easiest pathway for organizations that are still in the process of transitioning to a Lean or Agile model — a process that can take months in most cases.
There are, however, some disadvantages to the push model:
It can delay the organization’s cultural transformation to Lean/Agile: people feel less empowered, and can be more passive if they wait for work to get pushed to them by others.
A less empowered team is often slower to take the initiative.
Someone who has had work pushed onto them may feel less ownership of the outcome.
It provides a misleading picture of what’s actually getting done: this, in our experience, is the biggest shortcoming of the pull model!
When work gets pushed onto people, you can find that individuals have 10 or more items currently assigned to them. There’s no way they could be working on all 10 items at the same time, so one of the biggest advantages of Kerika — providing an accurate, real-time view of what’s getting done, and by whom — is somewhat negated.
The pull model is truer to the spirit of Kanban: it allows people to work at their own (true) pace, and empowers them to pick up new work as they get freed up — or blocked.
The Kerika team itself has transitioned from push to pull: with push we never had a true sense of what’s getting done; with pull, we do!
There are disadvantages to the pull model:
It requires more training and cultural change up-front: even for a team that generally feels empowered, it is a big shift in thinking and process to move from push to pull.
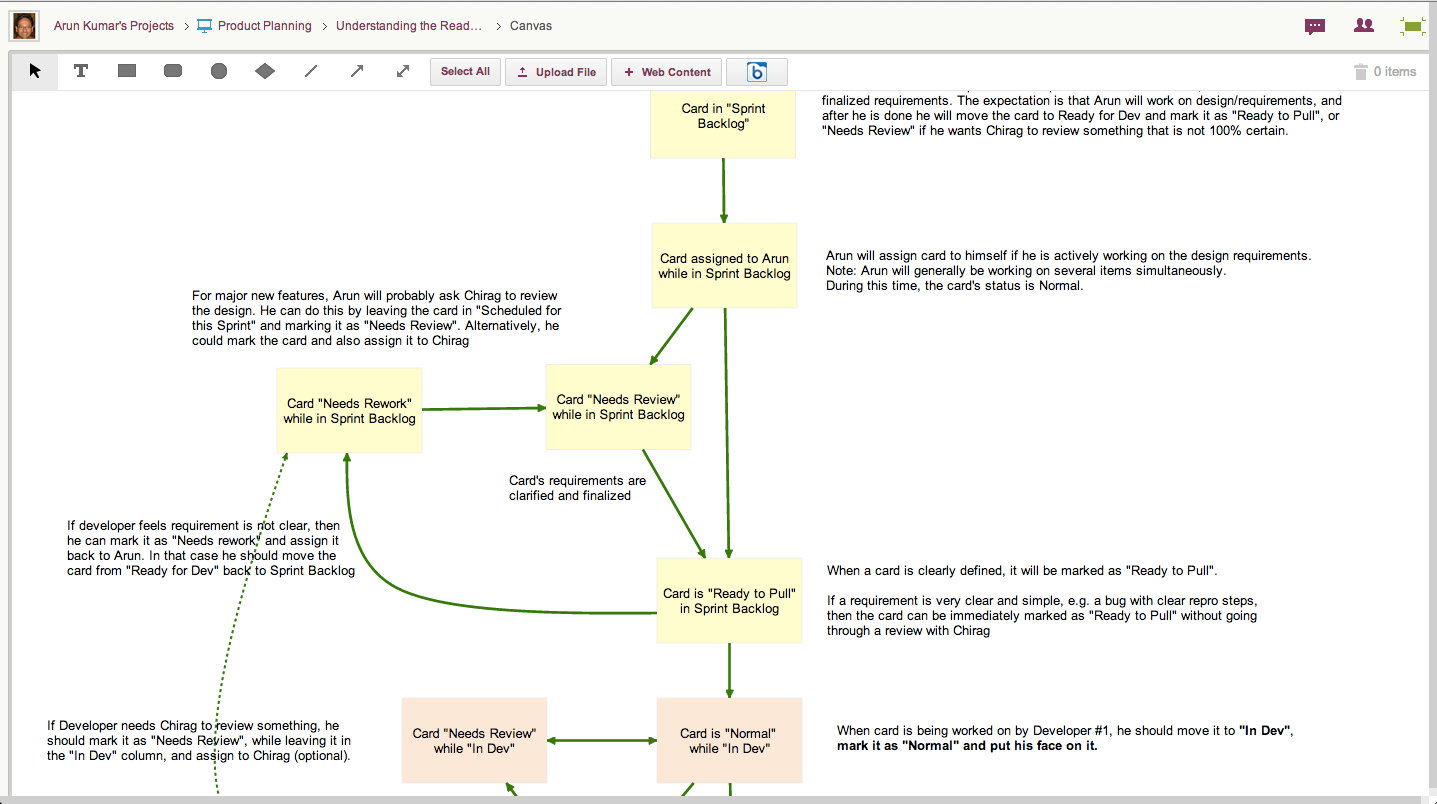
It can require a more complex workflow: for example, here’s a partial (!) view of the workflow that we adopted as part of transitioning to Pull, to make it work within our constraints:
Understanding the Pull Model
Pull is best implemented in conjunction with Work-In-Progress (WIP) Limits, which is a feature that we will be adding shortly to Kerika.
So, how should you use “Ready to Pull” as a status indicator?
If you are working in a push model, there’s nothing to do: you don’t need this feature.
If you are working in a pull model, whenever a user is done with a piece of work, she should mark it as “Ready to Pull”, and then take her name off the card.This will clearly signal the rest of the team that the work item is ready to be taken on by someone else.
Another question answered on LinkedIn’s Scale Agile group: The team is facing a high Technical debt before adopting Scrum. Now, they want to fix this. How could they include this in the Sprint?
If you already have a lot of technical debt, I would recommend that the first few Sprints do nothing but clear the most expensive debt.
The trick is to persuade the Product Owner that this is necessary, because it means deferring any delivery of “real features” while the debt is paid down.
Note that I say “paid down” rather than “paid off”: in my experience, there is rarely an opportunity to completely pay off technical debt and have a clean Product Backlog with nothing in it but nice user stories that deliver tons of end-user functionality.
At Kerika, we have found that we accumulate some debt almost continuously, and that this is unavoidable even though we are using Scrum.
Purists might argue that a true Scrum model eliminates technical debt, but this is unrealistic when you are dealing with a fast moving market and are focused on rapidly improving your product.
Periodically, we devote an entire Sprint to paying down technical debt. We did one fairly recently because we are in the process of adding some substantial new functionality: Kerika will now become the first Scrum/Kanban/Scrumban tool that has full integration with both Google Drive and Box for sharing project files within distributed team ;-)
Because this was a major platform enhancement, we took a 3-week Sprint to pay down our technical debt by clearing a bunch of bugs and server exceptions that individually were never going to make it to the top of the Product Backlog.
The Kerika tool makes it really easy to tag items, so it was easy for us to find all the bugs that were in our (rather large) Product Backlog and we cleared nearly 50 items.
Actually, this was our second debt payoff Sprint this year: in April, the Heartbleed scare prompted us to do a full internal review of our security processes, which morphed into a full review/overhaul of our QA and other software development infrastructure/process stuff, and we spent an entire Sprint to significantly clean up a bunch of stuff that had been moldering a while.
For what it’s worth, we generally do an all-hands-on-deck Sprint to pay down debt: we don’t try to sneak in any new product features because I find that it sends a confusing message to the team about the importance of paying down the debt.
I said earlier that often the big challenge is convincing the Product Owner of the need to devote a Sprint or two to pay down debt; in our case that’s relatively easy because I am the founder/CEO and buy into the idea ;-) but I do believe that if you are going to pay down debt, you need to do it with serious intent and get everyone focused on that, which means the Sprint is all about debt, not new goodies.