We have added more options for you to add Google files to your Whiteboards.
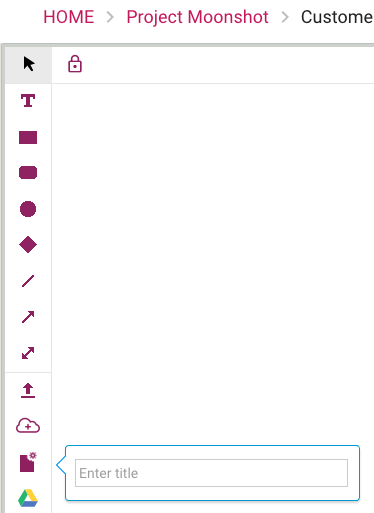
We used to have a quick way to create, name, and add a new Google Doc to your Whiteboard:
Old options for adding content
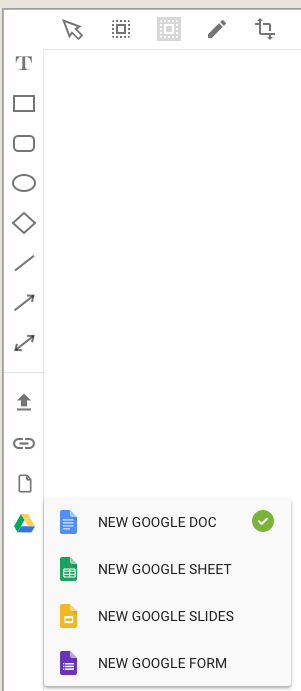
As part of our big redesign earlier this year, we added more options for people to create Google documents from within Task Boards and Scrum Boards; now we have the same flexibility for Whiteboards:
Google document options
With this new functionality you can create a larger variety of Google Documents from within your Kerika Whiteboards:
Google Docs
Google Sheets
Google Slides
Google Forms
After you name your new document, it is automatically added to the canvas you are working on, while the new document itself is opened in a new browser tab for you to start working on.
If you are still using Windows 7, please use Chrome or Firefox instead of Internet Explorer 11 (or, worse yet, an even older version of Internet Explorer).
We are not in a position to support Internet Explorer on Windows 7 anymore: for one thing, we don’t have any PCs running Windows 7 anymore. And Microsoft itself has stopped selling Windows 7 several years ago, and mainstream support ended two years ago.
We realize that some of our enterprise customers are forced to stay with Windows 7 because of legacy systems that don’t work well with newer versions of Windows, but supporting Windows 7 is not something we are in a position do, or have any interest in pursuing.
With our big UI redesign, launched a couple of weeks ago, we have started using lazy loading of cards in an effort to improve performance, particularly with very large boards.
Background:
Most Kerika boards tend to be small, or moderate: up to 100-200 cards in size. A few users, however, have very large boards: several thousand cards in size!
And this is not because we have users who are tracking thousands of work items simultaneously; it’s just that some users have been continuously using the same board for years to track all their work.
For people who use the same board over several years, the number of items in the Done or Trash columns can eventually number in the thousands. Displaying such large boards was already difficult in our old architecture: we had underestimated how many cards some boards might contain, so our old design downloaded all the cards on a board every time it was opened, and then created a DOM for each card!
This meant that, for very large boards, the browser had to create thousands of DOMs before it could even display the board. This was obviously not a sustainable model.
What we did:
With our redesign, we have laid the groundwork for a better architecture using two related concepts in lazy loading:
For columns that we anticipate being very large — the Done, Trash and Backlog columns for Task Boards and Scrum Boards — the browser now fetches only a small number of cards, say 10-20, from the server. (With our old design the browser would fetch every card, for every column.)
Fetching fewer cards means the amount of traffic between the browser and the server decreased dramatically, but it didn’t solve the performance problem by itself. We also changed our browser code to reuse DOMs instead of creating new DOMs. By reducing the total number of DOMs created and maintained within the browser by the Kerika app, we are able to reduce Kerika’s overall browser footprint while significantly improving performance.
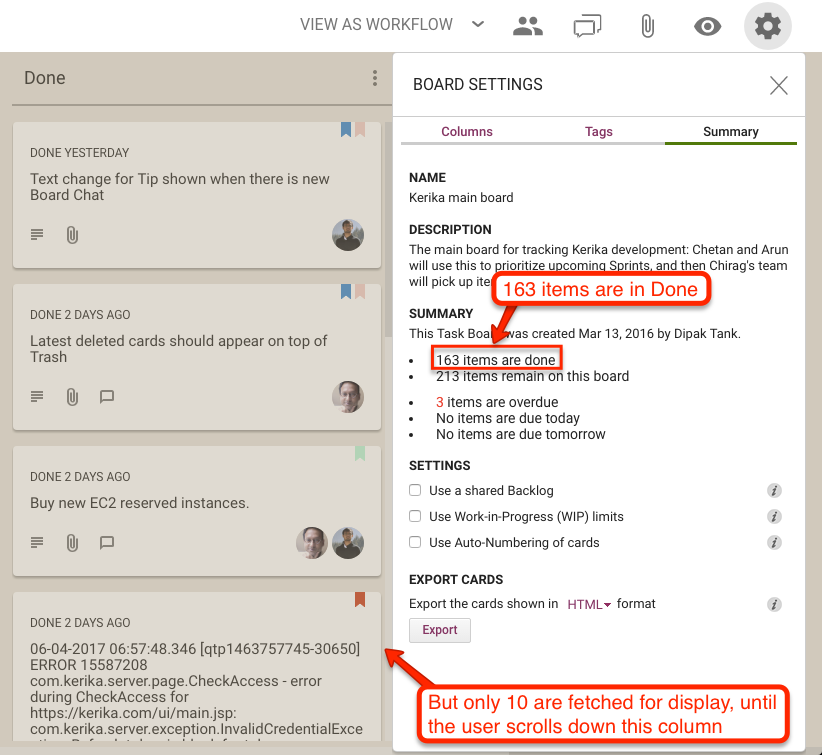
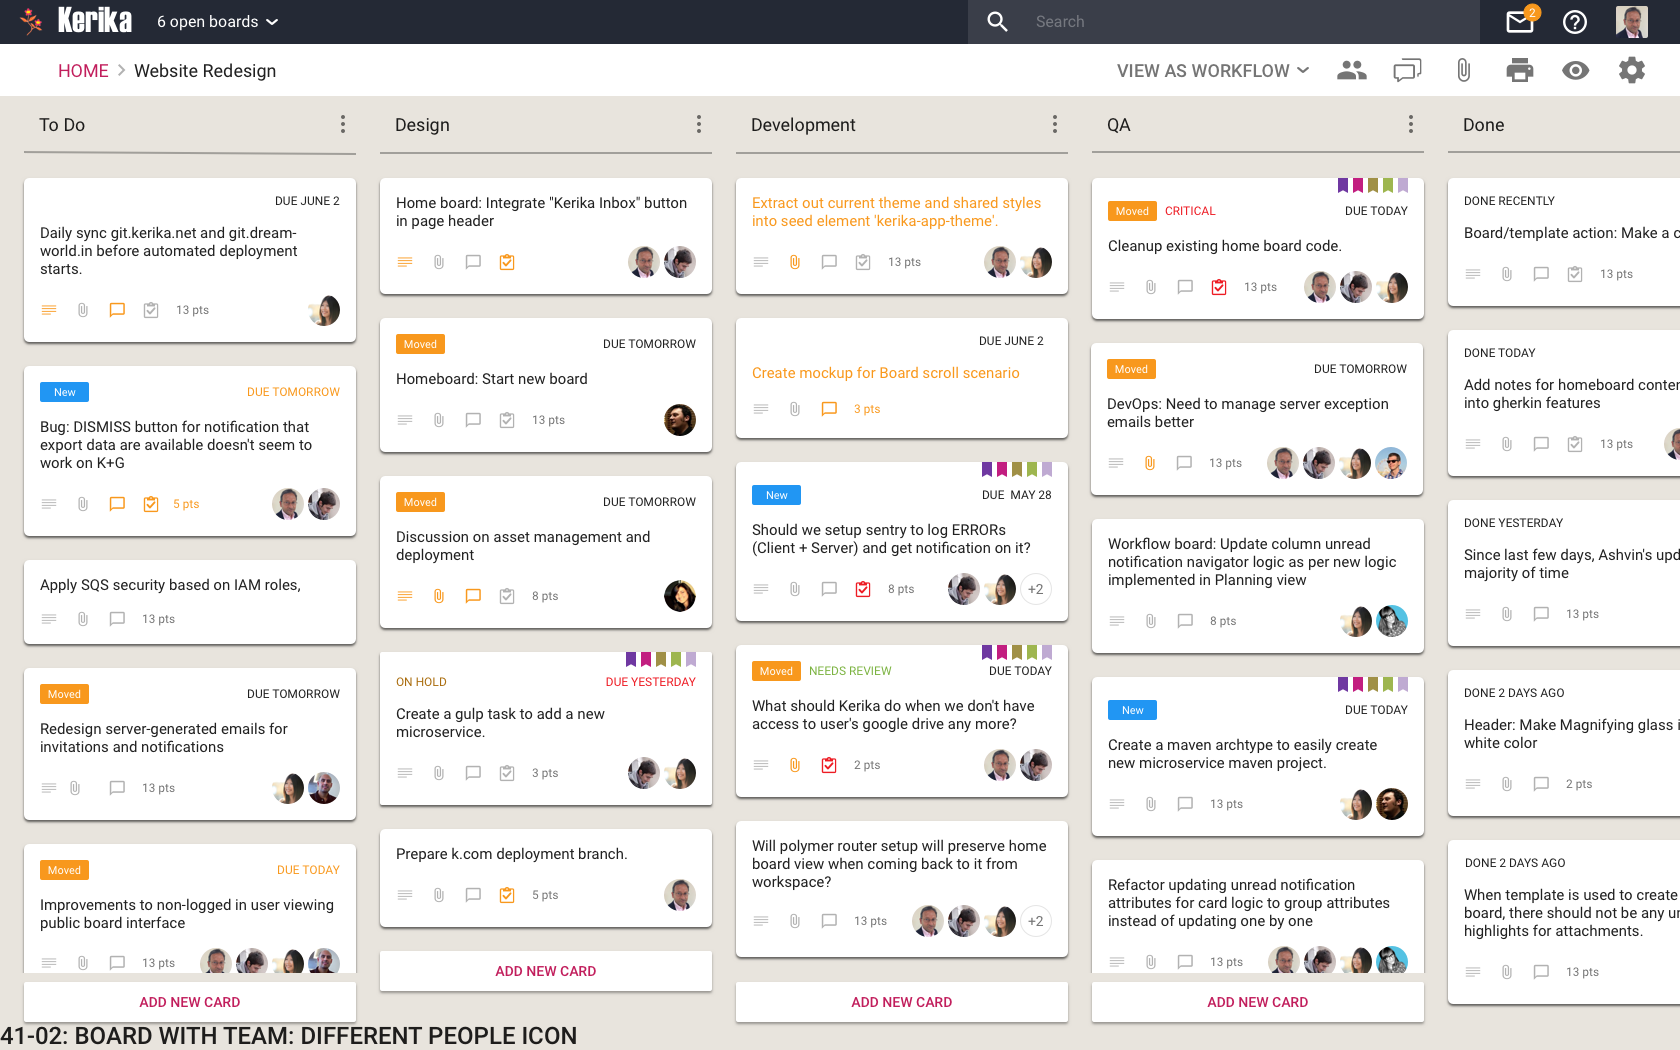
Here’s an example of lazy loading of the Done column:
Lazy loading of Done column
On this board, the Done column contains 163 cards, but when the board is opened only 10 are shown. Since these are the 10 most recently done cards, this works great for most users, most of the time.
If the user really wanted to see something that was done a long time ago, they can simply scroll down the Done column, as they would have with our old design as well.
As a user scrolls down, more cards are fetched automatically from the server. Slightly more cards are fetched from the server than are likely to be displayed, e.g. the browser may fetch 15 cards from the server even when it expects to display only 10.
This helps avoid the perception of delay when the browser needs to fetch more cards, since it will already have 5 more cards stored in memory to show as the user begins scrolling, giving it time to fetch another 15 before the user has finished scrolling.
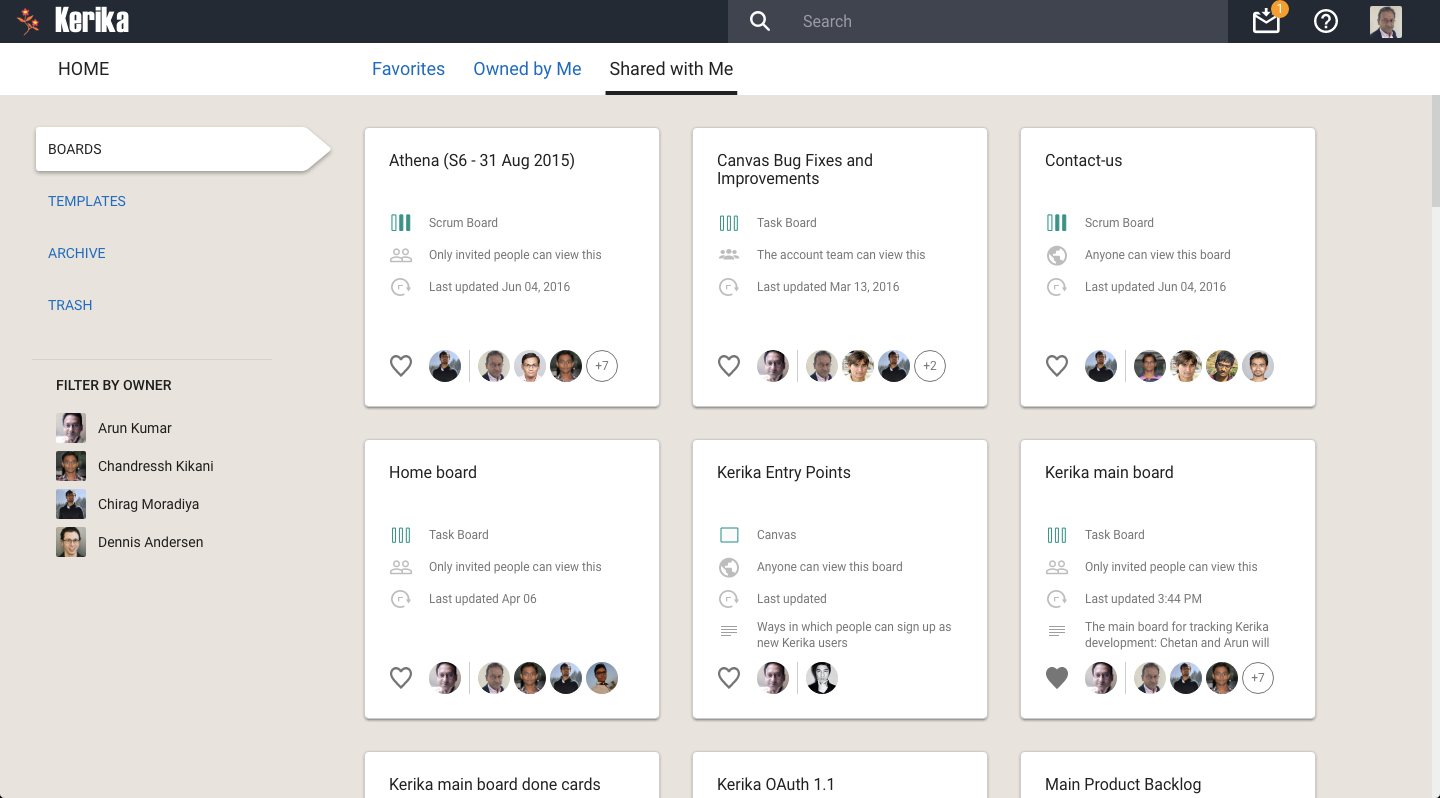
We also decided to use lazy loading on the Home page: with our new design we display more information about the state of each board than we did previously, and the cards themselves are much larger than before. This means we are unlikely to show the full set of boards to any user at any time, so lazy loading is a natural choice for this view.
Lazy loading of Home
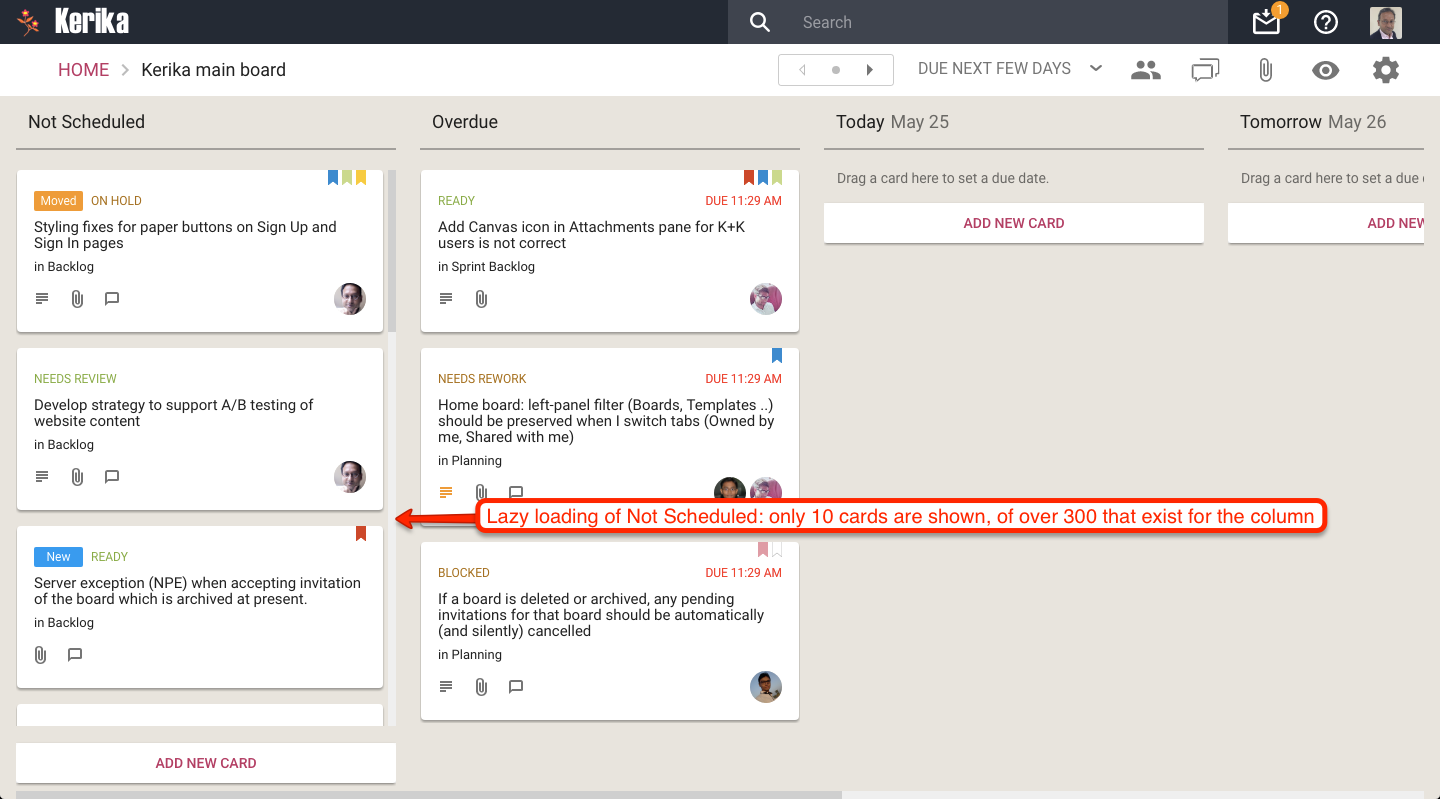
Finally, with our most recent update (launched two days ago), we have extended our use of lazy loading to include the Not Scheduled column in the Planning Views, where you can pivot your view of a Task Board or Scrum Board to see all the cards organized in terms of due dates.
Here’s an example of a board where there are a very large number of unscheduled cards:
Lazy loading of Not Scheduled
The Not Scheduled column only fetches and displays 10 cards at a time even though there are over 200 cards that are not scheduled. Since the browser (on this laptop) can only show 3-4 cards at a time, there isn’t any point in fetching all 200 cards: just fetching and displaying 10-15 at a time does the trick!
For our extensive redesign of Kerika we used the Sketch design app for the first time, transitioning way from our earlier use of Adobe’s Creative Suite.
Here’s our design effort, by the numbers:
We created a total of 937 individual screen layouts, all of which were high-resolution and pixel-perfect.
Each screen was designed for 1680×1050 pixels, which is the resolution of a 21″ desktop monitor although each design was subsequently tested on a 1400×800 laptop screen as well.
Every element on every screen was laid out to its precise final size and spacing, to create a photo-realistic view of the design.
We exclusively used vector graphics so we could scale our views for different devices and resolutions without any loss of resolution.
Every screen was mocked using real data, rather than lorem ipsum-style fake text, so we could get a more realistic idea of how much space actual cards, columns, etc. would take.
We used realistic storylines for all scenarios: user personas were developed and used consistently, so that, for example, the same person appeared as Board Admin on all screens.
Every interaction between different features was considered simultaneously, so that we could guard against edge cases where the design might clash or fail when multiple user conditions were true at the same time.
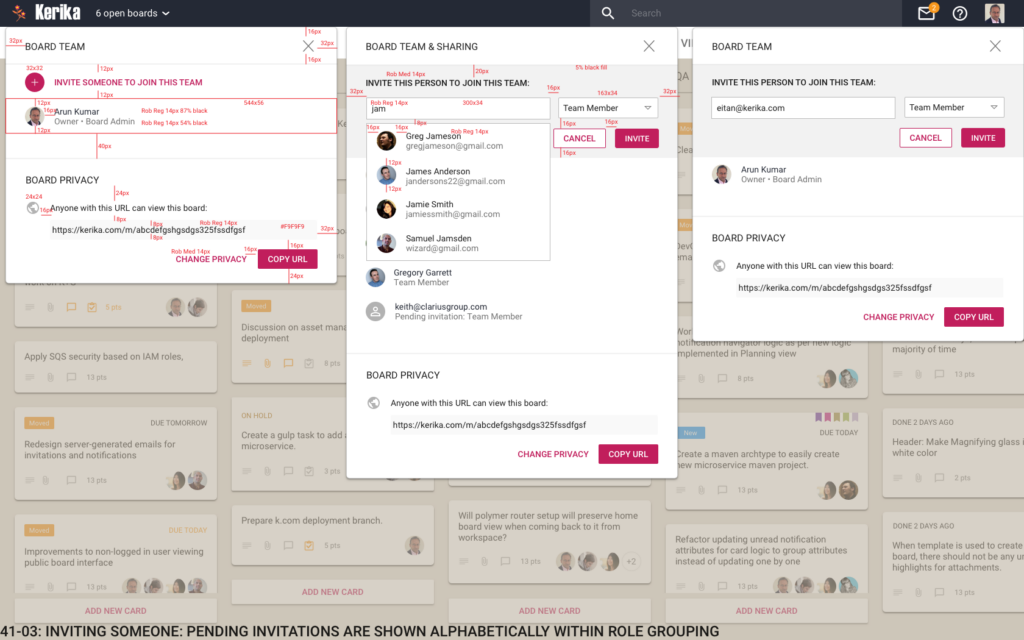
Here’s an example of a screen mockup:
Inviting someone
Here’s the same screen design, with dimensions marked as redlines:
Inviting someone (Markup)
Extensive use of symbols (repeating objects in Sketch) helped us ensure that we had consistency across all 937 designs, simultaneously.
We exported our icons using the Scalable Vector Graphics (SVG) format, rather than PNG or JPEG, to ensure there was no loss of resolution when we used these icons in the Kerika app.
Over 1.5 years, we went through 35 complete iterations of the design, where nearly all 937 screens were changed as we explored different concepts.
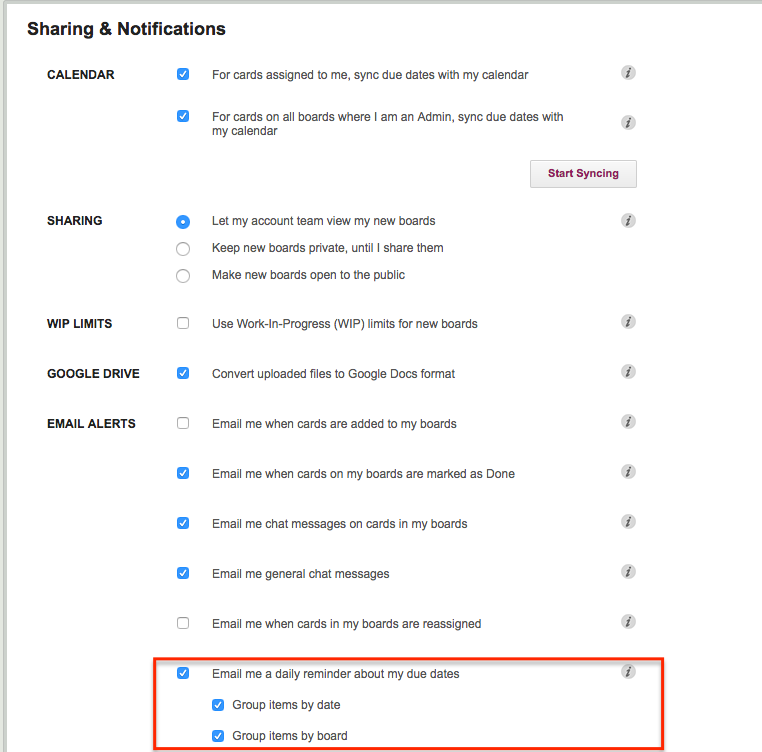
Welcome to 2017! We have a big bunch of goodies lined up for release in the coming weeks and months, and we are going to start off with some nice improvements to the 6AM Task Summary email that you can (optionally) get from Kerika:
You now have two options: you can get all your overdue and due items sorted by date, or by board. Or both.
We have also improved the “group items by date”: instead of showing what’s due today and tomorrow, this email now includes What’s Due This Week and What’s Due Next Week.
“This Week” is adjusted automatically as the week progresses to keep track of what’s left for the current week, which always ends on Sunday.
Unexpected bug we encountered recently: an attempt to sign up as a Kerika user, using our direct sign up process, failed.
When we looked into the error logged on our server, we discovered that this user was trying to enter a first+last name combination that came to 42 characters; our code assumed that no name would exceed 40 characters in length.
Digging a little further into the user scenario, we discovered that these were accounts that were being opened in the name of organizations, or departments within an organization, rather than actual people.
So while 40 characters may have been enough for most “real people” names, it wasn’t enough for department names, e.g. something like “Kerika Marketing Communications Team”.
We spent hours recently trying to understand why a particular user wasn’t able to join her coworkers boards, before finally figuring out that it was her company’s “email sandboxing” that was messing up Kerika’s invitation flow
The problem was a real nuisance to debug, and we fear it will affect more of our users in the future so we are going to make a change to our invitation process to make sure it continues to work well for everyone.
Some background:
“Email sandboxing” refers to a process that tries to trap malicious URLs that are included in emails. While the exact implementation varies by security vendor, the basic process is the same: use a virtual machine as a sandbox, and click on every URL contained within an email.
This can trap a lot of malware emails. If the URLs are designed to be single-use only, i.e. the URL is unique and intended to be clicked upon just once, the sandbox will “explode” the mine before the user gets to it.
More sophisticated implementations of sandboxing will handle multi-use URLs by watching for return traffic from the sender’s machine, which would indicate (potential) attempts to download malicious software onto the recipient’s computer.
The problem with sandboxing:
The sandboxing approach takes the same brute force approach to all links, in all emails, without trying to understand the context of the email itself.
One consequence may be that “Unsubscribe” links contained in newsletters are clicked on automatically by the email sandbox virtual machine, so the recipient gets just one copy of a newsletter that she signed up for.
To get around this, systems that generate emails automatically, like a newsletter, have to move from a one-click unsubscribe (which would be more user-friendly) to a two-step unsubscribe process (which is more annoying to the user.)
You will have seen the two-step unsubscribe process more and more often in your own newsletters and other mass mailings: you click on the “Unsubscribe” link in a newsletter, and you land on a web page where you are asked to, once again, confirm that you want to unsubscribe.
The user might think this is a last-ditch attempt by the newsletter publisher to hold on to their readers, but it might actually be an attempt to safeguard the newsletter’s subscribers from their own brute force security implementations!
How this affected Kerika:
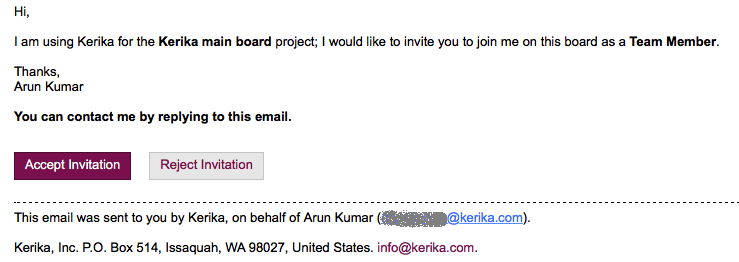
When you invite someone to join your Kerika board, as a Team Member, Board Admin or Visitor, the invitation gets sent to them by email as well from within the Kerika app. The emailed invitation looks like this example:
Example of invitation email
The email contains two links: the most prominent is the Accept Invitation, but there’s also the Reject Invitation.
Email sandboxing plays havoc with this sort of email invitation: there is an equal possibility that a particular sandbox will click on the Reject Invitation link before it clicks on the Accept Invitation link, which leads to a completely random experience for users who are being invited by the coworkers to join Kerika boards, since Kerika lets you act just once upon an invitation: once you accept it, or reject it, you can’t act upon it a second time.
How we discovered this problem:
One of our users, based in California ,was trying — repeatedly and unsuccessfully — to invite another user, based in Taiwan, to join one of her boards, and the process kept failing.
And for the longest time we couldn’t figure out why!
Our debugging seemed to suggest Kerika itself was somehow auto-rejecting invitations on the user’s behalf, which had us really worried about a serious bug in the server before one of our developers got the idea that perhaps the problem was with the user’s email system, and not Kerika.
When he examined the headers on an email we got from the affected user, he found references like these:
Received: from mail1.bemta12.messagelabs.com (mail1.bemta12.messagelabs.com [216.82.251.10])
A little more sleuthing led us to Symantec’s “threat protection” service, which is one of the common email sandboxing systems out there.
How we are fixing this:
We are moving to a two-step process for people who want to reject invitations that come to them by email: clicking on the Reject Invitation will now take you to a Web page where you will be asked to confirm that you want to reject the invitation.
It’s one more step for users, and not the kind of superb user experience we aim for, but without this there’s no way for us to make sure that the best intentions of security vendors don’t end up crippling our own business!
We switched over to Google as the registrar for a number of our domains yesterday (we used to use a mix of GoDaddy and Register.com previously), and in the process our DNS got screwed up.
We didn’t realize this right away because it affected one of our subdomains (which meant the website itself was up and running, but one of the ways in which you can sign into Kerika was messed up.)
The basic problem was with Google’s way of handling incoming transfers of domains that have already been set up: even if you use the setting for keeping your current domains, Google doesn’t keep your current DNS settings for all the subdomains as well.
Our apologies for everyone affected by this!
Update on 10:15AM PST Oct 6:
We are still waiting for Google’s bazillion DNS servers to all get the new DNS entries. It’s a bit hit-or-miss for individual users, depending upon which Google server they get routed to when they try to login.
Here in the Seattle area, for example, we can login consistently, but we know some of our users can’t. In India it is literally a 50:50 chance that your Kerika session will connect to an updated DNS server or not. In the UK the problem seems mostly fixed now.
Interested in using Kerika for software development? Here’s a practical example, taken from one of our own boards, that highlights best practices for tracking, investigating and fixing bugs.
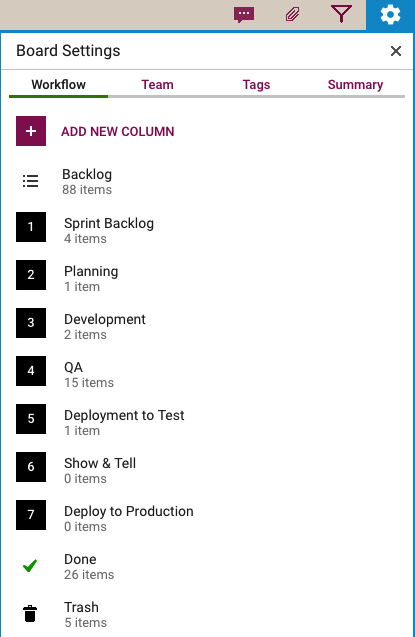
First, a look at our Workflow
Every software development team will want to set up its own workflow, of course, reflecting its internal dynamics and available resources. Here’s the Scrum Board workflow we use in our team:
Scrum Workflow
Our Scrum Boards are organized with these columns:
The Backlog contains all the ideas, large and small, that we have on our product road map: in Scrum terminology, it’s our Product Backlog.
The Sprint Backlog is the set of cards that we pulled from the Backlog at the start of this Sprint: right now, only 4 items are left as we are close to the end of our 2-week Sprint Cycle.
Within each Sprint, cards are picked up developers and first moved into the Planning column, where detailed analysis of the work to be done is completed.
Depending upon the complexity of a particular work item, a developer may request a design review before moving the card further into the Development column.
Developers do their own unit testing as part of the Development phase, but then the work item moves further down to the the QA column which frequently includes formal code review. (More on that below…)
After a bug has been fixed, had its code reviewed and passed unit testing, it gets Deployed to the Testenvironment.
We usually wait until the 2-week Sprint is over before asking the entire team to present the entire Sprint’s output to the Product Owner for the Show & Tell; this avoids distracting the team midway through the Sprint.
Once the output of a Sprint has passed the Show & Tell, it can then be Deployed toProduction.
The Done column shows all the work that got done in this Sprint. That’s where all cards are supposed to go, but sometimes a work item is abandoned and moved to the Trash.
(Side note: we sometimes use WIP Limits to make sure that people are not over-committed to work, but this is not a consistent practice within our team.)
Logging the bug
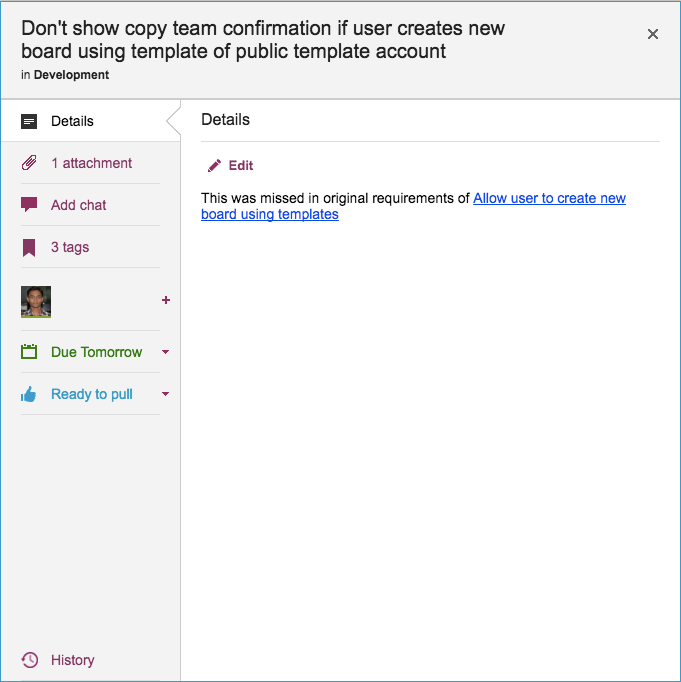
Now, let’s take a look at an example of an actual bug card that was worked on by our team:
Example of a bug tracked as a Kerika card
(This particular bug doesn’t have a lot in the details, because it is related to another task that is currently underway, and Kerika makes it easy to link cards, canvases or boards.)
Some bugs go into the Product Backlog, if they are not considered especially urgent, but others go straight into the Sprint Backlog if they represent serious production problems that might affect user’s access or the reliability of their data.
Adding bugs to the Product Backlog lets us process bugs along with other development, e.g. of new features, in the same way: everything can be prioritized by the Product Owner and handled through a consistent workflow.
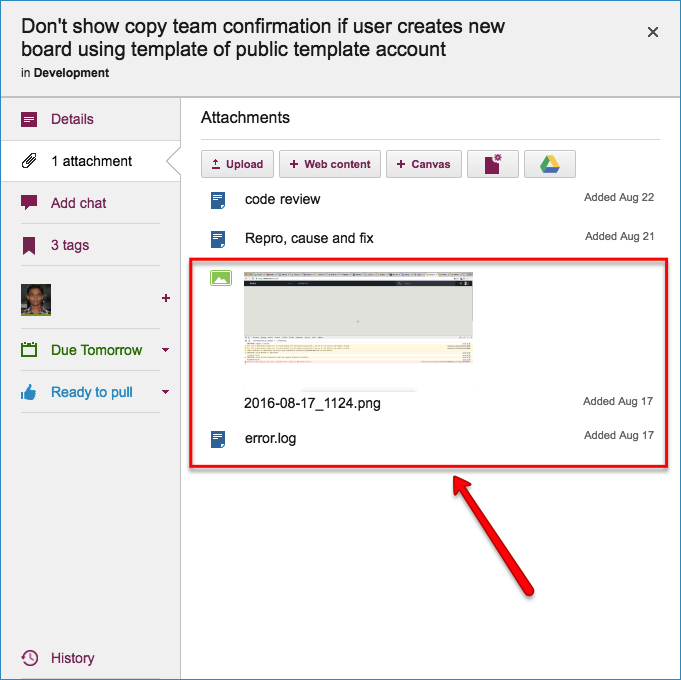
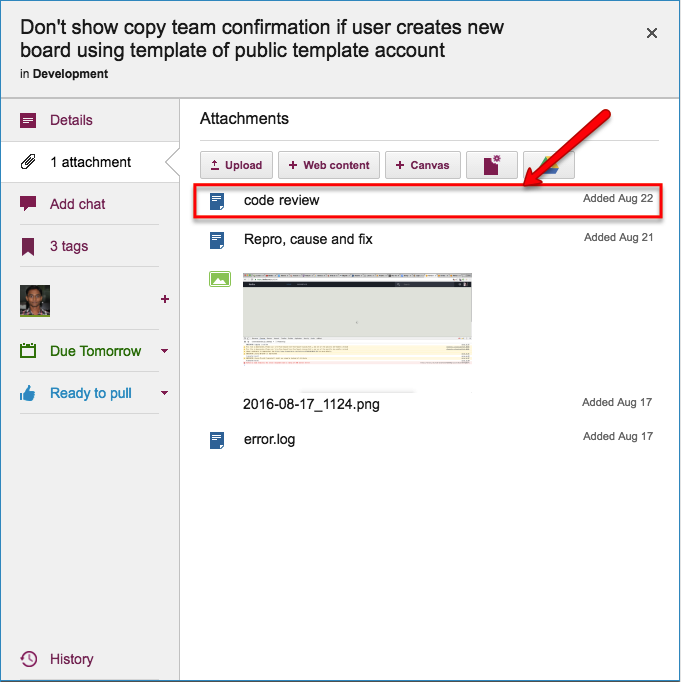
Documenting the bug
Our bug reports typically come with two attachments; at least one of these should always be included so that the developer has a clear starting point for her work:
A screenshot showing the user experience (if the bug can be observed directly by the user.)
An excerpt from the error log, if the server reported any errors around the time the bug was observed.
Original bug report documents
Kerika makes it easy to attach any kind of content to any card, canvas or board: for bug fixing, particularly in the analysis phase, this is very useful if the user needs to include URLs, material from Sourceforge or similar sites, links to Github, etc.
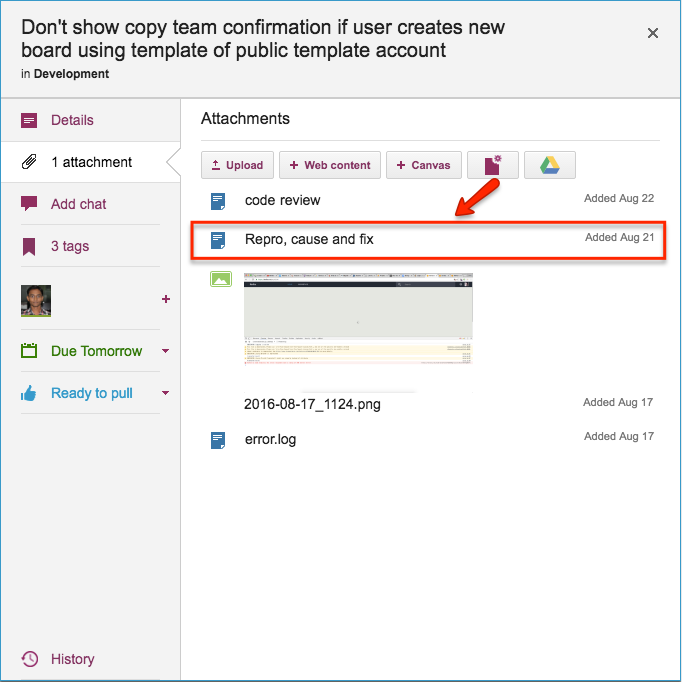
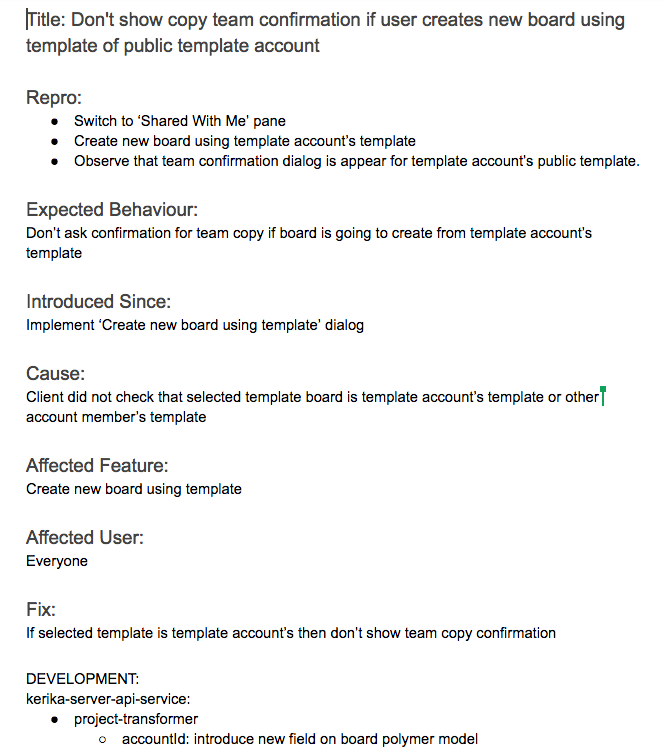
Repro, Cause & Fix
Before any bug is fixed, our developers always add a standard document we call Repro, Cause and Fix as an attachment to the card:
Repro, Cause and Fix
This document is added no matter how trivial the bug.
Why? Because, on average our team goes through about 30-40 cards a week, and has been doing so for years now. If we don’t document our analysis now, we will never recall our logic in the future.
Repro, Cause and Fix
Our team adopts a consistent layout of the Repro, Cause & Fix document, which we adhere to even for trivial bugs:
The Repro Steps are the steps needed to trigger the bug: usually they consist of a specific sequence of actions taken by a user that cause the bug to appear, but they can also consist of a sequence of events in the background, like specific server activity or memory/CPU utilization conditions, or overall network traffic, that trigger the bug.
The Expected Behavior helps clarify the developer’s understanding of the how the software should behave in this situation. It’s not uncommon for a developer who is new to the team to misunderstand how a particular feature is expected to behave, which could lead to more bugs being introduced. Clarifying Expected Behavior in this document provides an easy way for the Product Owner and the Team Lead to confirm that the developer is not going to go down the wrong track.
Introduced Since: our developers try to pinpoint the specific point in the software’s life where the bug was introduced. This helps the developers reflect upon how errors are created in the first place: the blind spots lie in their analytical patterns that need to be strengthened.
(In this particular example, the developer has been able to point back to some of her own work on an earlier feature implementation that caused this bug to appear.)
Root Cause is not the same as the Repro Steps. While a specific sequence of actions or events may reliably display the effects of a particular bug, they only provide the starting point for the analysis; the Root Cause itself is discovered only when the developer examines the code in detail and determines exactly what is breaking.
Affected Feature: all of our code goes through code review, which we view as one of the most effective QA processes we could adopt, but it can be very challenging when you are processing 30 cards each week, each affecting a different part of the software.
Identifying the Affected Feature helps with the code review process, since the reviewer can consider the bug fix in the larger context of the feature that’s being modified. Without this, it is doubtful that we could review so many changes each week.
Affected User: in most cases, this is “everyone” we offer the same Kerika to all our users, whether they are on free trials or have paid for professional subscriptions.
Identifying Affected Users is useful, nonetheless, when dealing with bugs that are browser-specific, or service-specific: for example, determining that a particular bug affects only Kerika+Google users, or only Internet Explorer users.
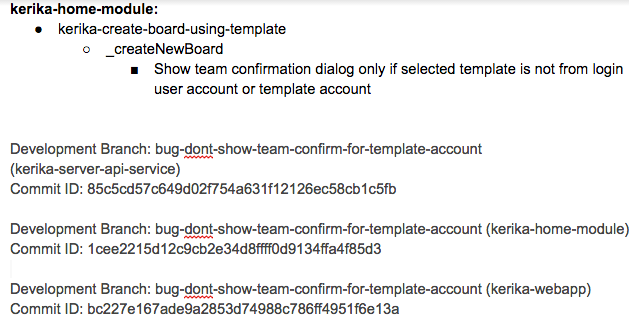
The Fix: OK, this might seem obvious, but this section really refers to identifying the specific modules in the software that will be changed as a result of the bug fix being applied.
Like many others, we use Git for managing our source code — along with Maven for builds — since our server environment is all Java-based.
The Fix
The Fix section usually includes references to Git checkins: this helps with future bug fixes, by making it easy to traceback sources of new bugs — part of the Introduced Since section described above.
We use separate Git branches for each feature that we develop so that we can decide precisely what gets released to production, and what is held back for future work.
This helps with the Show & Tell phase of our workflow, when the developers demonstrate the output of the Sprint to the Product Owner, who has the option to accept or reject specific features (i.e. cards on the Scrum Board).
Code Review
All of our code goes through code review, no matter how trivial the change:
Code review
We really believe that code reviews are one of the most effective QA practices we could adopt: having a second pair of eyes look over code can very considerably reduce the chances of new bugs being introduced.
So…
Kerika is great for distributed software teams: our own team is spread out between Seattle and India (roughly 10,000 miles apart!), and all of our work is done using Kerika for task management, content management and team collaboration.
Of course, an added benefit of “eating our own dogfood” is that we are highly motivated to make sure Kerika is the best tool there is for distributed teams :-)