An updated primer, showing for organizations that are using G Suite (formerly known as Google Apps for Business) can install and authorize Kerika for their domains:
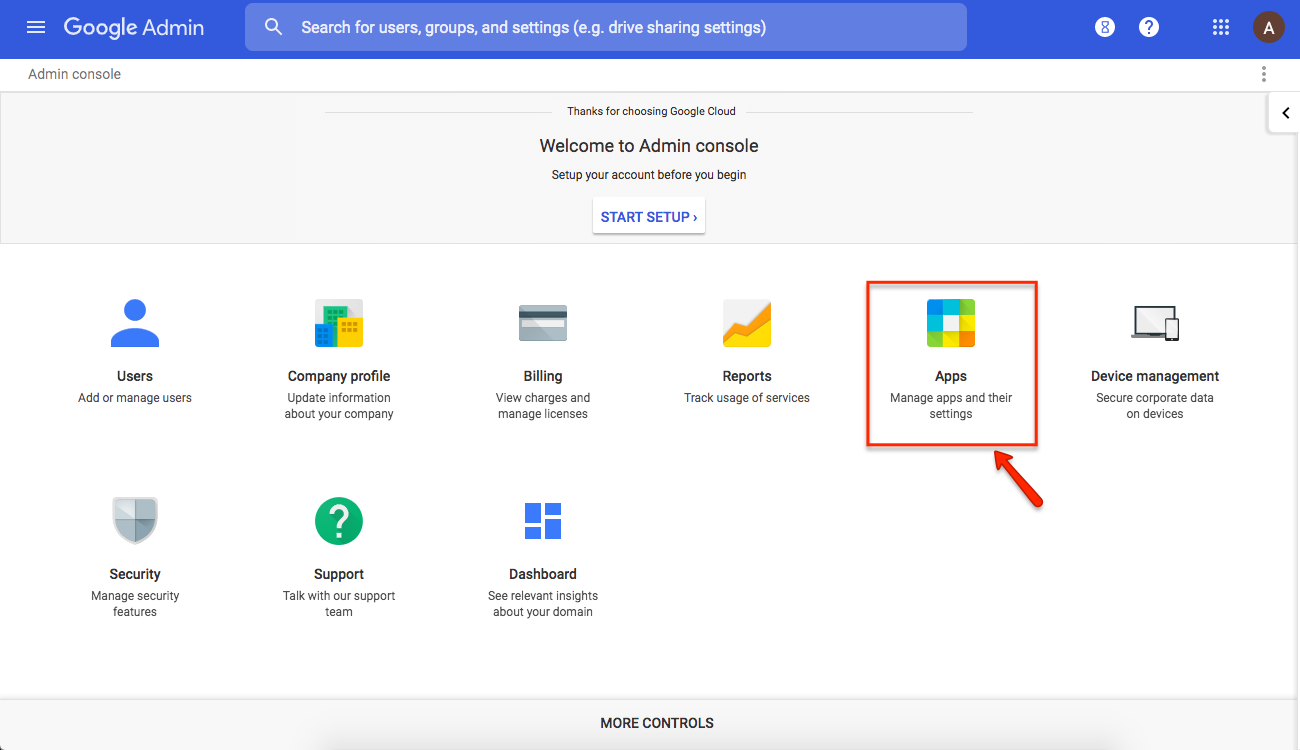
The organization’s Google Admins (and there’s usually more than one such person) can view their Google Console at https://admin.google.com: click on the Apps button.
Start at the Google Admin Console
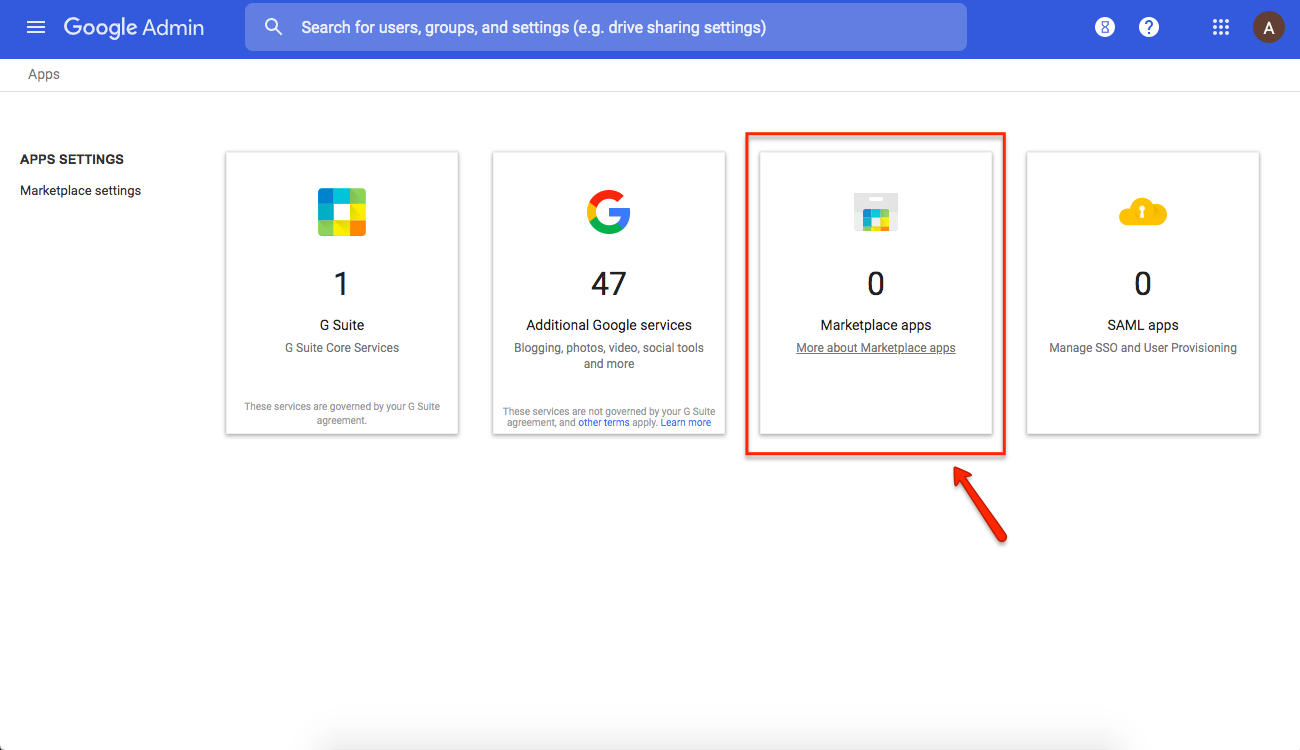
2. This will take you to all your Google-related apps.
Kerika falls into the Marketplace Apps category, so click on that button.
Go to Marketplace Apps
(All the other buttons are for apps from Google itself; Marketplace is where third-party vendors like Kerika show up.)
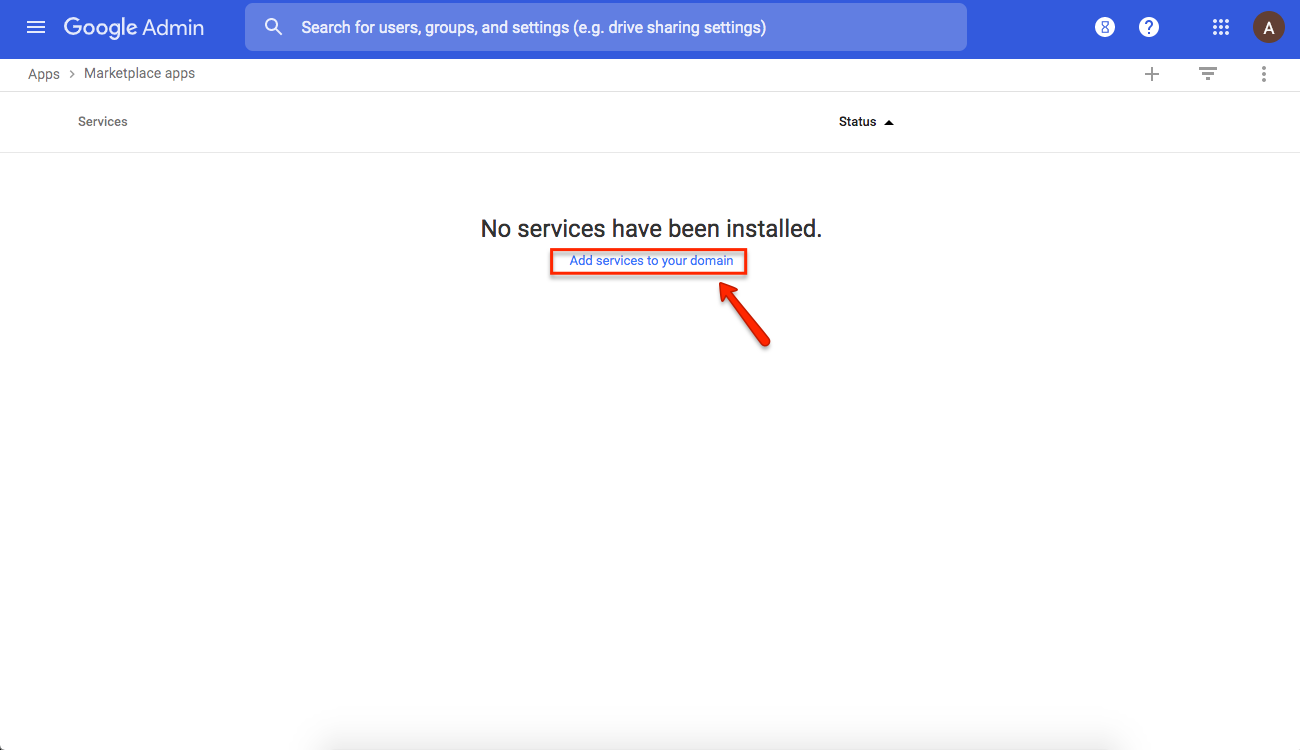
3. Click on Add Services
This will take you to the G Suite Marketplace
Add services to your domain
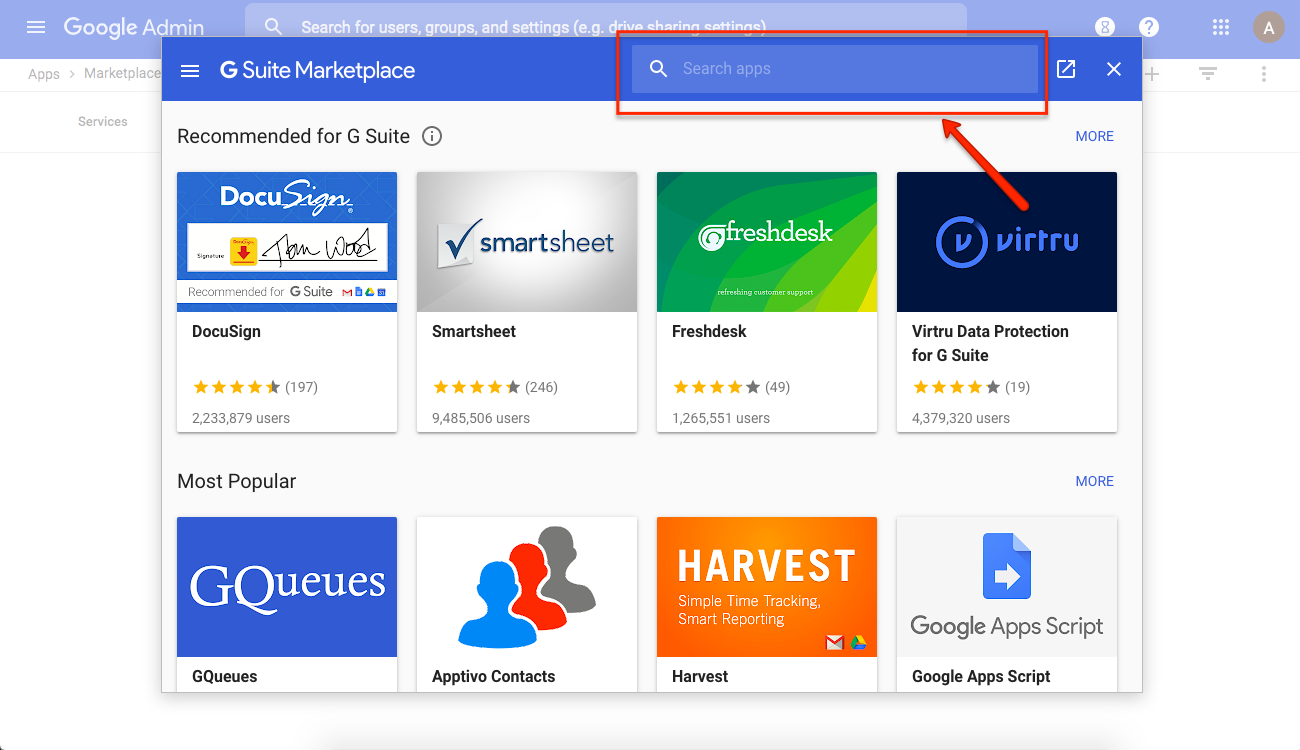
4. Search for Kerika
It would be nice if Kerika showed up right away, but you need to search for it in the box shown below:
Search for Kerika
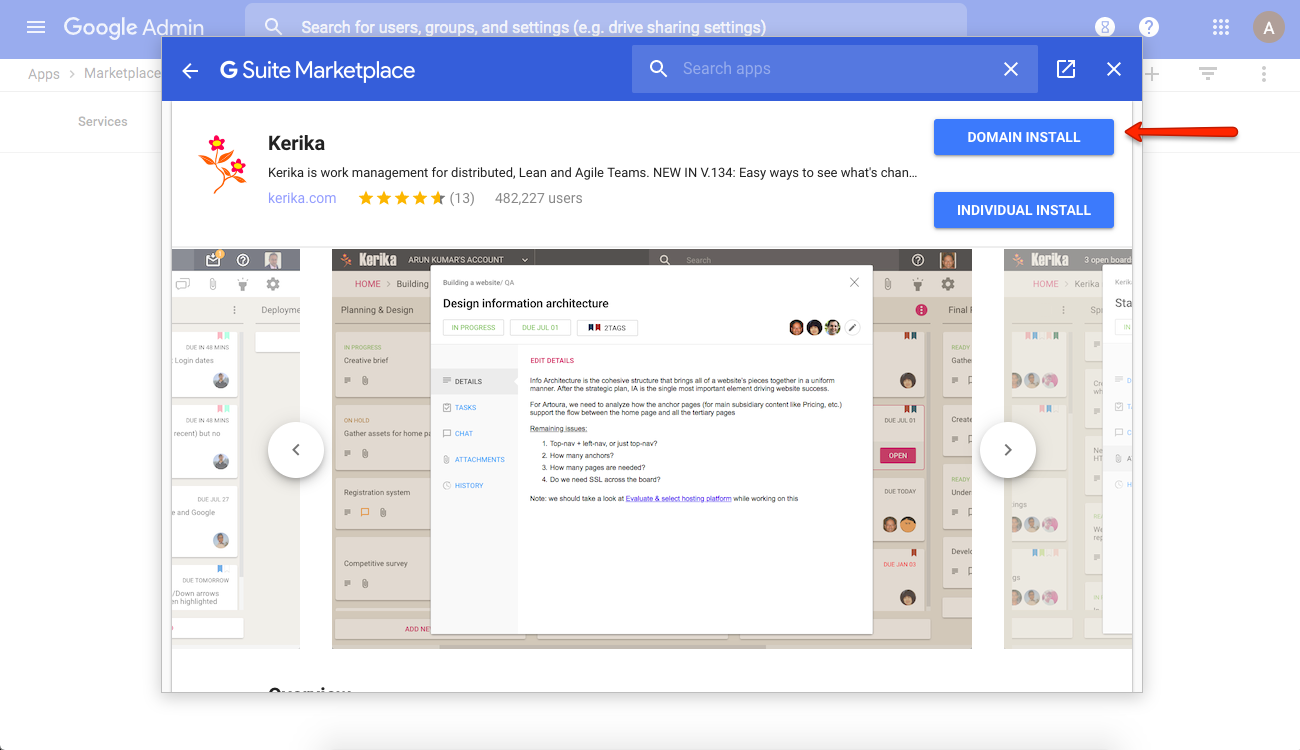
5. Select Domain Install
The Domain Install option will allow everyone in your organization to use Kerika:
Click on Domain Install
6. Accept the Terms
Accept the Terms
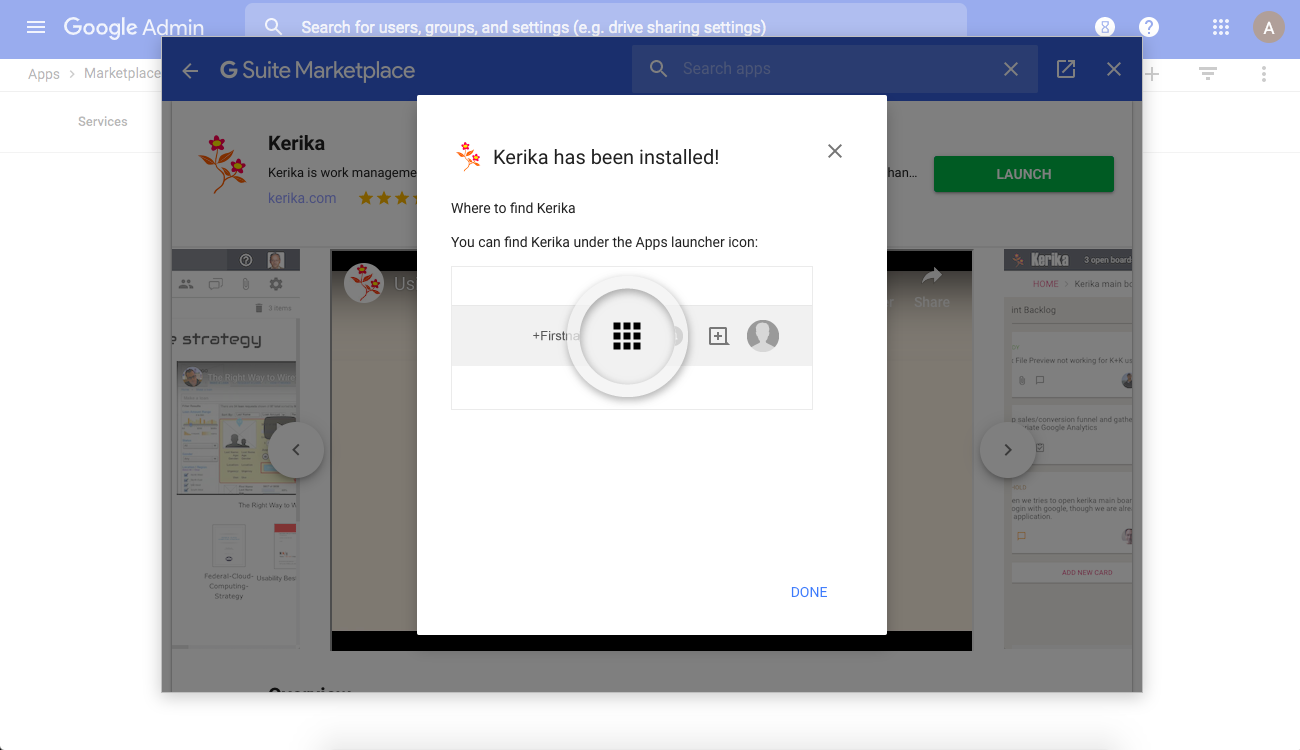
7. Success!
Kerika is now installed for your organization’s use:
We are making a significant change to how we store and manage project files for users who sign up directly (using an email), and we are getting close to finishing our internal testing. Here’s what’s coming, and why.
Background:
Previously, when someone signed up directly (with an email address) Kerika would automatically create a new Box account linked to that user, and use this account to store the user’s project files.
This was done by Kerika’s servers: our end-users didn’t have to do anything and, in fact, had no direct access to these Box accounts.
The trouble with this approach is that we ended up with three islands of users: people who had signed up with their Box IDs (Kerika+Box); people who had signed up with their Google IDs (Kerika+Google); and people who had signed up directly.
These islands were isolated: you could collaborate only with users who had signed up the same way as you had. In other words, someone who had signed up using a Google ID could not collaborate with someone who had signed up using their email, because the first user’s project files were getting stored in her Google Drive, while the second user’s files were getting stored in a Box account.
(And over time the ratio of people who preferred Google over Box became increasingly lopsided.)
New Architecture
We are now implementing a new storage model that will deliver four important benefits:
You will be able to collaborate with any other Kerika user, regardless of how the other person signed up. You can invite anyone using their email, and not worry about whether the other person has a Google or Box ID. If you accept an invitation to join a team, it won’t matter how you sign up. No more isolated islands.
Previously we would ask for access to your entire Google Drive if you signed up using a Google ID; now, we can limit our access to only those folders that Kerika itself creates and manages.
Folks coming via the Google Apps Marketplace can try Kerika without first having to get authorization from your Google Apps Admin. Authorization is actually needed only when you want to upload files to your Kerika boards.
Our direct signup users can benefit from Google Apps (Sheets, Slides, Forms, etc.) even if they had previously not used these apps. Direct signup users will be able to create new Google Docs; something that previously was limited to people using Kerika+Google.
How this will work:
Kerika will have a master Google Drive account, and inside this we will create separate, access-controlled folders for each (direct sign up) user. This will bring all the Google Docs functionality to our direct sign up users.
From a security perspective, we believe this will be good: each user’s project files are stored in a separate folder within Kerika’s Google Drive, and each user has access only to their own folders.
We believe this is good in terms of privacy, too: because Kerika has an enterprise Google Drive account, we get the additional privacy protection afforded to paid/business users of Google Apps. (Your files won’t get scanned by Google for any advertising purpose.)
We will do all the work needed to move our direct signup users from Box to Google Drive; no one should be inconvenienced!
We added ucr.edu to the list of domains that automatically qualify for free Academic Accounts: sign up with a ucr.edu email and you will automatically get a free 10-user plan.
In our previous blog post, we explained how an Account Owner can remove someone from their Account Team, or reduce their role to a Visitor. Both options can help if you want to reduce the cost of your Kerika subscriptions, since you don’t have to pay for Visitors.
Once the number of Team Members and Board Admins in your Account Team falls below the licensed (paid-for) amount, you can shrink your subscription count as well.
(You need to reduce the size of your active Account Team first, before you can reduce your subscription count since Kerika automatically checks to make sure you are paying for all of your current Team Members.)
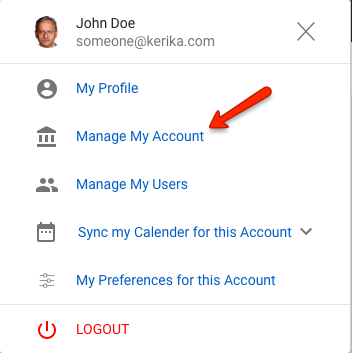
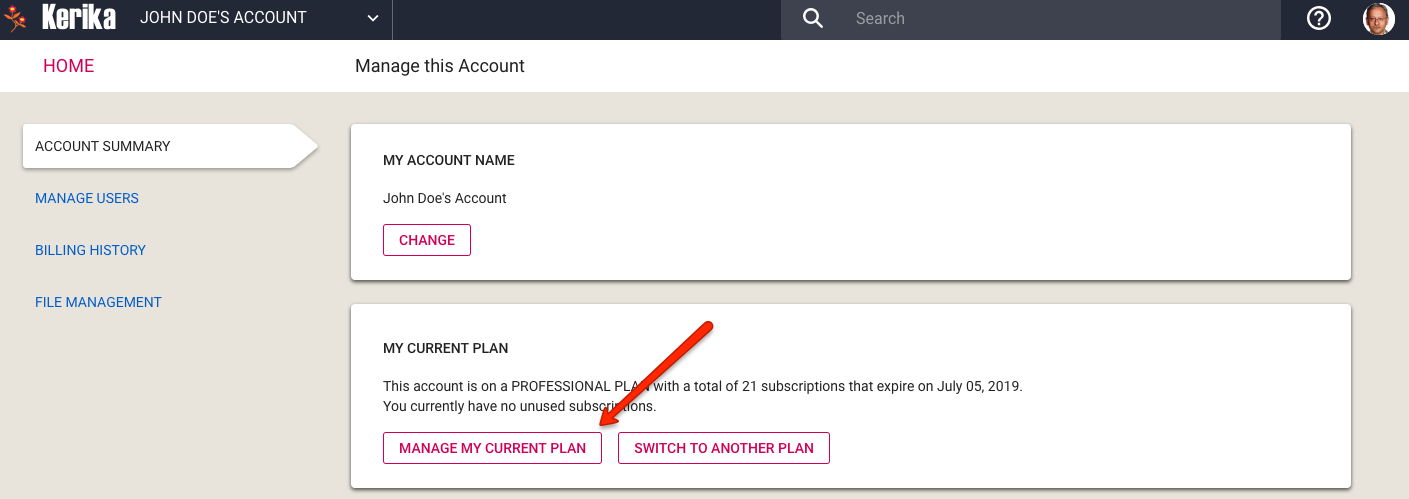
To manage your subscriptions, click on your photo/initials on the top-right corner of the app:
Manage Subscriptions Step 1
A dialog will appear; select the Manage My Account option:
Manage Subscriptions Step 2
This will take you to your Account page inside the Kerika app:
Manage Subscriptions 3
A section within this page shows the size of your current plan, and whether there are any unused subscriptions. If you had followed the steps for reducing the size of your Account Team, you should have unused subscriptions shown, as in the example above.
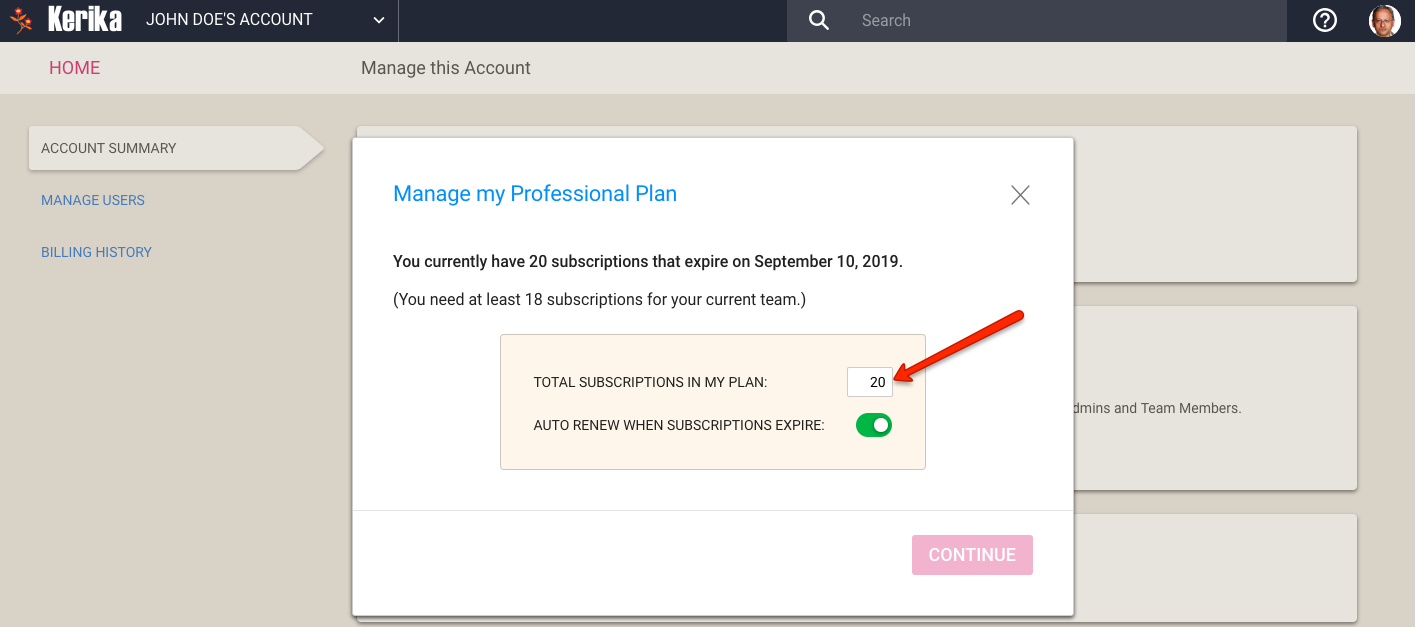
Click on the Manage My Current Plan button, and you will see a dialog like this:
Subscription Count
In the example shown above, this account has 2 unused subscriptions, and the Account Owner can reduce her Kerika plan down to 18 users. When the subscription plan size is changed, Kerika calculates whether you are owed a refund or need to pay more (if your plan increased in size).
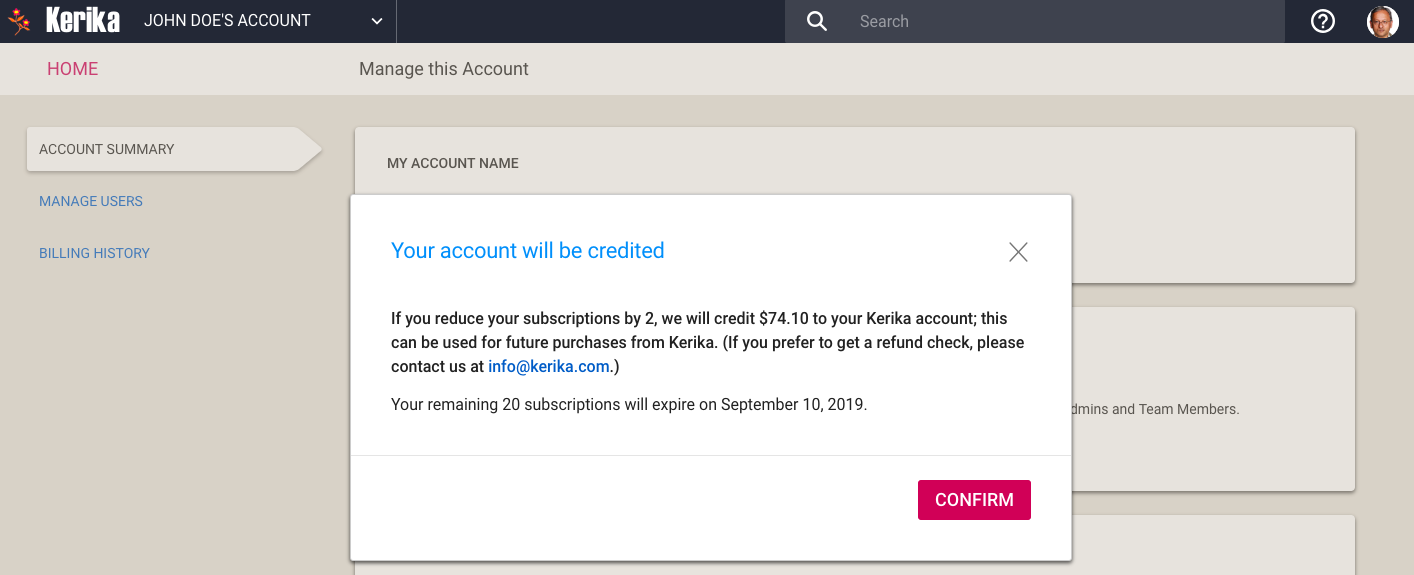
This calculation is based upon the number of days left before your existing subscriptions expire. In this example, the user can get a refund of $74.10:
Request Credit
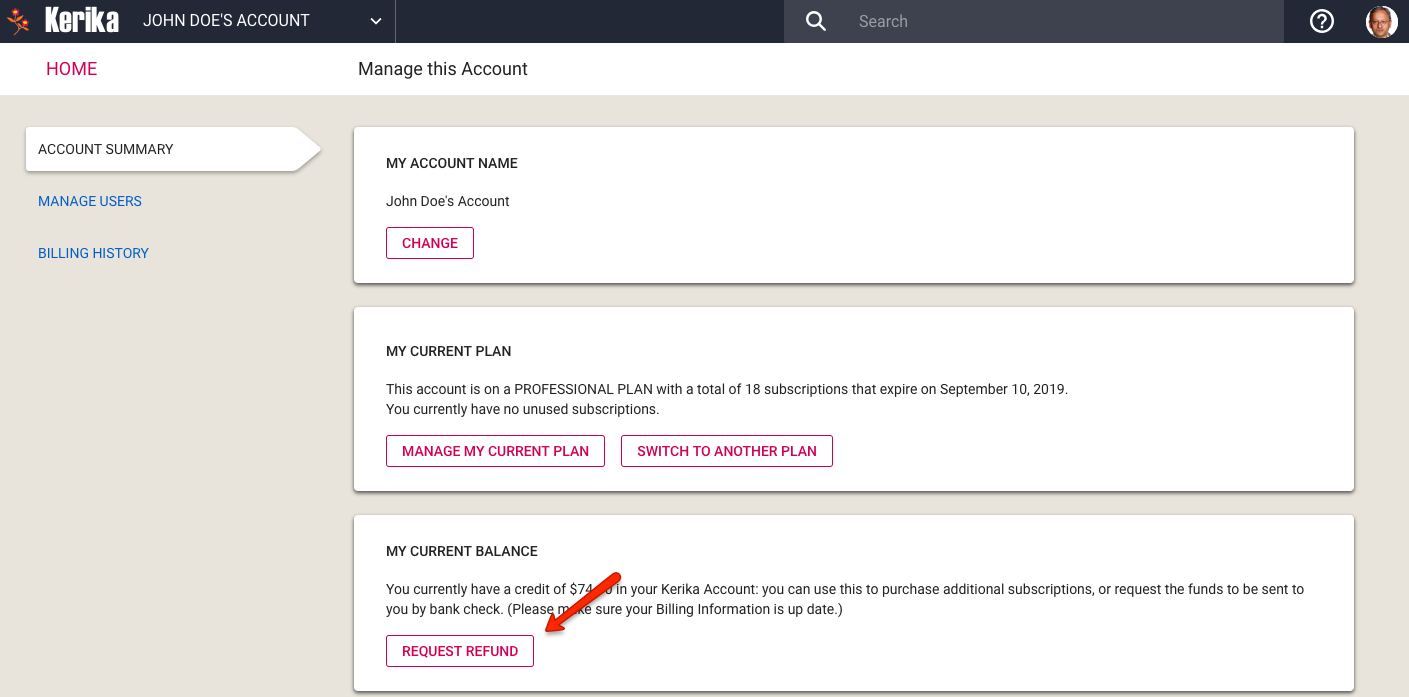
After confirming her request, the user’s Account Summary page now reflects the credit she has gotten by reducing her plan size:
Request Refund
Most people leave the credit in place because small changes in their Account Team are expected, both in terms of reducing Team Members and increasing them.
If you are sure that you will never use the credit, you can click on the Request Refund button (shown above) and a refund check, drawn in US dollars from a US bank, will be sent to the user’s billing address. (So make sure your billing address is up to date!)
We have added the University of Malaya to the list of domains from which people can automatically qualify for a free Academic Account: anyone signing up for Kerika+Google with a um.edu.my email — students, teachers and administrators — can automatically qualify to have up to 10 Team Members working on boards owned by their account.
Kerika works well on modern browsers, but we still occasionally get folks trying to sign up using an obsolete or very old browser. (For example, Internet Explorer is obsolete; you need to use Microsoft Edge.)
To handle this, Kerika checks the browser information returned by your computer when you try to sign up or login, to weed out the unsupported old browsers.
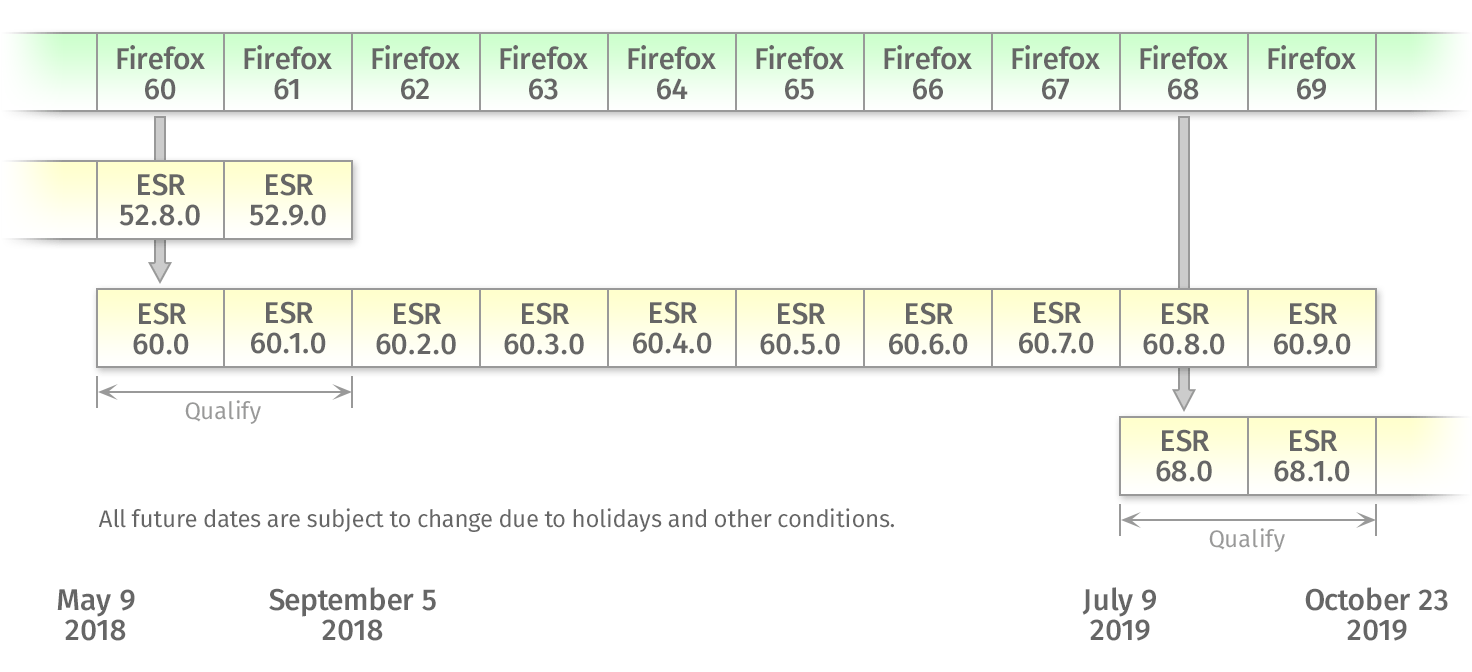
We have expanded this now to make sure organizations that are using Mozilla’s Extended Support Release (ESR) program to manage their Firefox deployments are not hindered. Based upon this chart from Mozilla:
It looks like ESR 60.3.0 is equivalent to regular Firefox 63, so we now let people using this ESR (or newer) to use Kerika.
We have added temple.edu to the list of domains that automatically qualify for free Academic Accounts — just sign up with your @temple.edu email and you can have up to 10 Team Members working on the Task Boards, Scrum Boards and Whiteboards owned by your account.
Here’s a feature that we suspect most people probably don’t know about: you can embed a live Twitter feed on any Kerika Whiteboard.
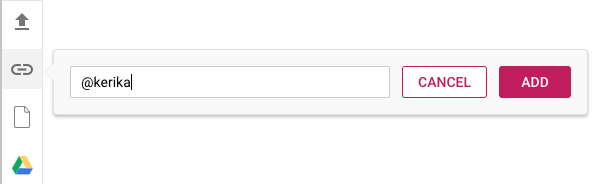
While working on a Whiteboard, click on the Add Web Content button that appears in the left-hand toolbar, towards the bottom:
Adding Twitter feed to Whiteboard
You can reference Twitter feeds with a simple “@” symbol: you can add Kerika’s Twitter feed just by typing in “@Kerika”.
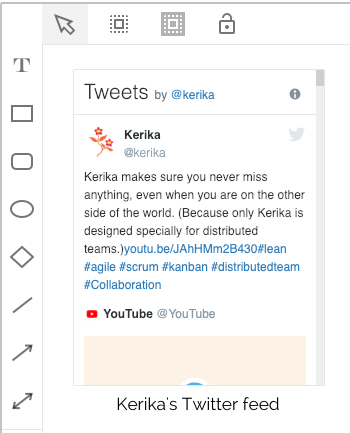
The Twitter feed appears as a live object on your Whiteboard:
Live Twitter feed on Whiteboard
You might find it convenient to rename the URL to something more descriptive: you can do this by selecting the object and using the right-mouse button to get this menu:
Renaming Twitter feed for WhiteboardEmbedded Twitter feed on Kerika Whiteboard