Managing access to your project boards is a key part of keeping your work organized and secure. Whether you’re working on a private team project or something meant for wider collaboration, privacy settings let you control who can see and use your boards.
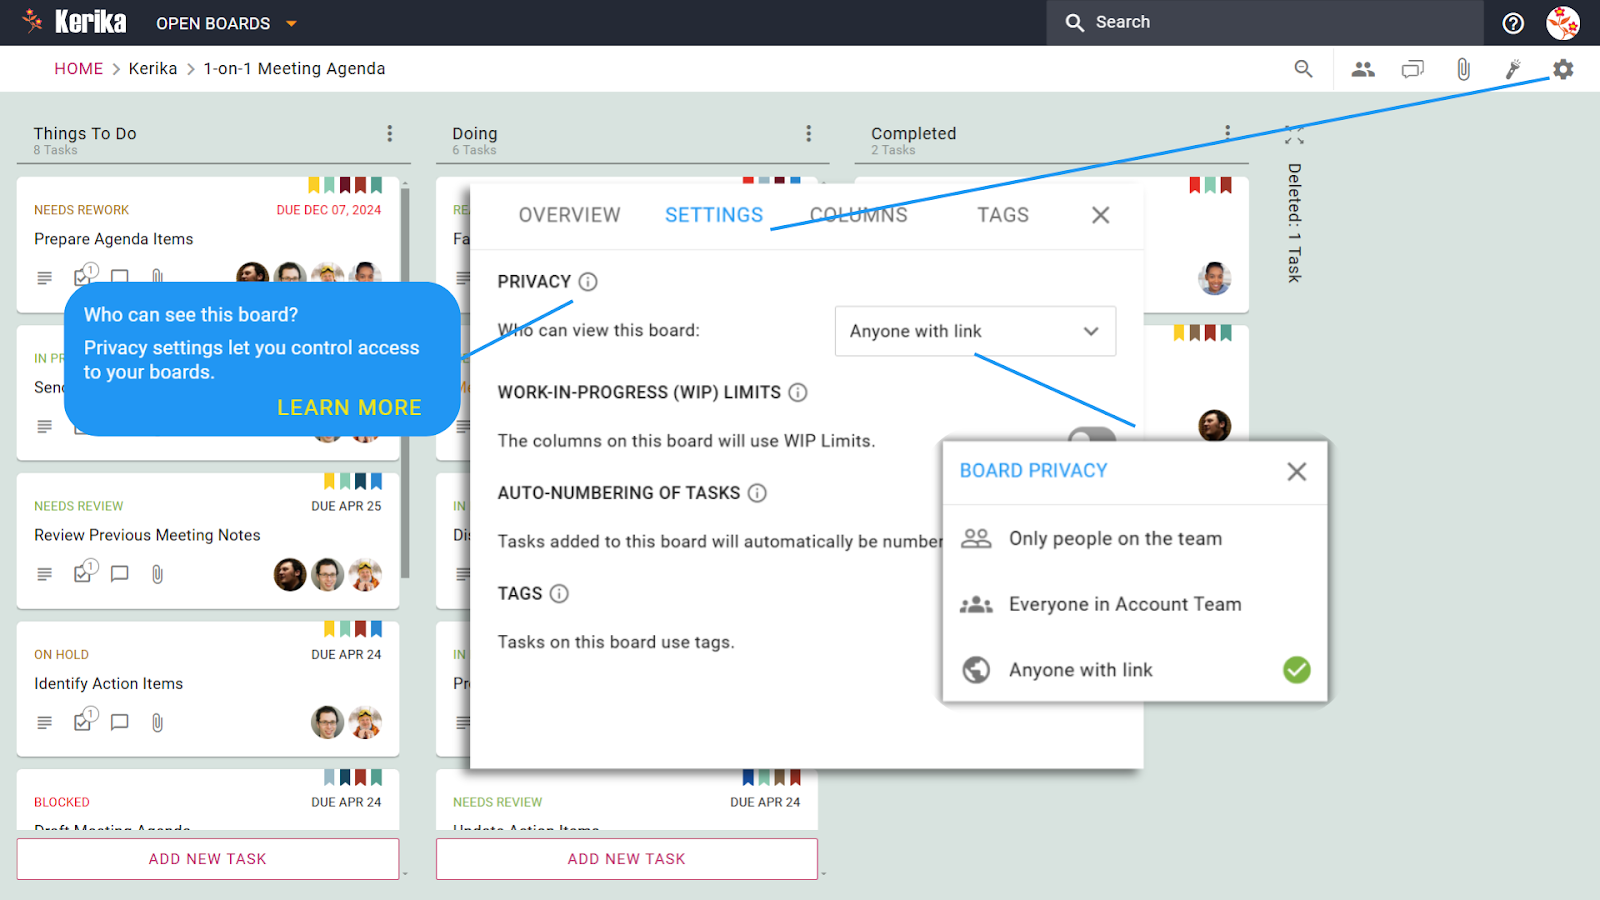
Only People on the Team:This setting ensures that only the people explicitly added to the board can see or interact with it. It’s perfect for projects where confidentiality is critical, like sensitive internal workflows or restricted client projects.
Everyone in Account Team:Need a little more visibility without opening it up to the whole world? With this setting, all members within your account team can view the board. It’s ideal for internal projects where team-wide transparency is helpful, but control is still important.
Anyone with the Link:Want maximum accessibility? This option allows anyone with the board’s link to view it – even if they don’t have a Kerika account. However, keep in mind that while they can see the board, they won’t be able to make changes unless they’re explicitly added as a team member or admin.
Key Things to Know:
Public Boards and File Visibility:When you set a board to “Anyone with the Link,” all files attached to the board become publicly accessible. If you’re using integrations like Google Drive, this means those documents will also be open to anyone with the link.
Account-Specific Restrictions:If you’re using a paid Google Workspace account, Google’s policies may prevent you from setting a board to “Anyone with the Link.” This ensures compliance with organizational security protocols.
How to Adjust Privacy Settings:
Open your board and go to Settings.
Under the Privacy section, choose the level of access that fits your needs.
Save your changes, and you’re good to go!
Conclusion: Privacy settings give you the flexibility to manage who can see and interact with your boards, making collaboration secure and seamless. Whether you’re sharing with a small team or opening a board for public viewing, you’re in full control.
Assigning tasks clearly and efficiently is the cornerstone of effective teamwork. But here’s the thing: not all tools make it easy to assign tasks to more than one person. And let’s face it, many tasks often require collaboration from multiple people to get done right.
Some tools let you assign tasks to just one person, which can leave teams scrambling to figure out responsibilities. However, there’s a way to assign tasks to multiple team members effortlessly, ensuring everyone stays in sync and collaboration flows naturally.
Here’s how task assignment works and how you can break big tasks into smaller, manageable pieces using checklists:
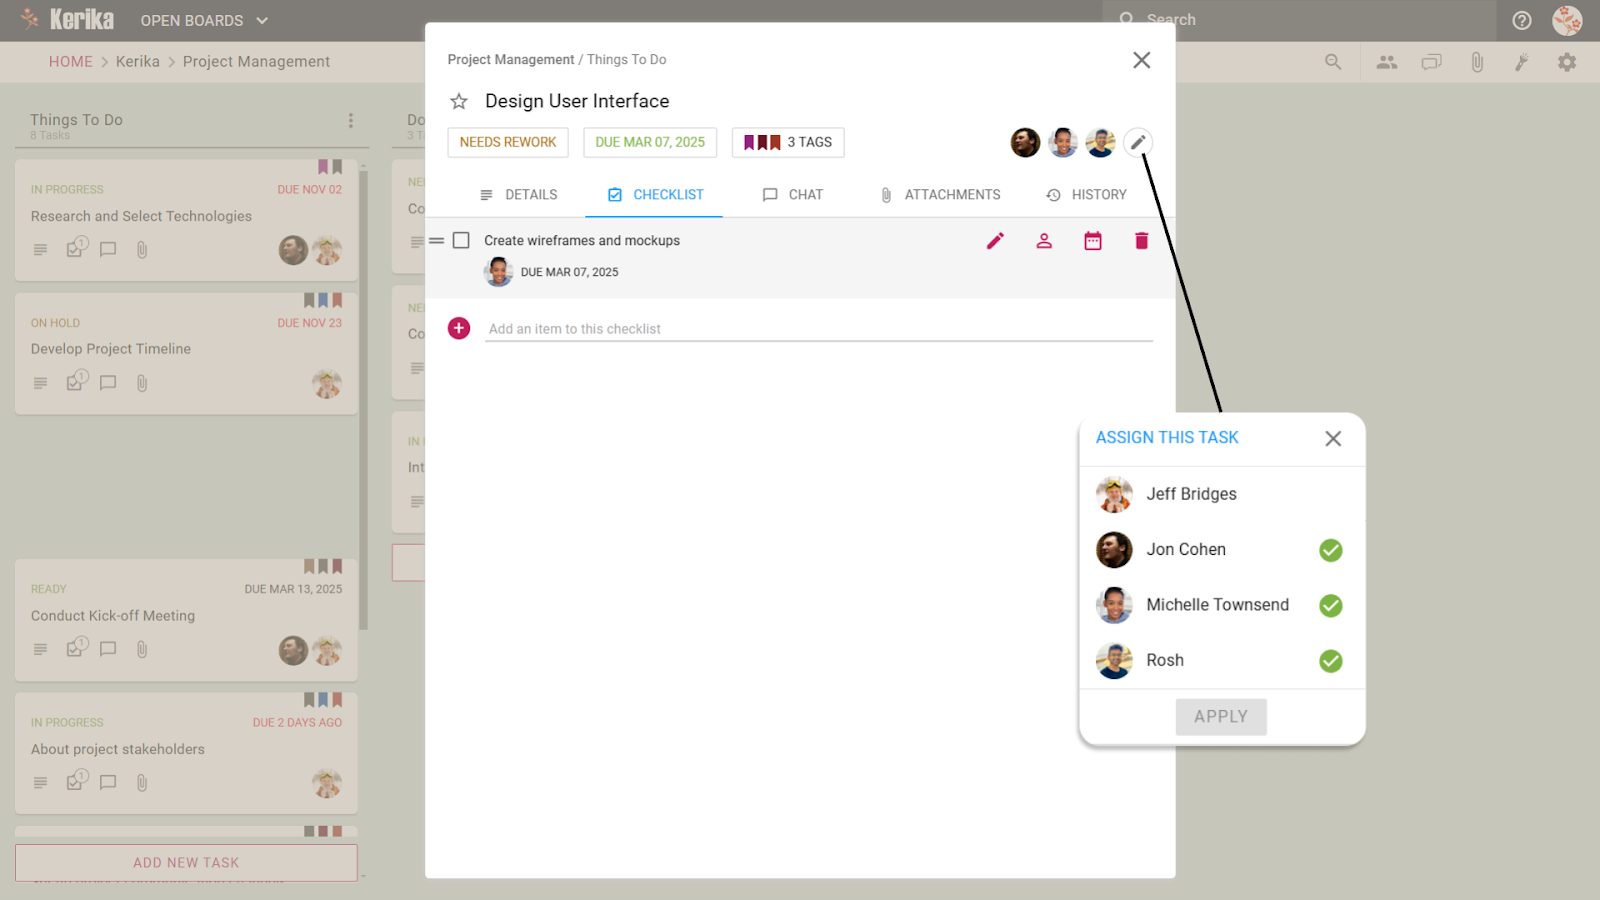
For larger tasks that need to be broken into smaller steps, Using checklists, you can assign subtasks to specific team members, ensuring every detail is handled:
Add a Checklist to the Task: Open the task and navigate to the Checklist tab.
Break It Down: Add each subtask as a checklist item.
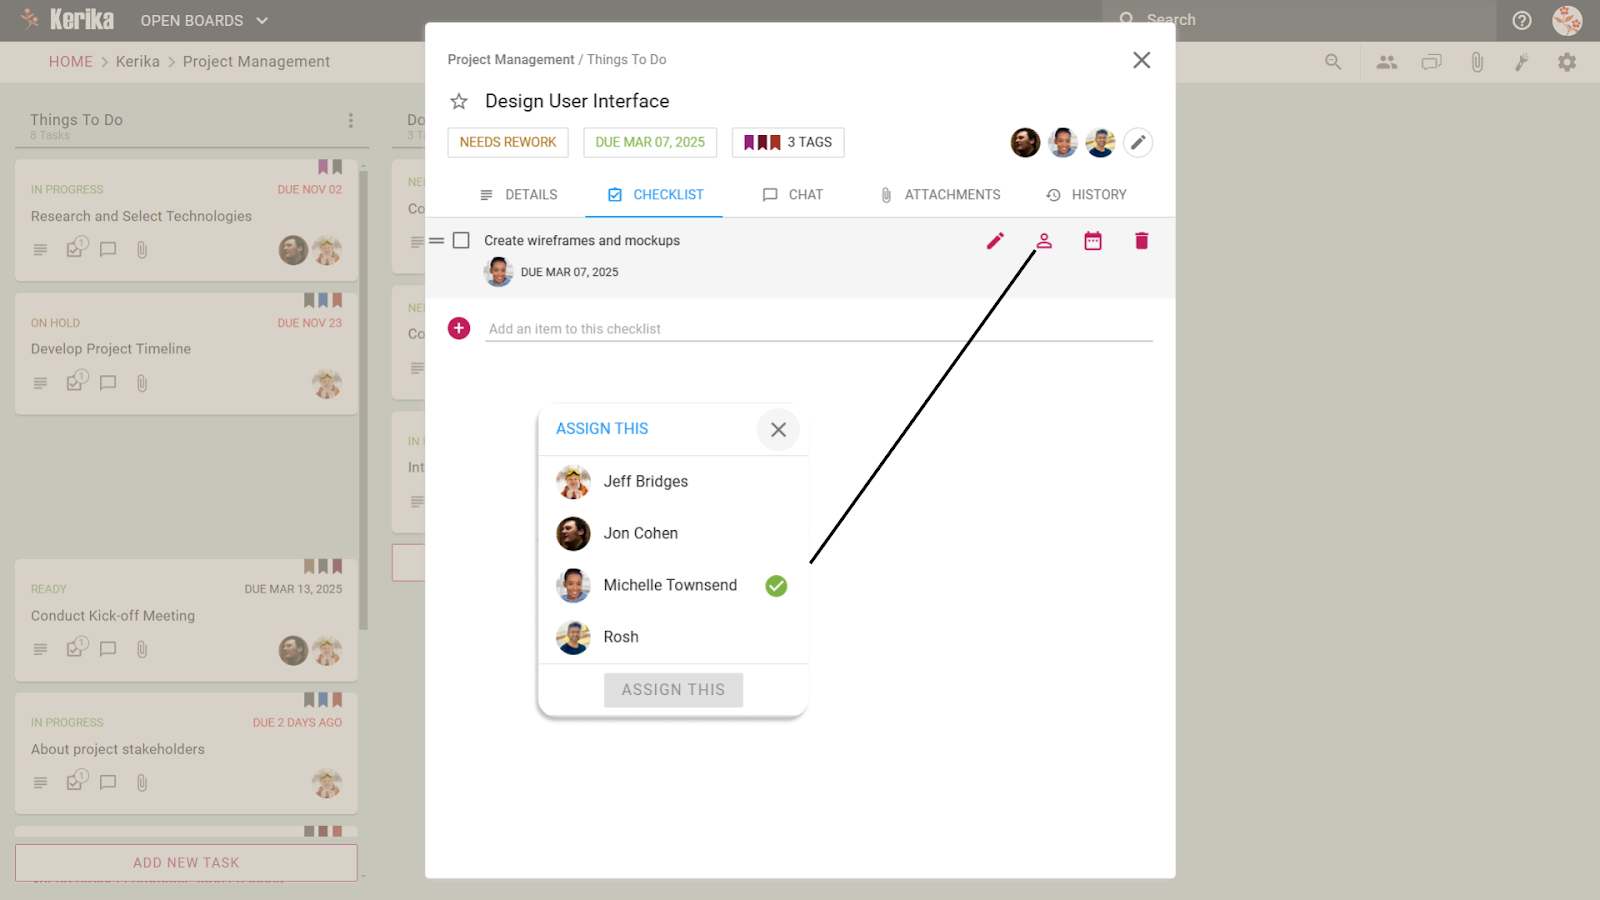
Assign Subtasks: Assign individual checklist items to one or more team members, ensuring every step has a clear owner.
Why It Works:
Simplifies big tasks by organizing them into smaller, actionable steps.
Ensures accountability at every level of the task.
Wrapping up
Efficient task assignment is key to fostering collaboration and ensuring accountability within a team. By assigning tasks to multiple teammates or breaking them into smaller subtasks with checklists, you create clarity and streamline workflows. These features allow teams to stay organized, align responsibilities, and work together seamlessly to achieve their goals.
Сарадња напредује када сви имају јасне улоге и прави ниво приступа. Позивање саиграча у ваш одбор може бити једноставан процес, који осигурава да сви – од менаџера пројеката до дизајнера и екстерних заинтересованих страна, могу ефикасно допринети.
Ево како можете да додате саиграче и управљате њиховим улогама са лакоћом:
Отворите своју таблу и кликните на Икона тима на траци са алаткама.
Унесите адресу е-поште особе коју желите да позовете.
Изаберите улогу за њих: Боард Админ, Члан тима, или Посетилац.
Корак 2: Доделите улоге
Боард Админ: Ако сте креирали таблу, онда сте подразумевано администратор одбора. Али некоме можете дати потпуну контролу над таблом, што укључује управљање члановима тима и подешавањима.
Члан тима: Може да сарађује на задацима, отпрема датотеке и доприноси одбору. Идеално за дизајнере, програмере и друге сараднике.
Посетилац: Приступ само за гледање. Одлично за спољне заинтересоване стране или клијенте који само треба да прате напредак.
Корак 3: Додајте их у тим
Кликните Додај, а ваш саиграч је одмах део одбора са улогом коју сте доделили.
Предности приступа заснованог на улогама:
Администратор одбора: Потпуна контрола за вође тима
Подразумевано, креатор одбора постаје администратор, али по потреби можете доделити администраторска права другима.
Кључне предности:
Управљајте члановима тима, ажурирајте подешавања одбора и одржавајте контролу над структуром одбора.
Идеално за пројекте са више вођа или пројектних менаџера којима је потребна једнака контрола.
Спречава уска грла ако је један администратор недоступан, на пример током одмора или других одсустава.
Администратори играју кључну улогу у одржавању одбора организованим, функционалним и сарадничким, осигуравајући да се руководећи задаци обављају несметано.
Члан тима: Оснажите своје сараднике
Чланови тима имају све алате који су им потребни да обаве посао. Они могу да сарађују на задацима, отпремају датотеке и доприносе напретку одбора.
Кључне предности:
Идеално за дизајнере, програмере и друге активне сараднике.
Одржава плочу динамичном омогућавајући практичну сарадњу уз одржавање надзора администратора.
Чланови тима покрећу пројекат, чинећи их окосницама продуктивног тимског рада.
Посетилац: Држите заинтересоване стране у току
Посетиоци имају приступ само за преглед, што значи да могу да прате напредак одбора без прављења промена.
Кључне предности:
Савршено за спољне заинтересоване стране или клијенте који само треба да виде ажурирања.
Осигурава транспарентност без угрожавања структуре одбора или тока рада.
Посетиоци су идеални за информисање свих без додавања сложености.
Закључак
Додавање саиграча треба да буде једноставно и прилагодљиво потребама вашег тима. Добро дизајниран систем заснован на улогама обезбеђује несметану сарадњу, било да радите са блиским тимом или координирате са спољним заинтересованим странама. Додељивањем правих улога, можете креирати ефикаснији и беспрекорнији ток посла за све укључене.
Collaboration thrives when everyone has clear roles and the right level of access. Inviting teammates to your board can be a straightforward process, ensuring everyone – from project managers to designers and external stakeholders, can contribute effectively.
Here’s how you can add teammates and manage their roles with ease:
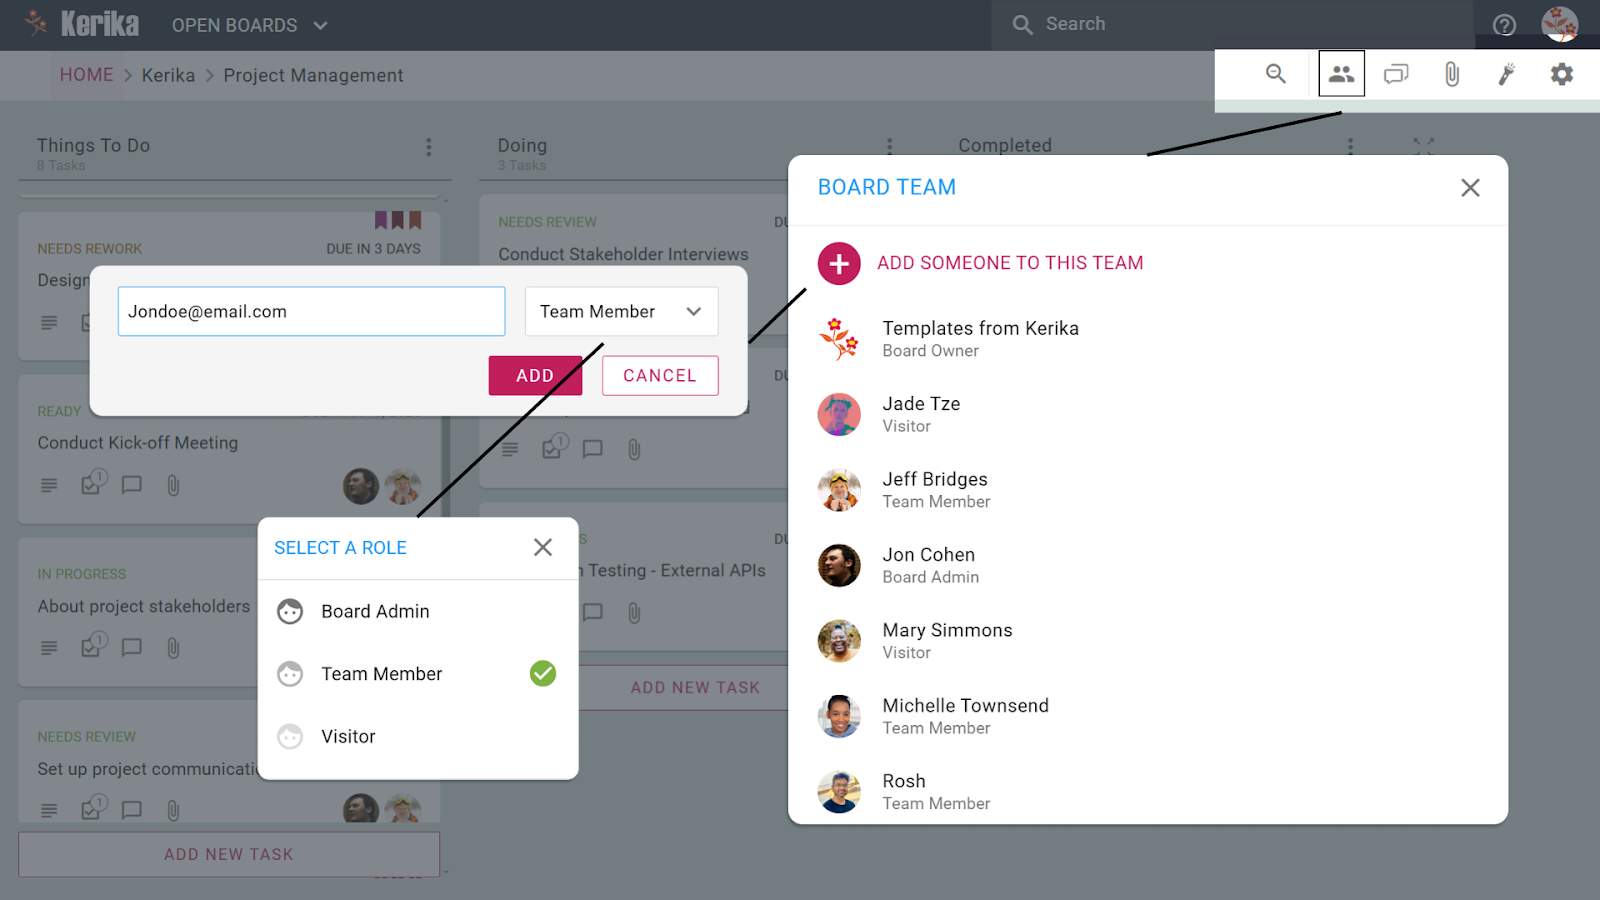
Open your board and click the Team Icon in the toolbar.
Enter the email address of the person you want to invite.
Select a role for them: Board Admin, Team Member, or Visitor.
Step 2: Assign Roles
Board Admin: If you have created the board, then by default you’re a Board Admin. But you can give full control of the board to someone, which includes managing team members and settings.
Team Member: Can collaborate on tasks, upload files, and contribute to the board. Ideal for designers, developers, and other contributors.
Visitor: View-only access. Great for external stakeholders or clients who just need to monitor progress.
Step 3: Add Them to the Team
Click Add, and your teammate is instantly part of the board with the role you’ve assigned.
Benefits of Role-Based Access:
Board Admin: Full Control for Team Leads
By default, the board creator becomes the admin, but you can assign admin rights to others as needed.
Key Benefits:
Manage team members, update board settings, and maintain control over the board’s structure.
Ideal for projects with multiple leads or project managers who need equal control.
Prevents bottlenecks if a single admin is unavailable, such as during vacations or other absences.
Admins play a crucial role in keeping the board organized, functional, and collaborative, ensuring leadership tasks are handled smoothly.
Team Member: Empower Your Contributors
Team Members have all the tools they need to get the job done. They can collaborate on tasks, upload files, and contribute to the board’s progress.
Key Benefits:
Ideal for designers, developers, and other active contributors.
Keeps the board dynamic by enabling hands-on collaboration while maintaining admin oversight.
Team Members drive the project forward, making them the backbone of productive teamwork.
Visitor: Keep Stakeholders in the Loop
Visitors have view-only access, which means they can monitor the board’s progress without making changes.
Key Benefits:
Perfect for external stakeholders or clients who only need to see updates.
Ensures transparency without compromising the board’s structure or workflow.
Visitors are ideal for keeping everyone informed without adding complexity.
Conclusion
Adding teammates should be straightforward and adaptable to your team’s needs. A well-designed role-based system ensures smooth collaboration, whether you’re working with a close-knit team or coordinating with external stakeholders. By assigning the right roles, you can create a more efficient and seamless workflow for everyone involved.
Sharing files across a team, whether it’s design mockups, campaign assets, or technical documents, can quickly become a complicated process. Ensuring everyone has the right files at the right time often feels like a juggling act.
The good news is that file sharing doesn’t have to be a hassle. By organizing and sharing files in the right way, you can make collaboration seamless, whether it’s sending a design file to your creative team or providing a project roadmap to stakeholders.
Here’s how you can streamline file sharing to keep your team connected and productive:
Task Cards are perfect for sharing files that are tied to a specific task. Here’s how file sharing works in Task Cards:
Attach Files Directly to the Task: Upload files or link resources directly to the task card. Your teammates can access these files without searching through emails or separate folders.
Instant Access for Everyone Involved: Anyone inside the board has immediate access to the attached files, keeping collaboration smooth and efficient.
File Sharing Benefits: No confusion over which files are relevant to the task. All task-related materials stay together, so your team always knows where to look.
Task Cards make file sharing focused, relevant, and effortlessly organized.
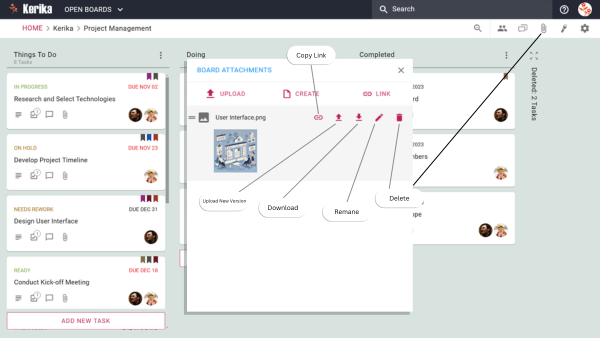
For files that affect the entire project, Board Attachments are the way to go. Here’s how file sharing works at the board level:
Upload or Link Files for the Whole Team: Add files or external links to the board that everyone can access, like project charters, shared templates, or reports.
Centralized File Sharing: All board members can access these files instantly, ensuring that key project resources are always within reach.
File Sharing Benefits: Perfect for team-wide updates or resources. Keeps your project running smoothly by ensuring everyone has access to the same information.
Board Attachments make it easy to share files that matter across your entire team.
Conclusion:
Effective file sharing is essential for smooth collaboration. By attaching files to specific tasks or centralizing project-wide resources, your team can stay organized and connected without the usual confusion or delays. Whether you’re focusing on task-specific details or sharing key resources across a project, having the right system in place ensures everyone has what they need when they need it.
Streamline your workflow by keeping your files accessible and organized, and make teamwork as efficient as it should be.
Ever found yourself wondering how a task ended up in a different column or why its details suddenly changed? Tracking changes on a task board can sometimes feel like piecing together a puzzle. That’s where the Card History feature comes in, offering a clear and detailed log of every action taken on a task card.
With just a click, you can see who made updates, what was changed, and when it happened—ensuring transparency and eliminating confusion. Whether you’re collaborating with designers, developers, or project managers, this feature keeps everyone aligned and informed.
Let’s dive into how Card History works and how it can simplify team collaboration
Open a Task Card: Click on the task card you want to review.
Navigate to the “History” Tab: At the top of the card, you’ll find a tab labeled “History.”
View Detailed Logs: Once you open the tab, you’ll see a chronological list of all actions taken on the card. This includes updates to details, status changes, new assignments, and more.
Every action is timestamped and shows who made the update, giving you a clear and reliable record at a glance.
When to Use Card History
Resolving Confusion: Sometimes tasks seem to take on a life of their own. If you’re wondering why a card moved to another column or its details changed, Card History is your answer. It gives you the full picture of the card’s journey, helping you avoid misunderstandings.
Accountability and Transparency: Want to know who made a decision and when? Card History provides a reliable record for performance reviews, audits, or simply keeping everyone on the same page.
Understanding Dependencies: For interconnected tasks, Card History helps you track changes and see how they align with the bigger picture. It’s especially useful for projects with complex workflows.
Why It Matters
Improved Communication: No need for endless back-and-forth questions; everyone stays aligned.
Efficiency: Save time by accessing a clear, consolidated record of changes.
Trust and Accountability: Build a transparent work environment where actions are traceable.
Conclusion:
The Card History isn’t just a feature – it’s your team’s memory bank. It empowers you to collaborate more effectively, ensuring that every update is accounted for and understood.
Launching a new product can be thrilling, but without proper planning, it can quickly spiral into chaos. From missed deadlines to poor market fit, many product launches stumble right out of the gate. As highlighted by the Harvard Business Review, most product launches fail due to common mistakes like poor timing, inadequate market research, and unclear marketing strategies. These issues can lead to disappointing sales and a tarnished brand reputation.
Without a clear roadmap, even the best ideas risk being lost in the shuffle. But don’t worry, this guide is here to help you avoid those pitfalls. We’ll break down the product launch process into practical, step-by-step strategies to help you get things done smoothly, ensuring your product gets the strong debut it deserves. Ready to launch with confidence? Let’s get started!
Essential Steps to Launch a Successful Product
A successful product launch doesn’t just happen, it’s built on a foundation of careful preparation, well-timed execution, and ongoing collaboration. Let’s break down the key steps you’ll need to follow to achieve launch success, along with practical tips and challenges to watch out for.
McKinsey emphasizes that product launches involving early stakeholder alignment and comprehensive planning are significantly more likely to stay on schedule and meet goals. With that in mind, the first step in any successful launch is getting everyone on the same page. Collaborate with cross-functional teams to define roles and responsibilities, ensuring that nothing slips through the cracks.
Take the time to conduct market research and refine your product positioning, don’t assume you already know everything about your audience. Creating a clear timeline with key milestones helps prevent last-minute scrambles. But remember, plans are only as good as the flexibility they allow. Build buffer time into your schedule to accommodate delays and surprises.
Without proper alignment, small miscommunications can snowball into costly delays. Regular check-ins can help you address issues before they become major problems, ensuring smoother execution from start to finish.
2. Develop Internal Materials That Drive Clarity
Imagine launching a product with incomplete internal documentation. Your marketing team misinterprets the product’s key features, and your support team fumbles with customer questions. This isn’t just a hypothetical, it’s what happens when internal materials like product demos, buyer personas, and training scripts aren’t prioritized.
Gather customer insights from beta tests or early feedback, and refine internal documents accordingly. Ensure your customer-facing teams have a solid grasp of key messaging, FAQs, and troubleshooting guides. Regularly review and update these materials, especially if you encounter last-minute product tweaks.
Internal clarity lays the foundation for external success. When teams have a deep understanding of the product, they can communicate its value consistently and effectively. According to Harvard Business Review, employees who receive adequate information to do their jobs well are 2.8 times more likely to be engaged, and companies with engaged workers report a 23% increase in profits..
3. Craft Targeted External Content
It’s easy to fall into the trap of creating generic promotional content that tries to appeal to everyone and ends up appealing to no one. The Content Marketing Institute has shown that brands that focus on personalized messaging see significantly higher engagement and conversion rates. Instead of vague messages about how “innovative” your product is, highlight the specific problems it solves and why customers should care.
For example, create blog posts, videos, and in-app messages that highlight key benefits while keeping customer pain points front and center. Include visuals like product screenshots or GIFs that demonstrate features in action. Align your messaging across channels so your audience receives the same clear message, whether they’re reading a blog or watching a demo video.
Without proper coordination, inconsistent brand tone and content gaps can confuse potential customers. A centralized content review process helps ensure that your marketing efforts are cohesive.
4. Train Internal Teams to Be Product Champions
Training isn’t just another item to check off your list, it’s a core part of launch success. A well-trained team is more confident and effective during launches.
Host role-specific training sessions for sales, support, and marketing teams to ensure they understand the product’s key benefits and can confidently address customer questions or objections. Develop internal FAQs and troubleshooting guides to minimize confusion during the launch. Assign experienced trainers and provide hands-on practice to boost team readiness.
However, skipping key training areas or rushing through sessions can leave teams unprepared, leading to inconsistent customer experiences. Create a training checklist to ensure that no topic is left out. The more prepared your team is, the smoother the customer interactions will be.
5. Review and Test Everything Before Launch Day
Imagine rushing to launch only to discover that a key feature is broken or a press release contains major errors. This kind of scenario is more common than you’d think when pre-launch reviews are treated as optional. Conduct a full review of marketing materials, distribution channels, and product functionality before the official launch.
A mock launch can help you spot weak points. Have stakeholders test various aspects, from customer support workflows to product demos, and gather feedback on anything that needs improvement. Pay attention to small details, as they often have the biggest impact during the launch.
Companies with robust pre-launch testing and risk assessments are better equipped to handle last-minute challenges. Don’t skip this step, it could save you from dealing with major issues on launch day.
6. Launch and Monitor Performance in Real Time
Imagine rushing to launch only to discover that a key feature is broken or a press release contains major errors. This kind of scenario is more common than you’d think when pre-launch reviews are treated as optional. Conduct a full review of marketing materials, distribution channels, and product functionality before the official launch.
A mock launch can help you spot weak points. Have stakeholders test various aspects, from customer support workflows to product demos, and gather feedback on anything that needs improvement. Pay attention to small details, as they often have the biggest impact during the launch.
Bain & Company emphasizes the need to track performance metrics during and after a launch. Smart data use helps measure progress and identify issues. Don’t just monitor, adapt quickly if feedback shows problems or underperforming campaigns to keep momentum.
Even the most detailed plan can run into roadblocks without the right tools to manage it. Whether you’re dealing with overlapping deadlines, shifting priorities, or coordinating multiple teams, a well-organized task management system is essential.
The right task management tool can help you stay on top of each stage of the launch, from pre-launch preparations to post-launch evaluations, ensuring that no task slips through the cracks. So let’s explore how this task management tool can help streamline this process, keeping your team organized and on track.
Using the Right Tools for a Seamless Product Launch
Managing a product launch can feel like juggling dozens of moving parts, preparing content, training teams, coordinating outreach, and more. What makes this board so helpful is its simplicity and the way it keeps everything visible and organized. You’re not left scrambling through scattered emails or vague to-do lists. Instead, you can see exactly what’s in progress, what needs attention, and what’s completed.
Let’s say you’re preparing a press release and waiting for approval from another team. Instead of guessing or constantly checking in, you can easily spot the task status and know who’s working on what. No guesswork, no confusion. It works because it reflects what we’ve talked about: clarity, accountability, and smooth collaboration. Teams can avoid missed deadlines by identifying delays early and fixing them before they escalate.
The board also helps balance long-term goals and short-term tasks. Teams working on product demos, sales materials, or customer FAQs can move forward without waiting for others to finish. By keeping tasks categorized, you can focus on one thing at a time without feeling overwhelmed by everything else happening around you.
What really makes it effective is how it adapts as you go. If a task needs rework or a new priority comes up, you can adjust without derailing the entire plan. It’s flexible and keeps the team aligned, making sure no task slips through the cracks. This kind of structure doesn’t just help during the launch, it sets you up for long-term success. With the right system, you’ll always know where things stand and what to tackle next.
A well-structured task management system keeps teams aligned, tasks organized, and progress visible, making even complex product launches manageable. Now, let’s take a closer look at how this board is designed to handle each stage of the product launch with precision and flexibility.
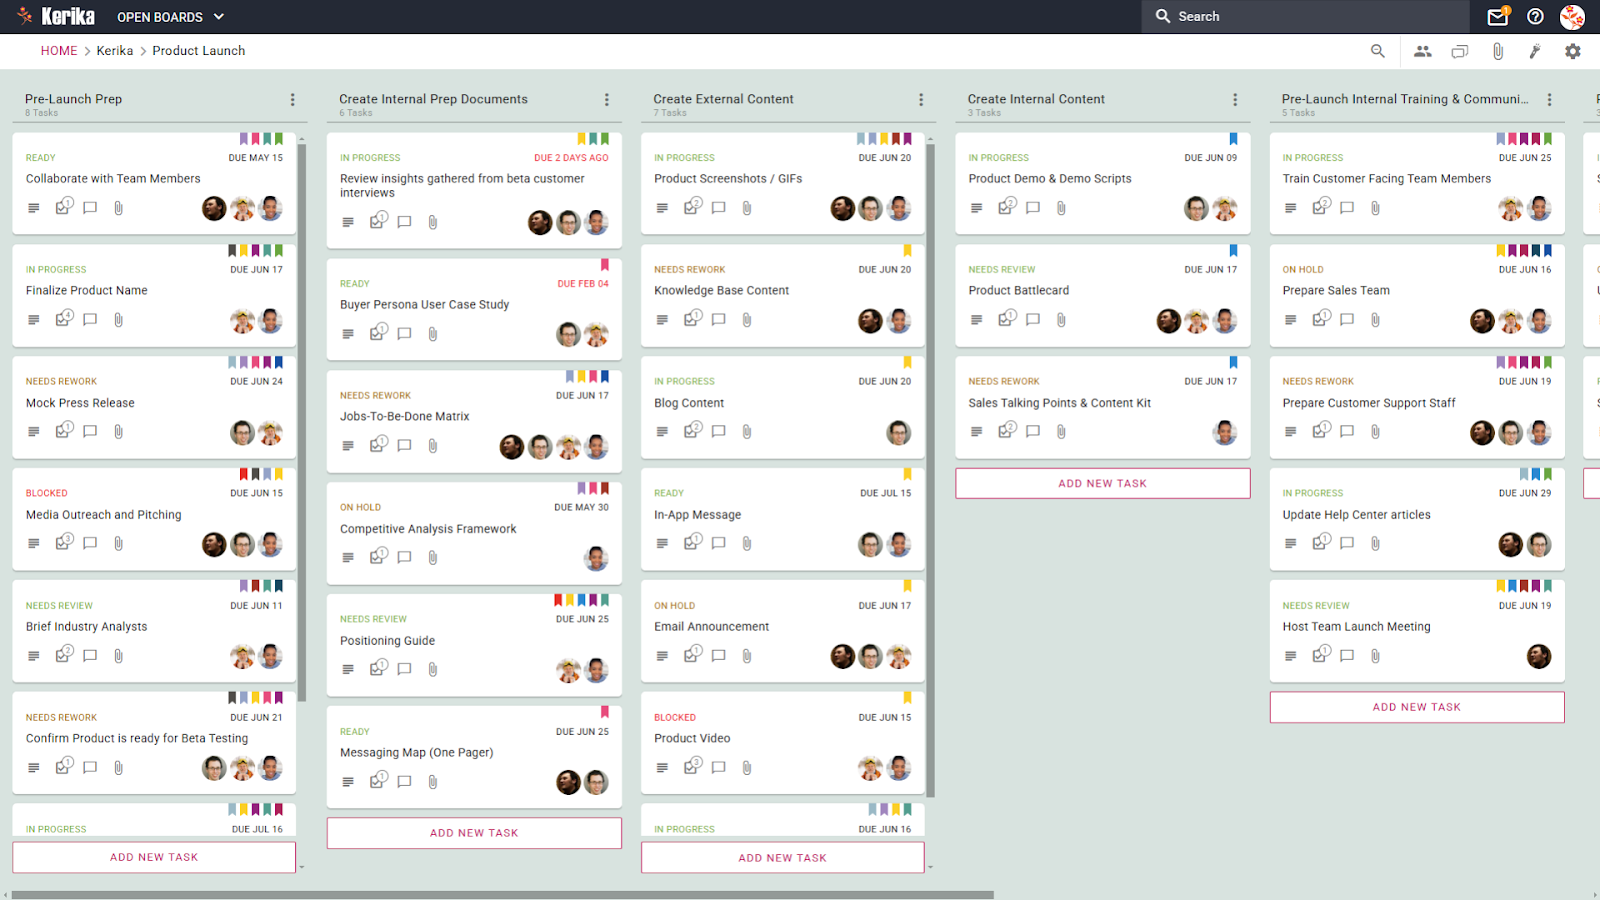
Taking a Closer Look at This Product Launch Board
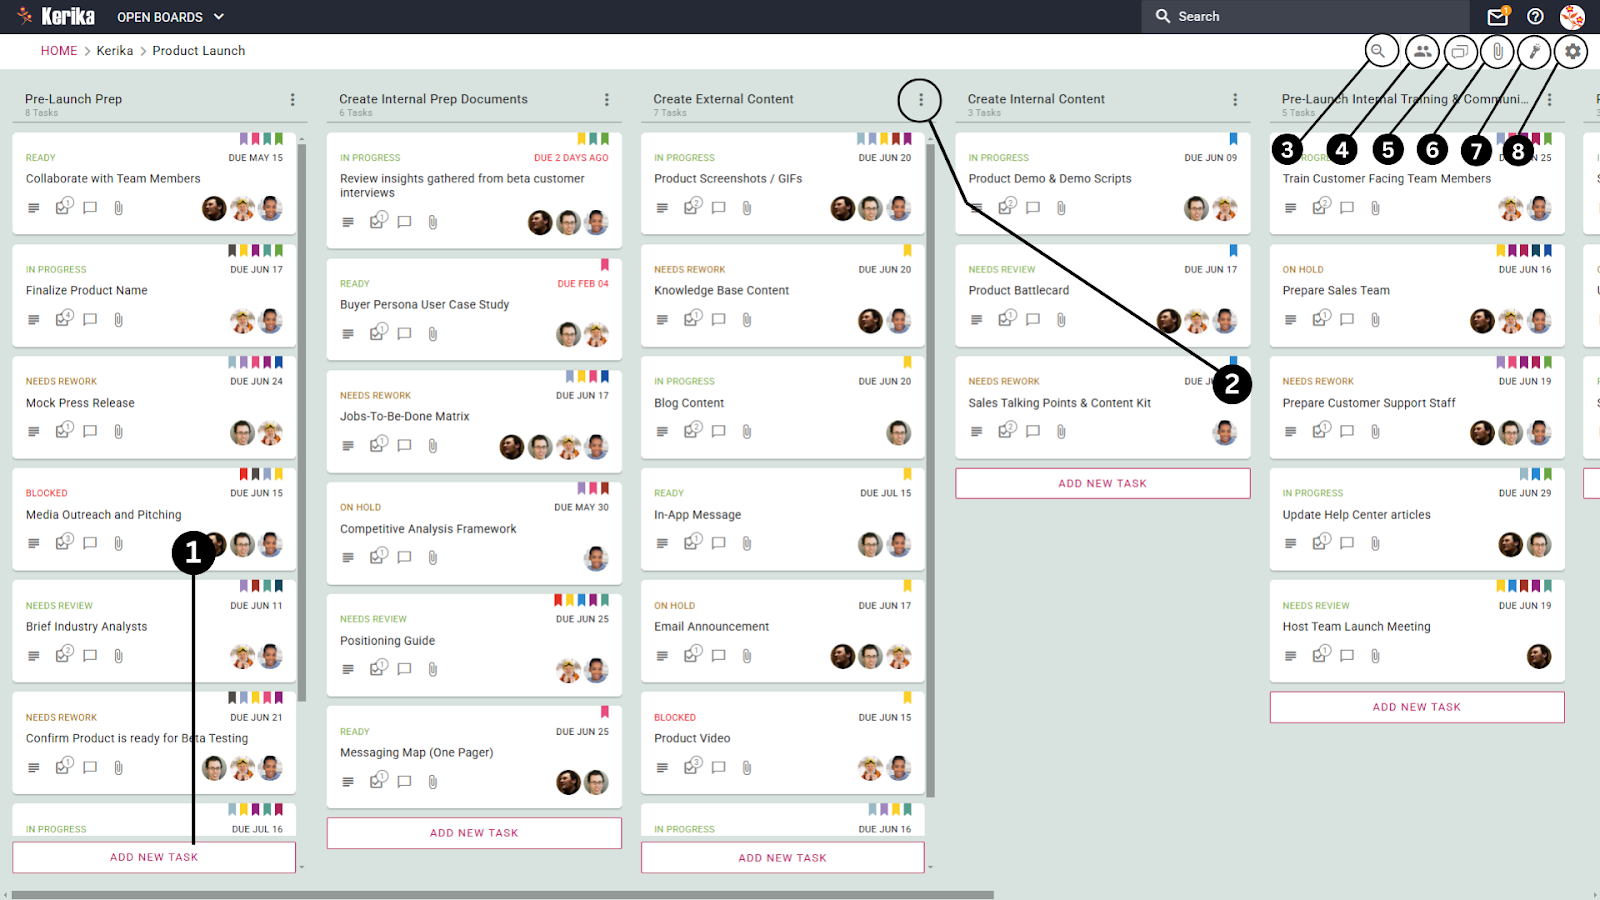
A great tool isn’t just about organization, but it’s about clarity and flow. This product launch board visually breaks down tasks into stages, allowing teams to track progress, prioritize what needs attention, and collaborate without confusion. Let’s explore how each key feature on this board helps the team stay on track and ensures the entire launch process runs smoothly.
Every product launch starts with ideas and action items, and this board makes it easy to capture them without missing a beat. Whether it’s conducting market research or preparing content, new tasks can be added seamlessly as they arise.
This feature keeps the team agile and ensures that important action items don’t get overlooked or delayed. By allowing tasks to be added on the fly, teams can react to new priorities, adjust to feedback, and maintain forward momentum, all while keeping everything organized in one place.
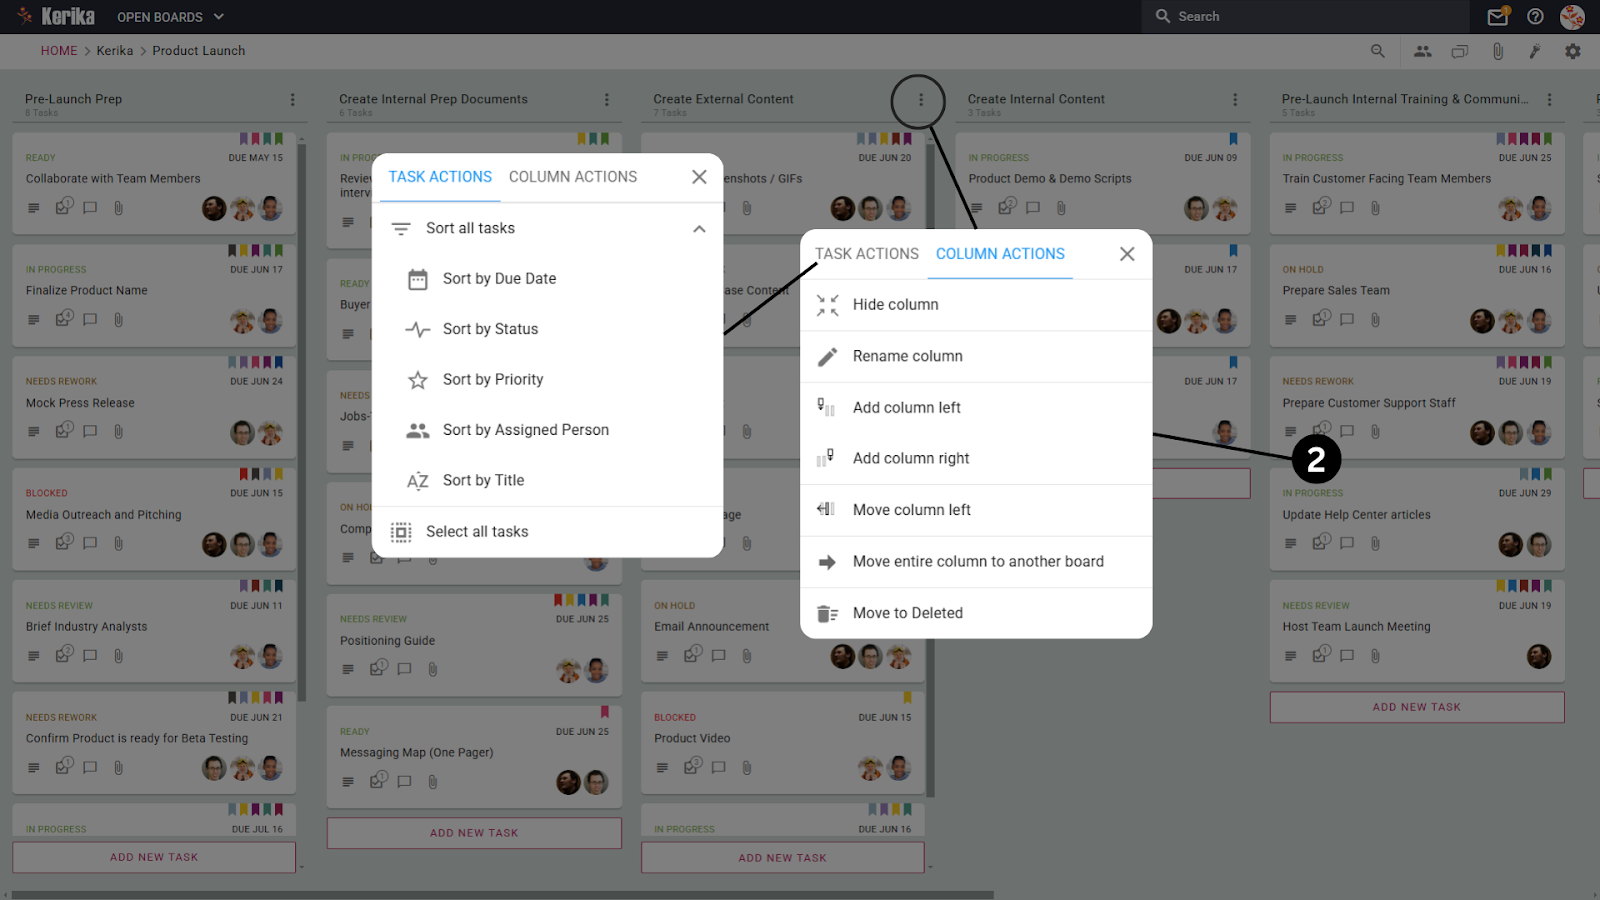
2. Creating and Managing Columns: Organize Tasks by Stages
Columns define the key stages of your workflow, making it easy to track tasks as they move from one phase to the next. Whether it’s initial planning, content creation, or training, each column represents a step in the product launch process.
What makes this feature valuable is its flexibility. You can rename, rearrange, or even add columns as the project evolves. If priorities shift or a new step is needed, the workflow can be updated without causing confusion. This keeps everyone on the same page and ensures that no task is left hanging between phases. It’s like giving your team a clear roadmap with the freedom to adjust as they go.
3. Zooming Out for a Quick Overview: Find What You Need Fast
When you’re managing multiple tasks, it’s easy to get lost in the details. That’s where the zoom-out feature comes in handy. By hiding extra details and only showing task names, it gives you a clean, simplified view of the entire board, making it easier to spot tasks, deadlines, or bottlenecks at a glance.
This feature is especially useful when you’re short on time and need a quick overview of what’s pending or when you’re searching for a specific task. It’s all about helping you scan the board efficiently and focus on what matters without distractions.
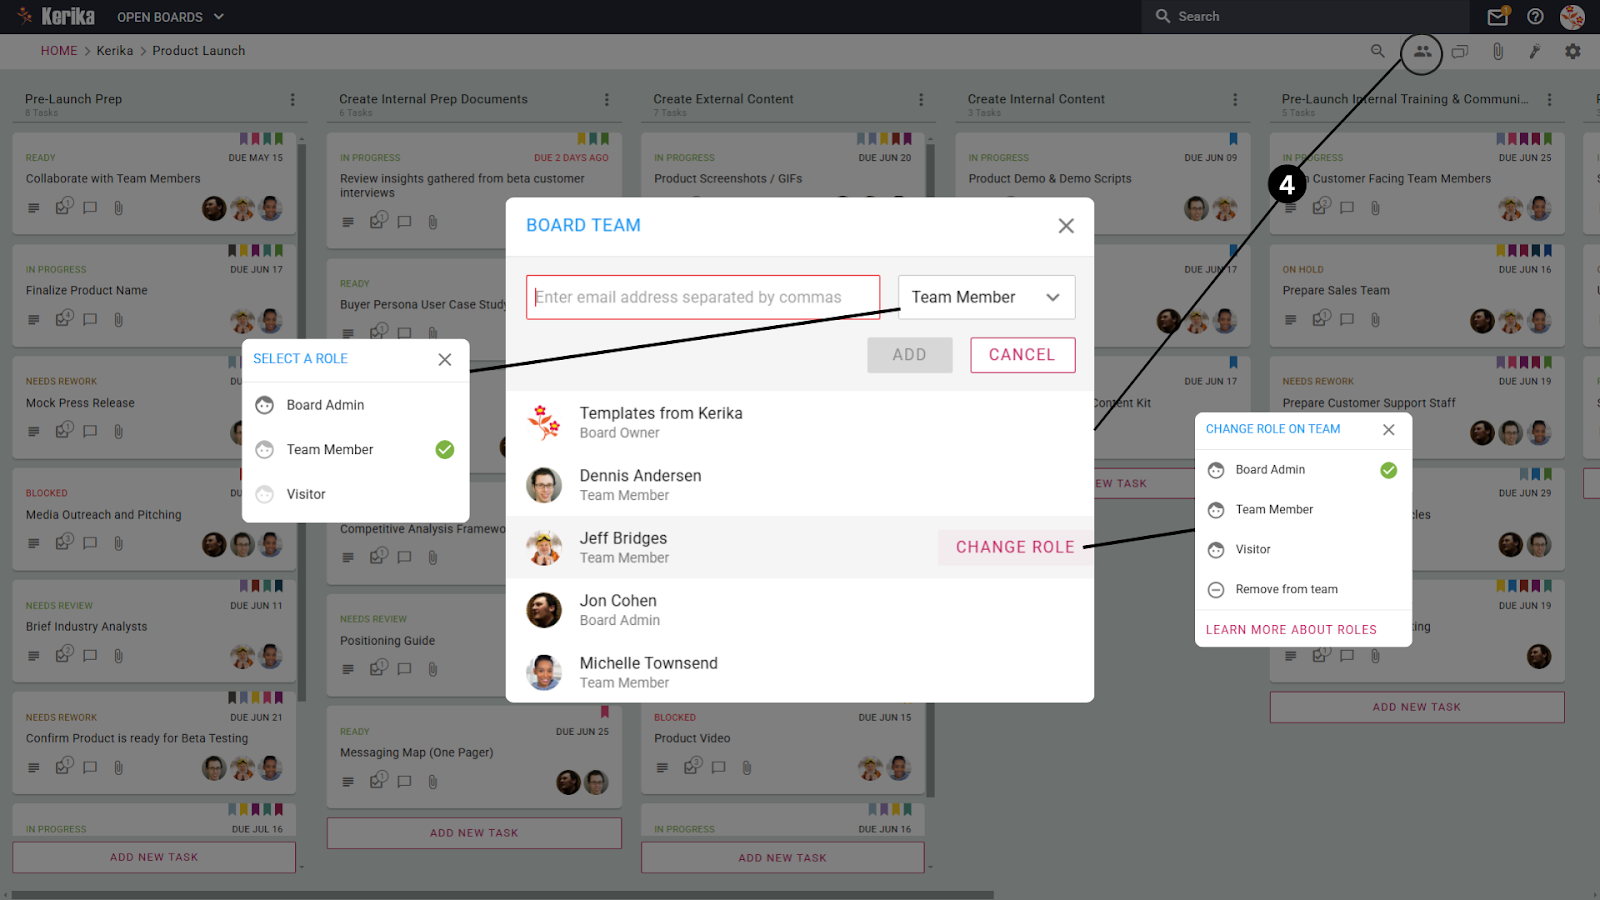
4. Managing Teammates and Their Roles: Assign Responsibility and Control Access
In any successful project, knowing who’s responsible for what is key. This feature allows you to add teammates, assign them roles, and adjust access levels as needed. Whether someone is a project leader, contributor, or simply a viewer, you can easily manage their permissions based on their involvement.
This helps prevent confusion and keeps sensitive tasks or information secure. Team members know exactly what’s expected of them, and leaders can maintain control without micromanaging. With everyone in the right role, the team operates more efficiently, and tasks move smoothly from one stage to the next.
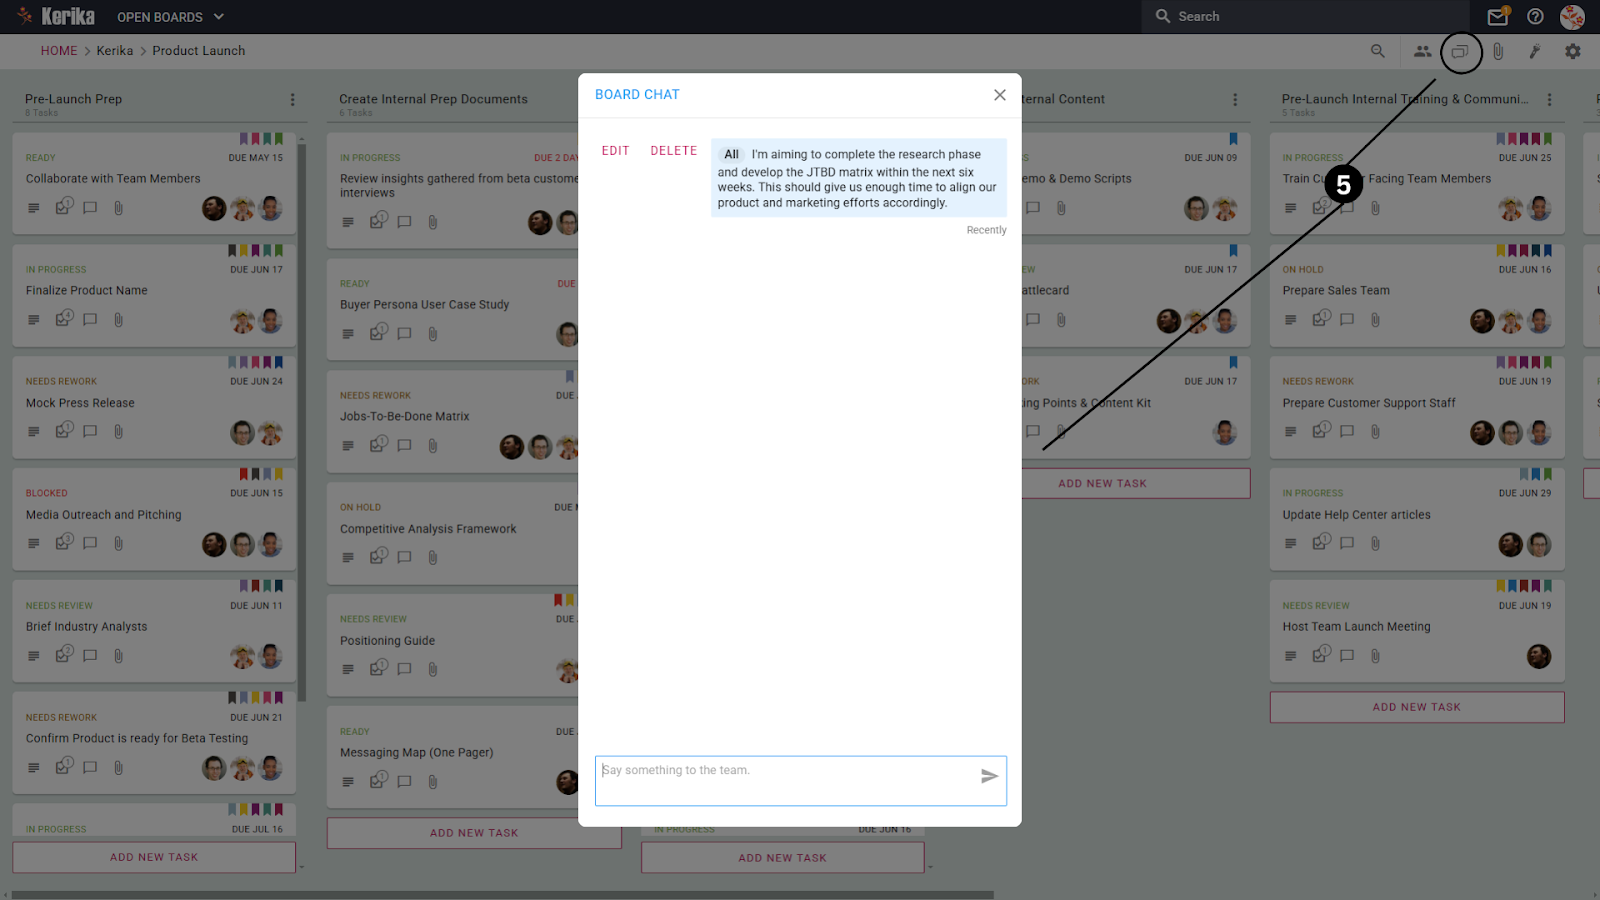
5. Board Chat: Keep General Discussions in One Place
While individual task cards have their own chat options, the board chat is where you can communicate with the entire team at once. It’s ideal for general updates, announcements, or discussions that don’t belong to any specific task.
This feature helps reduce confusion by keeping team-wide conversations separate from task-specific ones. Instead of important updates getting buried in individual chats, they stay accessible and visible to everyone, ensuring that no one misses out on key information.
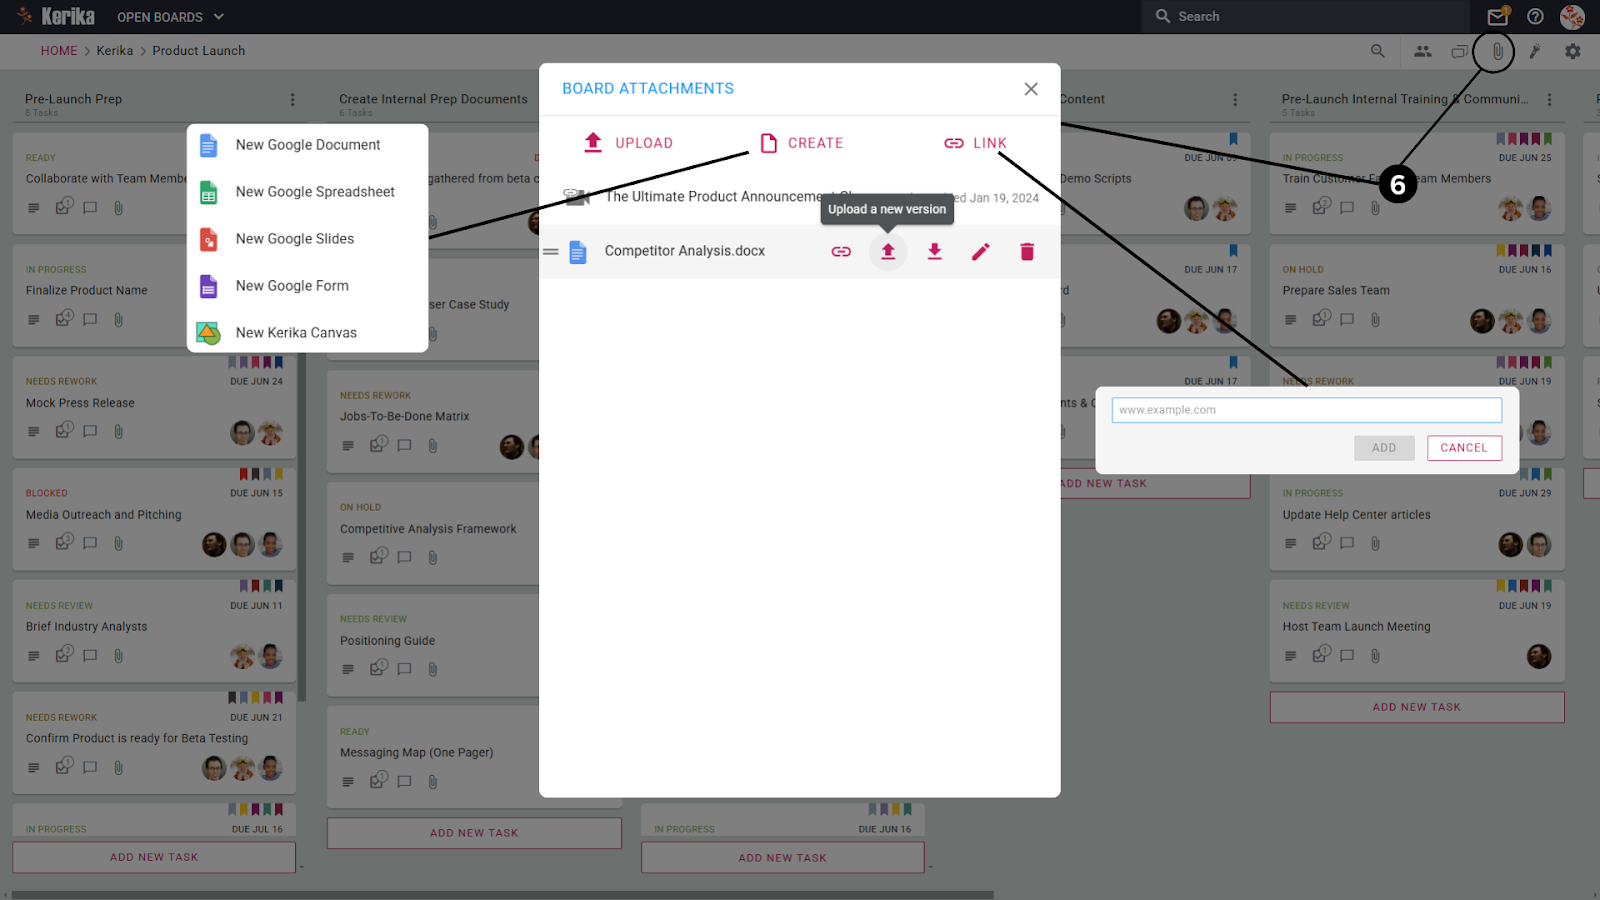
6. Sharing Files and Attachments: Keep Resources Accessible
This feature allows the team to upload, create, or link files directly on the board, making sure that important documents like product guides, analysis reports, or media kits are easily accessible. Instead of hunting through emails or external storage, team members can find what they need right where the work happens.
By attaching files directly to the task or board, it keeps resources organized and relevant. Team members always have access to the latest versions, which helps avoid confusion and ensures that everyone is working with up-to-date information. This streamlined file-sharing keeps projects moving efficiently and eliminates time wasted on searching for critical documents.
With multiple tasks spread across different stages, the highlight option helps you filter and focus on exactly what you’re looking for. Whether you want to find tasks assigned to specific team members, those marked as high priority, or tasks due soon, this tool makes it easy to apply any combination of filters.
This feature is especially useful when deadlines are approaching or when certain tasks need immediate attention. Instead of scanning the entire board, you can quickly highlight relevant tasks and stay on top of what matters most, saving time and improving efficiency.
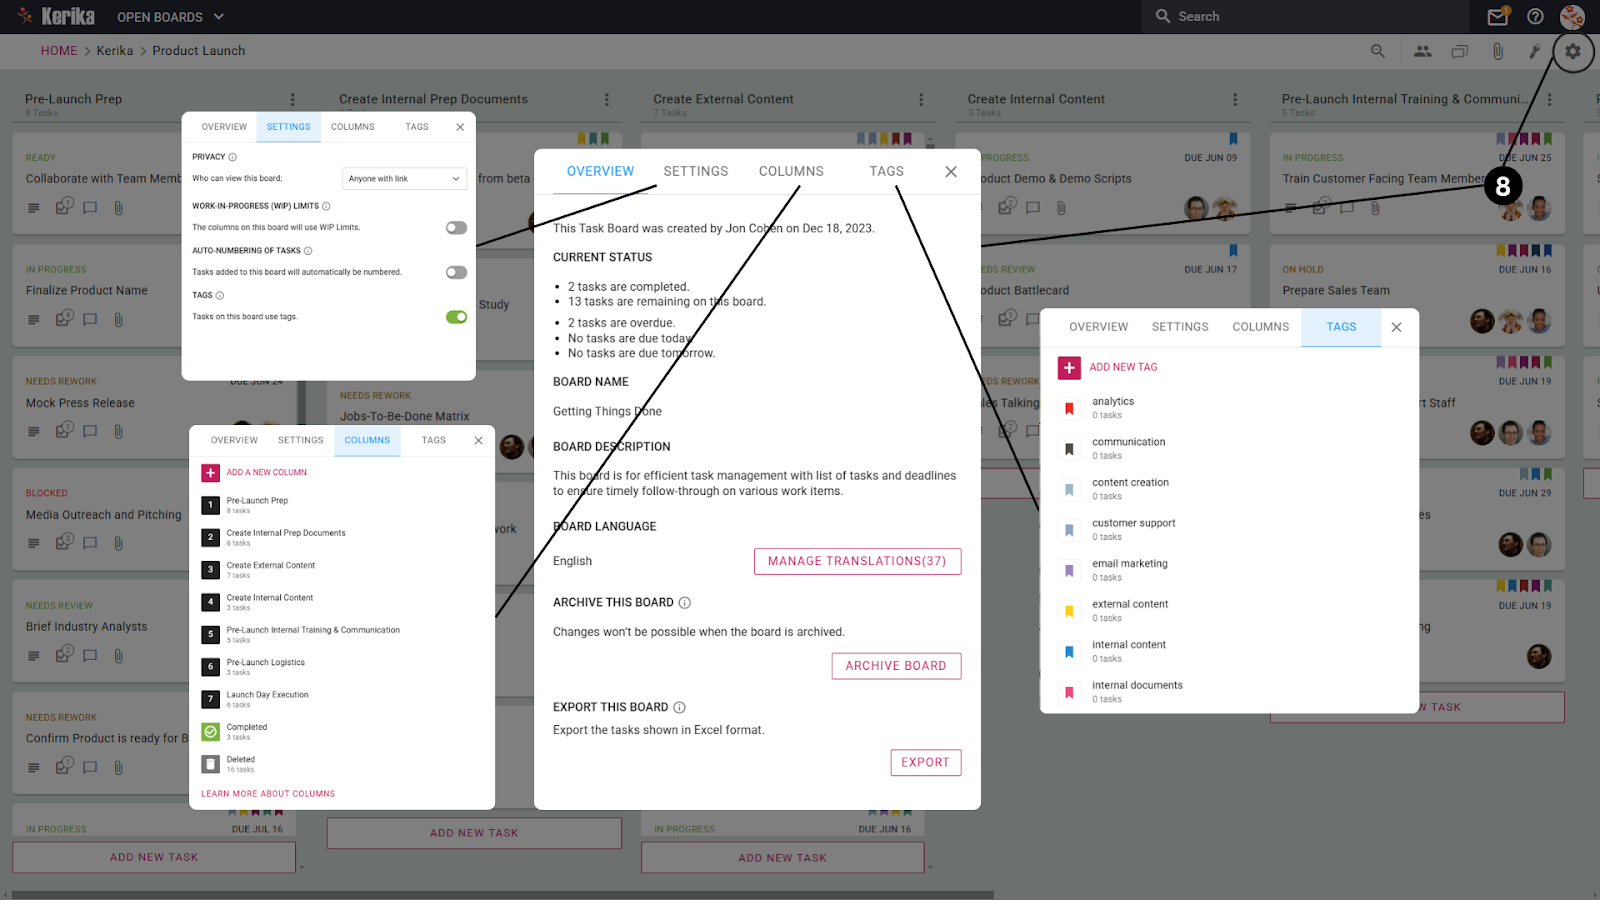
8. Board Settings: Fine-Tune Your Product Launch Board
The board settings give you complete control over how tasks and progress are managed during the product launch, ensuring every stage runs smoothly. Here’s how they help:
Privacy Settings: Manage who can access or contribute to the board, keeping sensitive product details secure while allowing the right people to collaborate.
Work-In-Progress Limits: Prevent your team from taking on too many tasks at once, reducing burnout and ensuring high-priority tasks get the attention they deserve.
Auto-Numbering of Tasks: Keep tasks easily identifiable so your team can track them without confusion as they progress through the product launch phases.
Overview of Progress: Get a real-time snapshot of completed tasks, overdue items, and upcoming deadlines, helping you address bottlenecks before they become issues.
Column Management: Adjust stages like “Pre-Launch Prep” or “External Content Creation” to fit the needs of your evolving launch plan.
Tag Management: Label tasks with tags like “marketing,” “customer training,” or “media outreach,” so you can filter and locate tasks quickly.
Archive or Export Options: Archive the board post-launch or export key data to review what worked and plan for future launches.
With the right setup, your product launch board serves as a powerful roadmap, keeping tasks organized, teams aligned, and progress visible at every stage. Now, let’s break down how individual task cards work and see how they help you manage each step of the launch with precision and ease.
Break Down Product Launch Tasks Into Manageable Steps
Launching a product involves dozens of moving parts, but success comes from breaking them down into smaller, actionable tasks that teams can easily tackle. That’s where task cards play a key role. Each task card is more than just a reminder, it’s a central hub where teams can access all the details they need to get the job done.
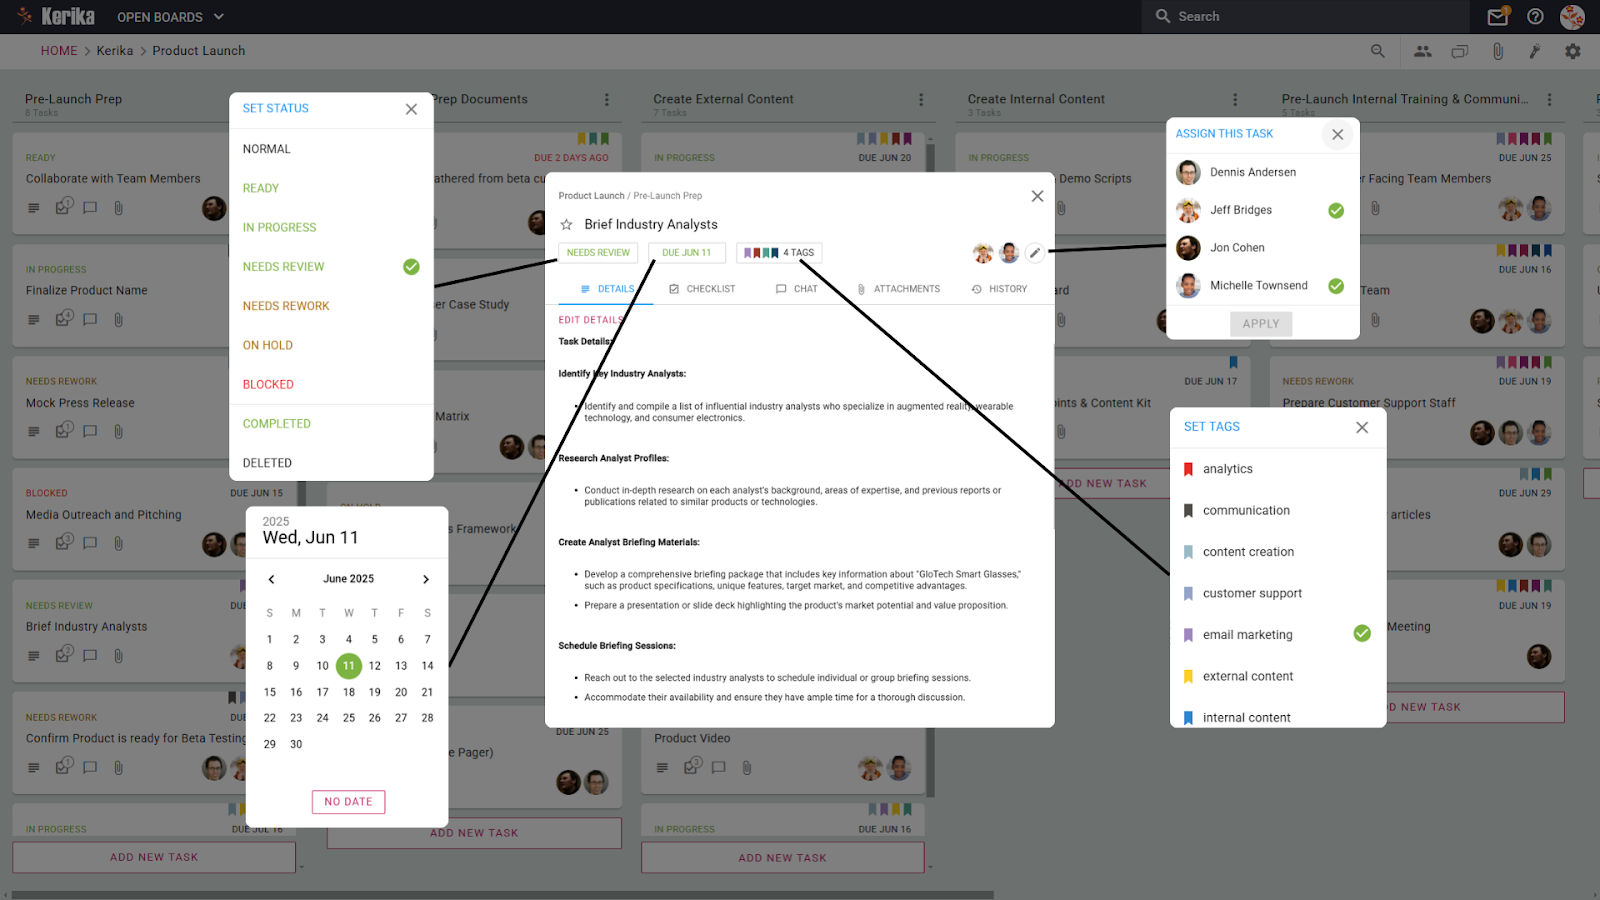
From the first glance, a task card tells you everything important: what needs to be done (task details), who is responsible (assign task), the task’s current status, when it’s due, and what category it falls under (tags). This setup makes it easy for teams to prioritize work, stay accountable, and ensure no steps are missed along the way. Let’s take a closer look at how each of these features helps break down even the most complex product launches into manageable, achievable tasks.
Big tasks can feel overwhelming, but the checklist tab makes them manageable by breaking them down into smaller, actionable steps. Once you open the tab, you can create a list of subtasks, each with its own due date and assignee. This allows you to assign specific pieces of a larger task to different team members while maintaining clear deadlines for completion.
For example, when preparing an industry analysis, you can create subtasks for gathering analyst profiles, creating briefing materials, and scheduling sessions, all within the same task card. This structure keeps large tasks organized and ensures that each step is tracked and completed on time, making the entire process much smoother.
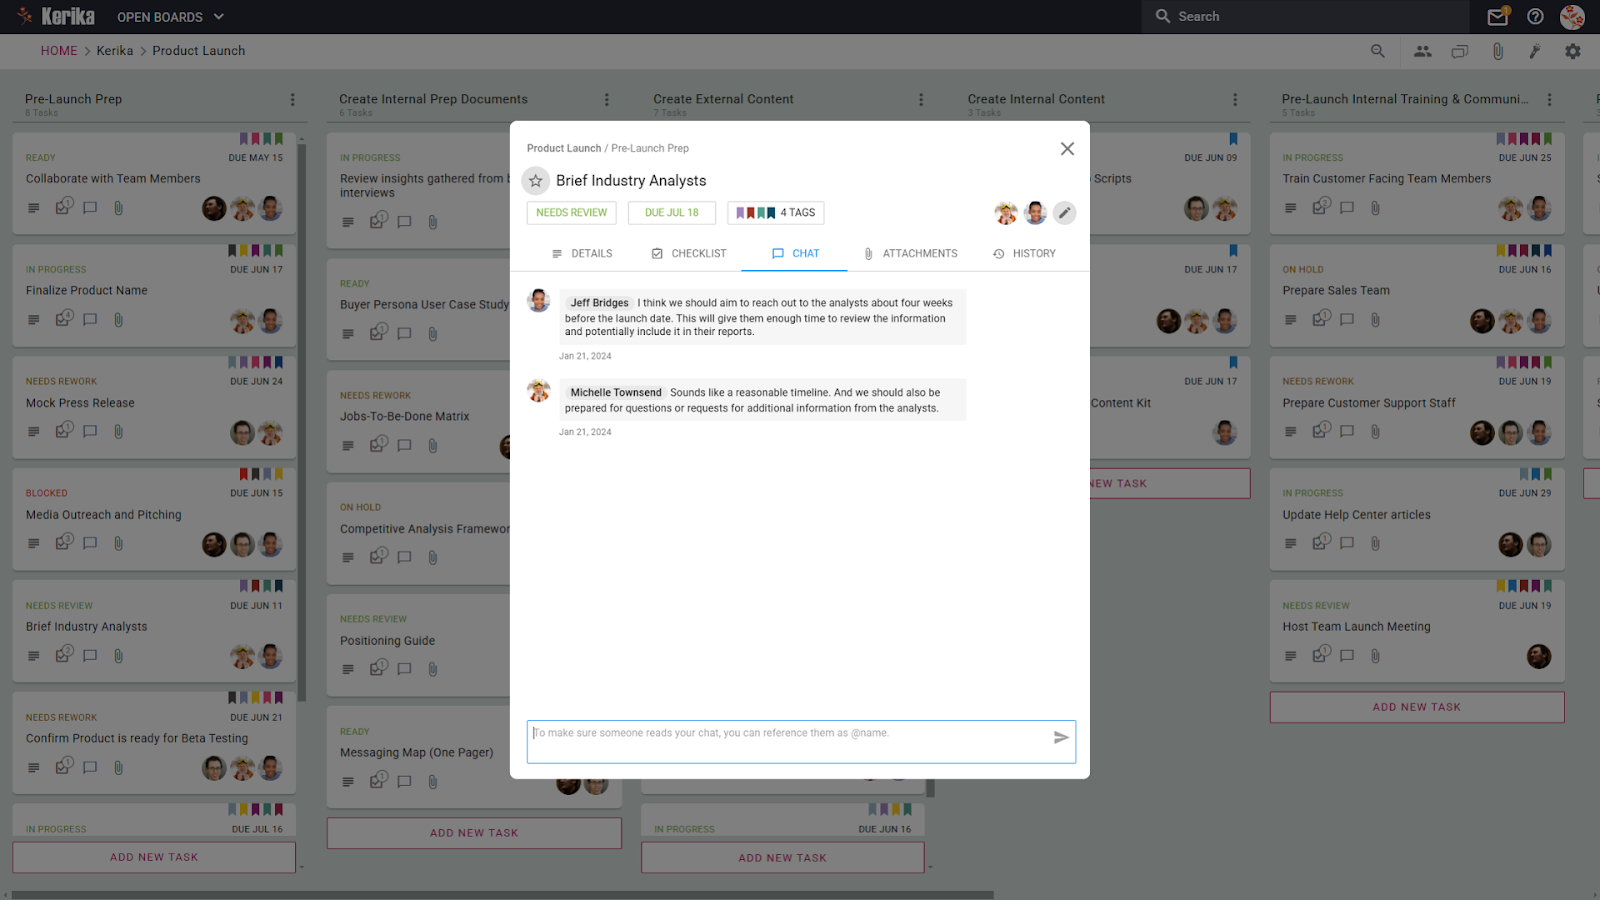
The chat tab is designed to make collaboration simple and focused by keeping task-specific conversations within the task card itself. Instead of using external communication tools or long email chains, team members can discuss the task directly, ensuring that all relevant comments, feedback, and updates stay in one place.
This feature is especially useful for tracking decisions or clarifying details without disrupting the workflow. For example, when discussing outreach timelines or deliverables, team members can quickly reference past messages without switching between tools. It streamlines communication, keeps everyone on the same page, and saves time by eliminating the need to search for important updates elsewhere.
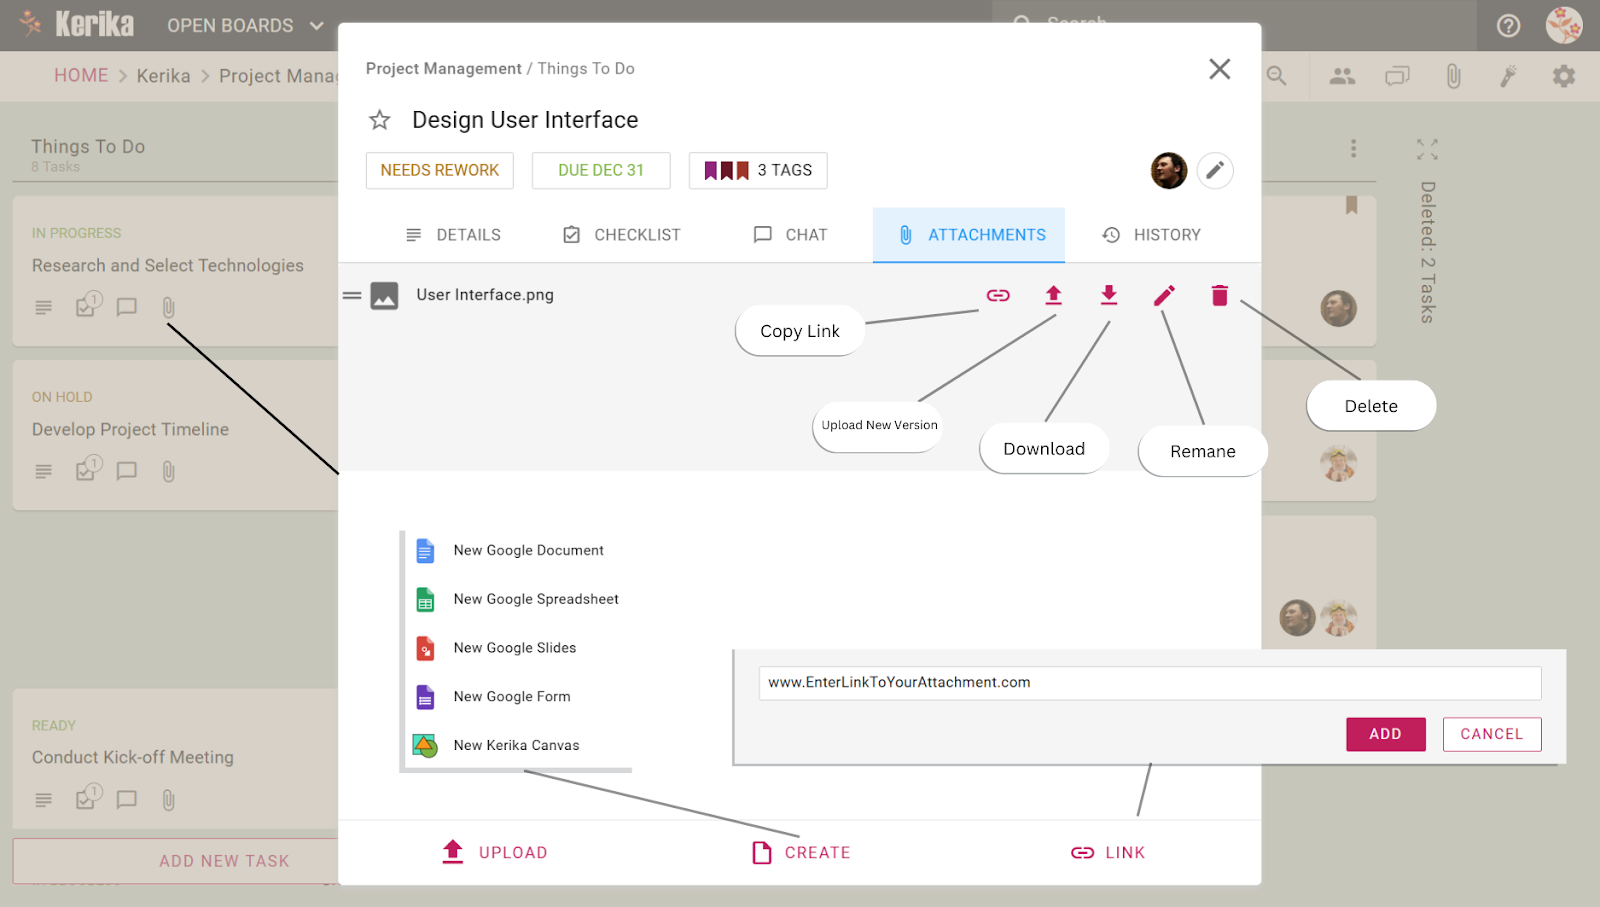
The attachments tab is a game-changer when it comes to keeping all product launch materials, like press releases, product demos, or marketing assets, organized and accessible. Each task card can store its own relevant files, so your team always knows where to find what they need, whether it’s a competitive analysis document or a product announcement draft.
One of the most important features is the ability to update file versions directly within the card. Instead of confusing your team with multiple file versions like “press_release_v1” or “final_v3,” you can upload updated versions under the same attachment. This ensures that everyone is working with the most current files, preventing mix-ups and making collaboration more efficient during critical launch phases.
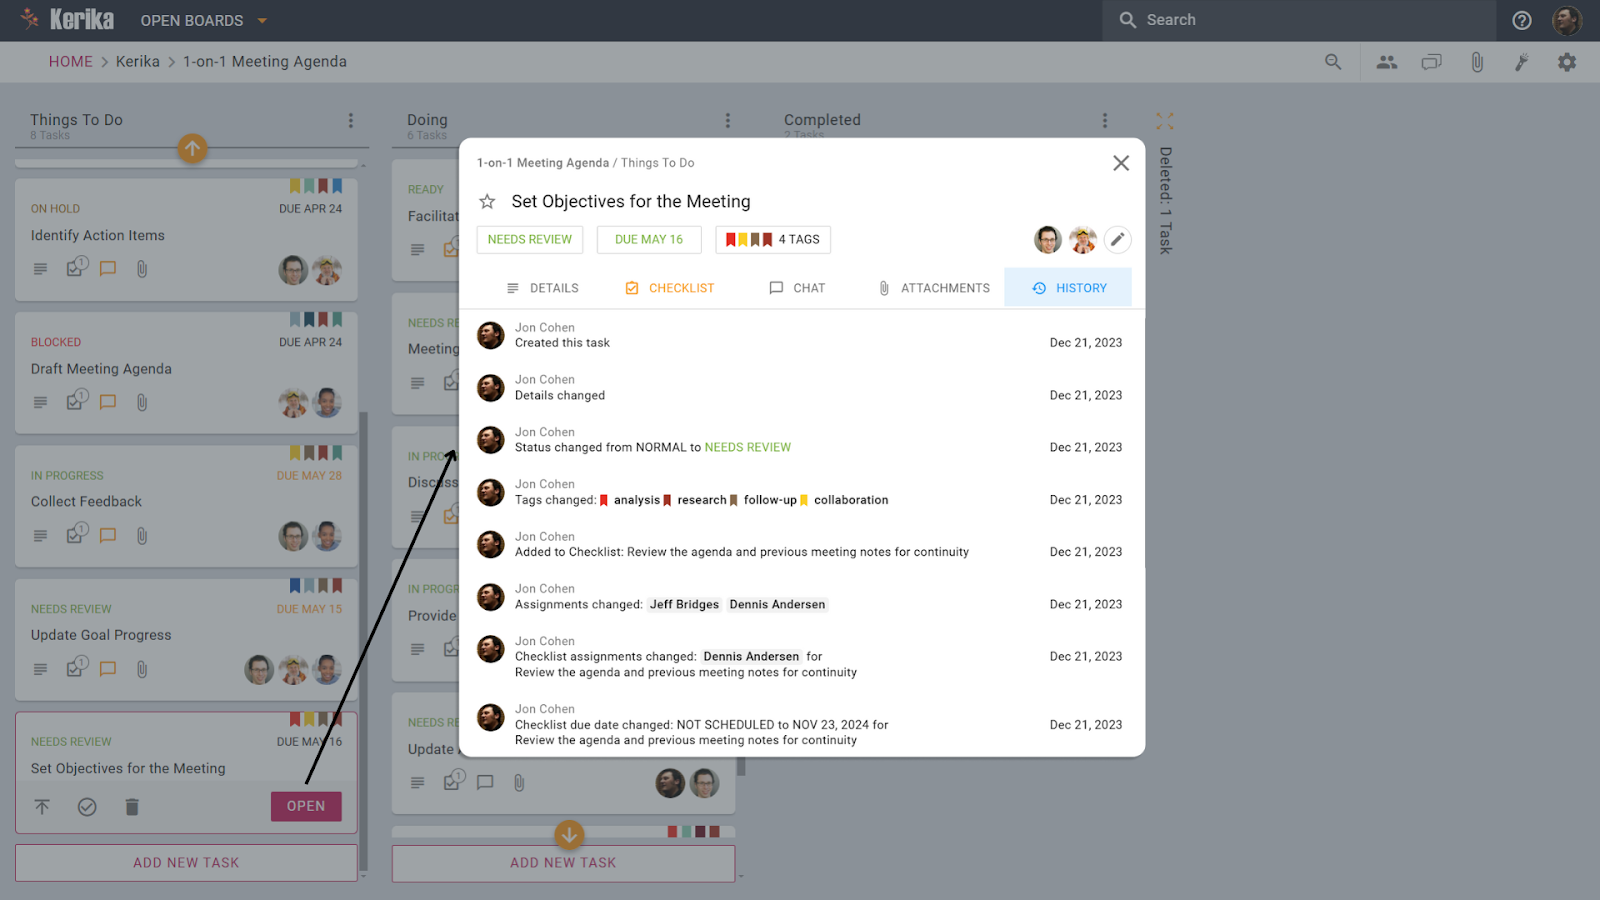
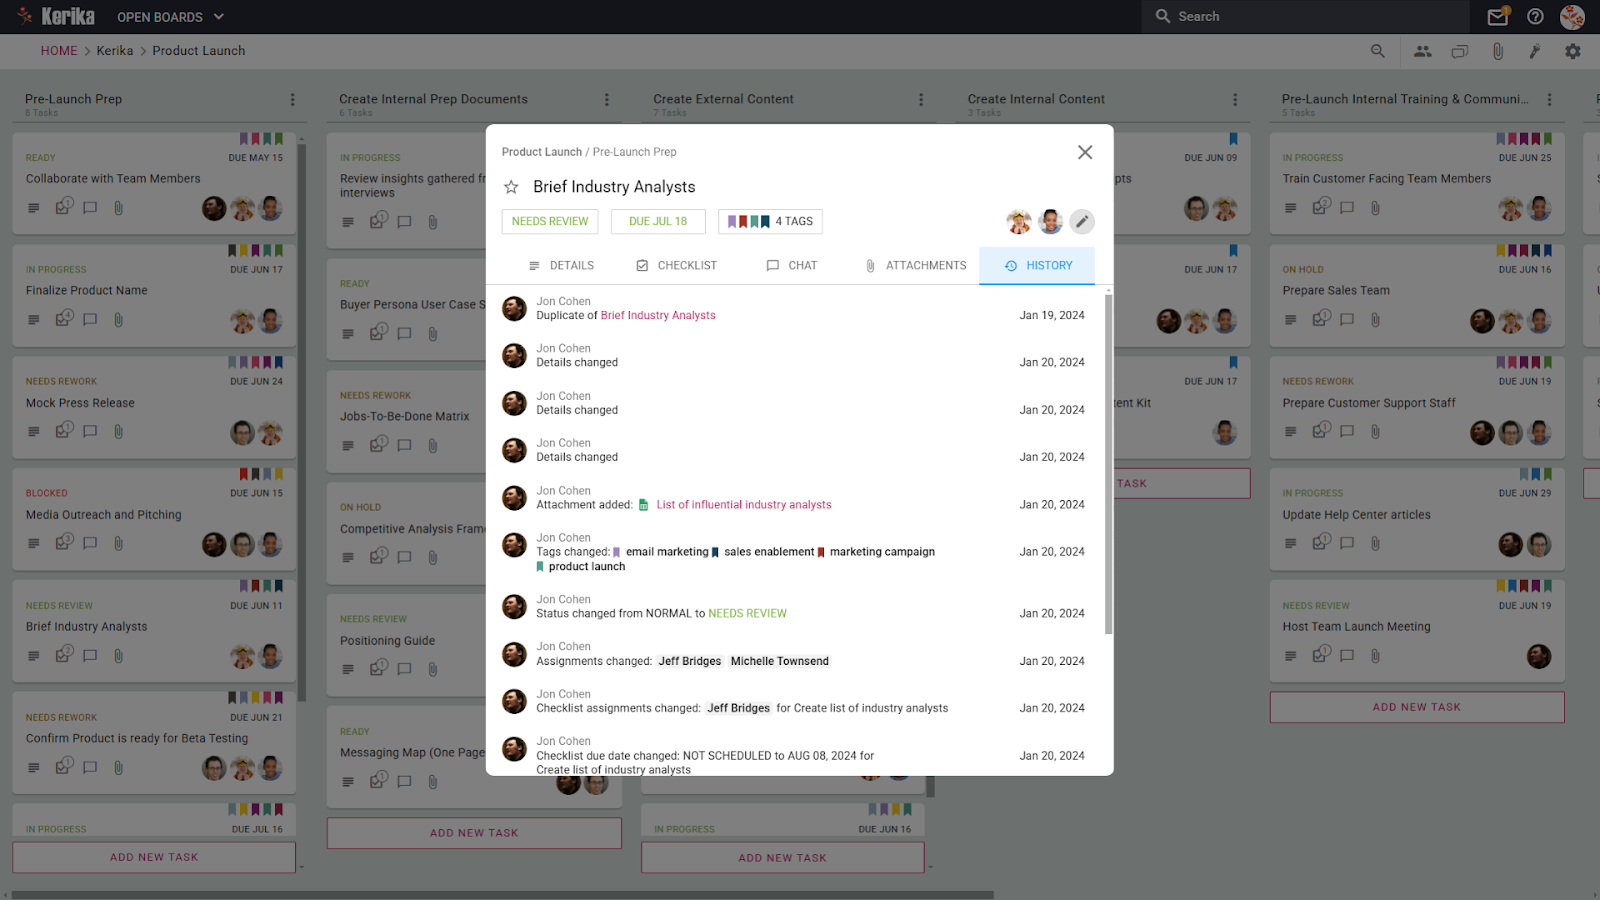
The history tab provides a detailed log of every change made to a task, ensuring that the entire team stays informed and accountable. Whether it’s a status update, file attachment, tag change, or assignment shift, everything is recorded in chronological order.
This feature is particularly valuable during a product launch when tasks and responsibilities evolve quickly. If a deadline changes or a new team member is assigned, anyone can easily trace back what happened and when. It eliminates confusion over who did what and helps teams resolve issues efficiently by reviewing past decisions and updates in one place. With this level of visibility, you can prevent miscommunication and keep the launch on track.
Conclusion: Set Your Product Launch Up for Success
A successful product launch is built on a foundation of careful planning, effective collaboration, and organized task management. Breaking down complex tasks, assigning responsibilities, and tracking progress ensures that nothing slips through the cracks. By using structured steps, from pre-launch prep to post-launch reviews, your team can work with clarity and confidence.
With the right tools and processes in place, you reduce the risk of delays, missed opportunities, and last-minute chaos. Instead, you create a streamlined path that aligns everyone toward a common goal, giving your product the best chance to make a strong and lasting impact.
Managing communication while working on projects can be a challenge. Inbox clutter, endless notifications, and the need to switch platforms just to reply can slow down your workflow. It’s a frustrating and time-consuming process.
The “Reply By Email to Chat” feature makes it possible to respond directly to chat notifications from your email. Just hit “Reply” in your email client, and your message syncs seamlessly with the corresponding chat – effortlessly keeping the conversation flowing and organized.
Here’s how this feature works for both task card chats and board-level chats, and why it can make collaboration smoother and more efficient.
When a conversation happens within a task card, email notifications include the chat history and task details. You can hit “Reply” in your email client, and your response will instantly appear in the chat section of the task card.
Board-level communication is equally seamless. Chat messages from the board chat are delivered to your email, and when you respond, your reply syncs back into the board chat for everyone to see. No logins required!
The Magic Behind “Reply By Email to Chat”
Stay in Context: Email notifications include the full conversation thread, linked directly to the relevant task or board. You can hit “Reply” in your email, and your message is automatically synced as a chat update, keeping everything connected and clear.
No Clutter, Just Clarity: Unnecessary email signatures, logos, and attachments are automatically removed, ensuring discussions remain clean, focused, and easy to follow.
Keep Everyone Aligned: Your email reply isn’t just logged—it’s instantly visible to all teammates with access to the task or board, ensuring that everyone stays updated and on the same page.
How Does it Help You
Save Time and Energy: Replying directly from your inbox means you skip the hassle of switching tabs or logging in, letting you focus on your work.
Keep Things Professional: Chats are clean and distraction-free, making it easier for your team to follow discussions and make decisions faster.
Perfect for Remote and Busy Teams: This feature ensures remote teams stay connected, and no update gets delayed, regardless of time zones.
How It Helps in Real Life
Tight Deadlines: Quickly provide updates or answer questions without pausing your workflow.
Collaborating Across Time Zones: Ensure remote teammates stay informed without requiring you to log into Kerika.
Simplifying Task Reviews: Add notes or feedback directly from your inbox, with everything tied to the correct task.
Why You’ll Love It
The “Reply By Email to Chat” feature keeps communication streamlined, organized, and accessible. It’s not just a time-saver, it simplifies collaboration, ensuring everyone stays connected and aligned without unnecessary effort or steps.
Conclusion
The “Reply By Email to Chat” feature transforms how teams communicate by making collaboration seamless and efficient. With the ability to reply directly from your inbox, every update stays organized, accessible, and tied to the right task or board. This approach not only saves time but also ensures clarity and alignment across your team, even when working remotely or under tight deadlines.
In an age of constant connectivity, where digital notifications and information streams are endless, productivity is harder to maintain than ever. This Pew Research Center study highlights how information overload affects our ability to prioritize tasks and make decisions effectively, leading to increased stress and diminished productivity. Many of us face the same challenges: forgotten deadlines, half-finished projects, and that paralyzing sense of overwhelm when juggling too many priorities.
The Getting Things Done (GTD) method has emerged as a game-changer for those seeking clarity and control over their tasks. But implementing it successfully isn’t always straightforward. This guide will walk you through practical steps to fully embrace the GTD method, avoid common pitfalls, and give you proper tools to execute your workflow. Let’s dive in and get things moving efficiently!
Essential Steps to Mastering Productivity and Getting Things Done
Achieving productivity doesn’t happen by chance, it’s the result of a deliberate, well-structured approach. Let’s explore the essential steps to help you organize your tasks, prioritize effectively, and turn intentions into tangible outcomes.
Step 1: Capture Everything in a Trusted System
The GTD method begins with capturing every idea, task, or commitment in a reliable system outside of your brain. The goal is to free your mind from the burden of remembering everything while ensuring nothing important slips through the cracks. This is crucial because mental overload significantly impairs productivity (Mayer & Moreno, 2003)
Create an inbox or central location where you can immediately jot down tasks as they arise. Whether it’s a digital tool, a notebook, or both, the key is consistency in capturing every to-do.
Watch Out For: Relying on memory instead of documenting tasks. Studies show that mental overload impairs productivity, so make capturing a habit you don’t skip.
Step 2: Clarify and Categorize Tasks
Once you’ve captured tasks, clarify what each item means and what actions are required. Not every task needs immediate attention, some may require delegation, scheduling, or simply discarding.
Ask yourself, “Is this actionable now?” If yes, define the next step. If not, categorize it under “Someday/Maybe,” “Reference,” or “Waiting For.” This process prevents clutter and keeps your list actionable.
Watch Out For: Vague or unclear tasks, like “Prepare report.” Be specific about next actions, “Draft outline of report” provides clarity and momentum.
Step 3: Organize Tasks Based on Context and Priority
Organizing tasks by priority and context ensures you can access the right tasks at the right time. Tasks can be grouped by project, deadline, or environment (e.g., tasks for meetings or errands).
Use categories such as “Urgent,” “Important,” and “Delegated” to make decision-making easier. Consider the Eisenhower Matrix to distinguish between urgent and important tasks.
Watch Out For: Overloading high-priority categories. If everything is labeled urgent, you risk decision fatigue and feeling overwhelmed.
Step 4: Schedule Time for Review and Planning
Regularly reviewing your task list ensures you stay on top of commitments and can adjust plans as needed. The weekly review, a core element of GTD, lets you reflect on what’s completed, pending, or no longer relevant.
Dedicate time each week to review upcoming deadlines, unfinished tasks, and long-term projects. Use this session to clean up your system and refocus on what matters.
Watch Out For: Skipping reviews due to a busy schedule. Without regular reviews, your task list may become outdated or overwhelming.
Step 5: Break Down Complex Tasks Into Manageable Steps
Large tasks or projects can be intimidating, leading to procrastination. Breaking them down into smaller, achievable steps provides clarity and keeps you moving forward.
For any project, identify the first actionable step, such as “Schedule kickoff meeting” or “Gather research materials.” As you complete smaller tasks, you’ll build momentum toward completing the larger goal.
Watch Out For: Underestimating the time required for sub-tasks. When planning, allocate buffer time to account for unexpected delays.
Step 6: Minimize Distractions and Batch Similar Tasks
Distractions can derail productivity, while context-switching between tasks decreases efficiency. Minimizing interruptions and batching tasks that require similar focus is crucial.
Schedule deep work sessions for high-concentration tasks and group similar activities, like answering emails or making phone calls, into designated time blocks.
Watch Out For: Overloading your day with tasks requiring intense focus without breaks. Fatigue can lead to burnout, so schedule downtime.
Step 7: Reflect and Refine Your System
Productivity is an evolving process. What works today may not work tomorrow, so regular reflection is essential. Identifying what’s effective and where improvements are needed will ensure your system remains flexible and relevant.
At the end of each week or month, assess what’s working. Adjust categories, modify task priorities, or experiment with new techniques if needed.
Watch Out For: Sticking rigidly to a system that no longer fits your workflow. Adaptability is key to long-term productivity.
Mastering productivity with the GTD method begins with capturing tasks, clarifying priorities, and regularly reviewing progress. With these steps in place, let’s explore how the right tools can streamline your workflow, enhance collaboration, and keep you on track.
Using The Right Tools
To successfully get things done, having a clear system is key. This kanban board is a perfect example of how to stay on top of tasks without feeling overwhelmed. Everything is neatly organized into different stages, making it easy to know what’s coming up, what’s in progress, and what’s done. No guesswork, no forgotten tasks.
Why does this setup work so well? First, it’s simple. Tasks aren’t just scattered across notebooks or apps. They are placed where they belong, ready to be tackled with clear priorities and due dates. It reflects what we covered earlier: capturing tasks, clarifying them, and knowing exactly what needs to happen next. You can see tasks that need review, upcoming deadlines, and the progress made so far. That’s exactly how you avoid the mental clutter we discussed earlier.
Second, the layout helps you focus on what really matters. By visually seeing tasks at different stages, you can quickly spot what needs immediate attention. Missed deadlines? Easily identified and corrected. Overdue tasks? Right there, waiting to be rescheduled or updated.
Finally, collaboration becomes smoother. Team members know what they’re working on without needing long email threads or constant status updates. Everything is available, from feedback to files, keeping progress steady and eliminating confusion.
In short, this board works because it simplifies the complex. It puts everything you need in one place, making sure no task falls through the cracks, and lets you focus on moving things forward. Ready to dive deeper into how you can make this work for you? Let’s break it down step by step.
Take a Closer Look at This Task Board
This task board is designed to simplify that chaos by giving teams a clear visual overview of what needs to be done, what’s in progress, and what’s already completed. It acts as a central hub where tasks, deadlines, files, and updates are all in one place, making sure nothing falls through the cracks.
The purpose of this board is to help teams stay organized, prioritize tasks effectively, and collaborate seamlessly without constantly searching for updates or juggling scattered to-do lists. In this section, we’ll break down key features of the board, showing you how they can boost productivity and help you successfully get things done.
Without a proper system, it’s easy to forget important tasks or feel overwhelmed by the scope of a project. Task cards solve this by making sure every action is clearly defined and tracked. As shown in the image, the card for “Review and organize notes from yesterday’s meeting” includes detailed instructions, action points, and categories.
This level of detail reduces confusion and eliminates the back-and-forth of clarifying instructions, letting teams dive into the work confidently. By keeping everything in one place, it ensures smoother handoffs, quicker updates, and better results.
Without a clear workflow, tasks can get stuck, deadlines may be missed, and teams may lose track of progress. Managing columns solves this by creating a step-by-step visual process where tasks move fluidly through different stages.
As seen in the image, you can rename columns, sort tasks, or even move entire columns if priorities shift. This flexibility ensures that you can adapt the board as the project evolves, making sure no task is left behind or forgotten. The result is a smoother, more visible workflow that keeps everyone on the same page.
When managing multiple tasks, it’s easy to get bogged down by too many details or struggle to locate specific tasks quickly. The zoom-out feature solves this by stripping away the extra information and providing a clean, uncluttered view of all tasks across the board.
You can easily spot tasks by name, check progress across different stages, and identify what needs attention without scrolling or getting distracted by additional details. This helps you stay efficient and maintain focus when you’re short on time or need a quick update.
When teams lack clarity about their roles or responsibilities, it can lead to missed deadlines, confusion, or duplicated efforts. This feature solves that by clearly defining roles such as Board Admin, Team Member, or Visitor. As shown in the image, admins can manage tasks and permissions, team members can collaborate and update progress, and visitors can view updates without making changes.
This structure ensures smoother collaboration and keeps sensitive information secure while holding team members accountable for their respective tasks.
Without a dedicated space for team-wide discussions, general updates can get buried in email threads or scattered across various platforms. This feature solves that by centralizing conversations that are relevant to everyone, such as project milestones, feedback, or announcements.
Unlike task-specific chats, board chat lets you address the entire team all at once, ensuring everyone stays informed without the need to check multiple places. It keeps general discussions organized and prevents important updates from being missed.
When important files are scattered across emails or different storage platforms, teams can waste valuable time searching for what they need. This feature eliminates that issue by providing a central location where everyone can access shared files, whether it’s reports, spreadsheets, presentations, or links to online resources.
Unlike attachments in individual task cards, these files are available for the entire team to reference whenever needed. It promotes smoother collaboration by ensuring that key documents, such as project guidelines or meeting notes, are always within reach, saving time and avoiding confusion.
When managing multiple tasks, finding the right one can be time-consuming, especially when deadlines, priorities, and responsibilities overlap. This feature solves that by letting you filter tasks based on criteria such as due date, priority, assigned team member, or status. For example, you can instantly highlight overdue tasks or those marked as high priority.
As shown in the image, you have complete flexibility to customize the filters and zero in on tasks needing immediate action. This keeps the team efficient, helps prevent bottlenecks, and ensures nothing important is overlooked.
The board settings give you the flexibility to customize the board according to your project’s needs, helping you manage everything from privacy to task organization.
Here’s a closer look at the key options available:
Overview: Provides a snapshot of the current status, showing completed tasks, overdue items, and tasks due soon. This summary keeps you updated on progress without needing to open individual task cards.
Privacy Settings: Control who can access the board by restricting access to team members or sharing it via a link. This ensures sensitive projects stay secure.
Work-in-Progress (WIP) Limits: Set limits on the number of tasks allowed in each column to prevent overload and maintain an efficient workflow.
Auto-Numbering of Tasks: Automatically assigns numbers to tasks, making it easy to reference them during discussions or progress reviews.
Tags Management: Create and manage tags to categorize tasks. Tags help filter and prioritize items, allowing you to quickly locate tasks related to specific themes or requirements.
Column Management: Add, edit, or rearrange columns to reflect changes in the project workflow. This feature ensures flexibility when adjusting to new tasks or phases.
Export and Archive Options: Export the entire board into an Excel file for external reporting, or archive completed boards to preserve project history.
These settings give you the tools to tailor the board to your team’s specific requirements while keeping everything organized, secure, and adaptable to change.
With the board fully set up and organized, it’s time to focus on the core of any successful project: the tasks themselves. Let’s explore how breaking down tasks into manageable steps using task cards can help you maintain clarity, boost collaboration, and ensure steady progress.
Break Down Tasks Into Manageable Steps
Task cards serve as the backbone of any project by transforming large, overwhelming goals into smaller, actionable steps.
Let’s explore the key features within task cards and how they help teams maintain focus and organization.
When you open a task card, the first thing you’ll notice is its clean, structured layout that presents essential details without overwhelming you.
Here’s why it matters:
Task Details: The core description of the task, including what needs to be done and any important context. This section ensures that team members understand the task from the start and know exactly what’s expected.
Assign Task: Quickly identify who is responsible for the task or add team members to collaborate. Assigning tasks upfront ensures accountability and avoids confusion about ownership.
Task Status: The current status, such as “Needs Review” or “In Progress,” keeps everyone updated on where the task stands. This feature helps maintain smooth workflows and prevents tasks from stalling.
Due Date: The set deadline is clearly displayed, ensuring that tasks are prioritized correctly and progress is aligned with project timelines. This feature reduces the risk of overdue or forgotten tasks.
Tags: Tags allow for easy categorization, helping you organize tasks by themes like “action items,” “documentation,” or “follow-up.” This makes it easier to filter tasks later and focus on specific priorities.
2. Checklist Tab: Breaking Down Tasks into Actionable Steps
The Checklist tab is designed to help you break down large tasks into smaller, more manageable actions. Instead of treating complex tasks as a single item, this feature allows you to divide them into subtasks that can be tracked individually, ensuring steady progress and reducing the risk of oversight.
Key Benefits:
Breaking Down Big Tasks: For tasks that involve multiple steps, the checklist ensures that no step is overlooked. For example, in the image, the item “Summarize Decisions” is part of a larger review task but is treated as a separate action to ensure completion.
Setting Deadlines: You can assign specific due dates for each checklist item, ensuring that subtasks are completed on time and do not delay the overall project. In this example, a due date of February 13 has been set to keep the process on schedule.
Assigning Subtasks: The checklist also allows you to assign individual subtasks to specific team members. This feature promotes accountability by making sure that everyone knows their role and prevents confusion about who is responsible for each step.
3. Attachments Tab: Centralized Access to Task-Specific Resources
The Attachments tab allows you to attach important documents directly to the task card, providing a centralized place for task-specific files, links, or newly created documents. This feature ensures that team members have all the resources they need without switching between multiple apps or platforms.
Key Benefits:
Quick Access to Relevant Files: Instead of searching through emails or cloud drives, team members can find everything related to the task in one place. This saves time and boosts productivity.
Create Documents Directly: The feature also allows you to create Google Docs, Sheets, Slides, Forms, or even project-specific documents without leaving the task card. This makes it easy to document progress or collaborate on updates.
Support for Multiple File Types: Whether it’s meeting notes, reports, or design mockups, the Attachments tab accommodates different file types and links, making sure no information is left out.
Easily Update Files Without Confusion: You can upload new versions of a file without deleting the old one. Just hit the upload button, and the updated version will be added seamlessly. This saves you from the confusion of managing versions like v1, v2, or v3.
4. Task History: Track Every Change with Precision
The History tab keeps a detailed log of every action taken on the task, providing a full record of changes, updates, and progress. From status changes to file attachments and assigned members, everything is recorded to maintain transparency.
Key Benefits:
Transparency: Everyone on the team can see who made changes, what was updated, and when it happened, ensuring that no action goes unnoticed.
Accountability: If questions arise about task progress or decisions, the history offers a reliable reference point.
Version Tracking: Whether it’s changes to deadlines, updated task assignments, or added documents, the log ensures that previous actions can be reviewed at any time.
Conclusion: The Key to Getting Things Done
Effective task management is more than just completing checklists, it’s about creating a well-structured process where planning, collaboration, and accountability work hand in hand. Breaking down tasks, assigning responsibilities, setting deadlines, and tracking progress through a visual system ensures that nothing is missed and everyone stays on the same page.
With the right approach and tools, you can overcome information overload, streamline your workflow, and achieve your goals without stress. By combining structured planning and collaboration, you give your team the clarity and direction they need to turn even the most complex projects into success stories.
Managing complex assignments can often feel like a juggling act. Limited customization, rigid layouts, and repetitive shuffling of tasks can make the process more tedious than it needs to be.
A well-designed Actions Menu can give you the flexibility to tailor your task board to your unique workflow. From rearranging and renaming columns to moving tasks and sorting them by priority, due dates, or assignments, these features can simplify even the most complex projects.
Ready to take full control of your workflow? Let’s explore how the Actions Menu can help you streamline your tasks and boards with ease.
What is the Column Actions Menu?
The Column Actions menu is a gateway for organizing and customizing your task boards. Accessible through the three-dot menu at the top of each column, it provides a range of options to modify and manage your board layout.
Key Features:
Add Columns: Insert new columns to refine your workflow.
Move Columns: Rearrange columns to match your project’s priorities.
Rename or Hide Columns: Keep your board visually tidy by renaming or temporarily hiding sections.
Transfer Columns Across Boards: Seamlessly migrate an entire column to a new board without losing any tasks.
The Task Actions Menu: Sorting Made Simple
Alongside the Column Actions menu, the Task Actions menu helps you manage tasks efficiently within a column.
Sorting Tasks:
The Sort All Tasks option allows you to organize tasks effortlessly based on the following:
Sort by Due Date: Prioritize tasks with approaching deadlines.
Sort by Status: Group tasks by progress stages (e.g., In Progress, Completed).
Sort by Priority: Highlight high-priority tasks so nothing critical gets missed.
Sort by Assigned Person: Organize tasks by assignees for better clarity on responsibilities.
Sort by Title: Alphabetically sort tasks for quick referencing.
Select All Tasks:
Need to take action on multiple tasks at once? Use the Select All Tasks feature to apply bulk changes efficiently.
Why You’ll Love These Features
Improved Organization: Customize your task board to fit your exact project requirements, whether you’re managing a marketing campaign or a software development sprint.
Enhanced Flexibility: As projects evolve, so can your board. Adjust columns and tasks dynamically without disrupting your workflow.
Streamlined Task Management: Combine column actions with task sorting and bulk selection for a perfectly organized board.
Sort Within Columns: Use Task Actions to align tasks by priority or deadlines for better clarity.
Experiment with Layouts: Don’t let your board stagnate – keep updating column arrangements as your team’s needs change.
Wrap-Up
The Column Actions and Task Actions features give you the tools to adapt and optimize your workflow effortlessly. Whether you’re adding a column, sorting tasks, or moving a column to another board, these options let you tailor your board to suit your needs.


